DOWNLOAD MODS
Are you looking for something shiny for your load order? We have many exclusive mods and resources you won't find anywhere else. Start your search now...

LEARN MODDING
Ready to try your hand at making your own mod creations? Visit the Enclave, the original ES/FO modding school, and learn the tricks of the trade from veteran modders...

JOIN THE ALLIANCE
Membership is free and registering unlocks image galleries, project hosting, live chat, unlimited downloads, & more...

Search the Community
Showing results for tags 'guide'.
Found 2 results
-
To whom it may concern, This one is an avid user of Wrye Bash, but doesn't use most of its features because the help file isn't very helpful when it comes to explaining them. In no particular order, here are some things he'd like to know. *What do the different-colored checkboxes mean? *How does one merge mods into a Bashed Patch? Can it even be done in the standalone version? *What does it mean if the Python version won't even list installers when they're in the right folder? Please link me to an idiot's guide or answer these questions in your reply. Many thanks.
-
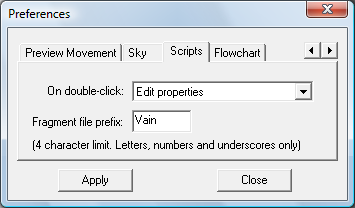
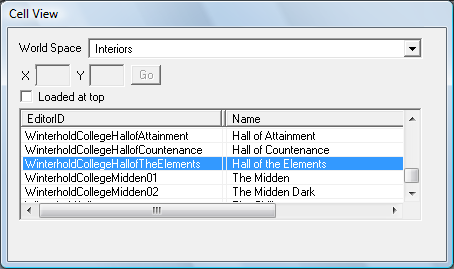
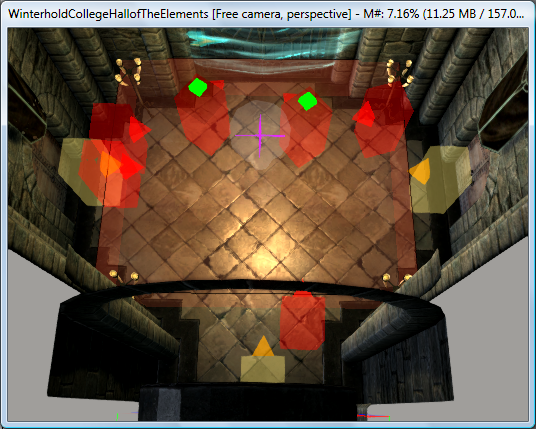
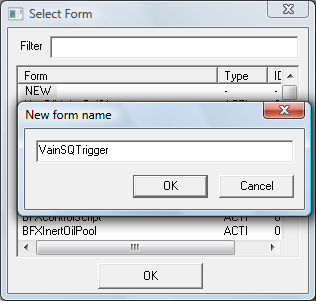
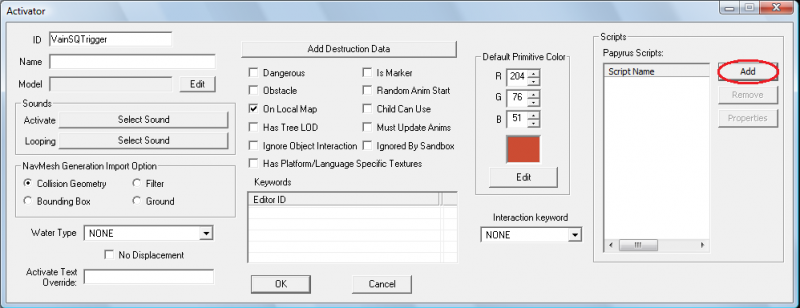
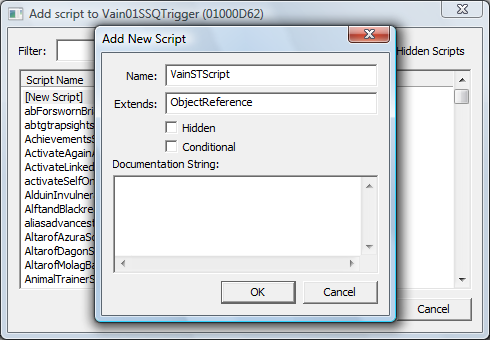
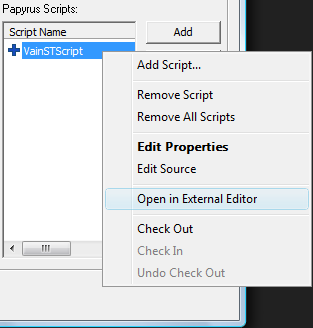
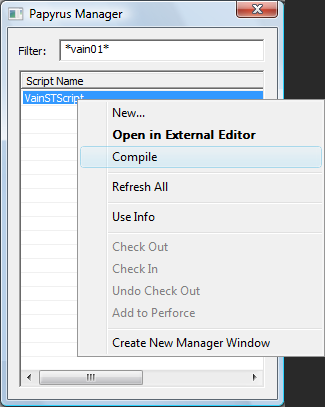
Modding Workshop: My First Quest Welcome to the Modding Workshop: My First Quest. In this tutorial we will be discussing how to create a lore-friendly quest using existing NPC's and recorded dialogue and how to package it properly for upload. We will briefly discuss item creation, triggers, and scripting, but this workshop will not cover every aspect of these topics, only what is needed for this task. Coming into this tutorial, you should already be familiar with the basics of navigating the Creation Kit and some knowledge of Papyrus syntax. Part I: Tools You're going to need several tools for this job in addition to the Creation Kit. BAE - Allows you to view the contents and extract from Skyrim BSA and ESM files. Voice File Reference Tool - Allows you to view and search the voice files from Skyrim without needing to extract them and shows file name, dialogue, and voice type. Unfuzer CPP Edition - Allows you to decompress FUZ files from Skyrim to WAV and LIP and compress WAV and LIP files to FUZ. Wrye Bash - Takes care of most of the hoop jumping needed to get your mod packaged for release to Steam. Not necessary for other mod sites who allow uploads of loose files. TES5Edit - Shows you what files are included in your mod and how they are interacting with their respective masterfiles and/or other mods. Useful for finding mistakes and conflicts. Experimental. Clean Saves - make your own or use my resource. Probably both. You'll want saves made at key points around the area and time frame in game that you'll be modding. For example - if your quest doesn't start until after a certain event, make a clean save before and after that event. This way you will be able to test if your quest triggers properly even if a downloader installs it on a game that has already passed that checkpoint. Notepad ++ - Text documents on steroids. Infinitely helpful for scripting. It numbers lines, helps you line up indented code properly. Such nice, much syntax. 7 zip - File compressor and extractor. Skyrim scripts now come packaged in a .zip file and need to be decompressed to be edited Dialogue Length Extender - A quick guide for how to extend the 80 character limit on dialogue lines for the Creation Kit. Tools you should already have Skyrim - Downloaded from Steam or installed from a disc. I recommend making a shortcut to this directory. You'll be going here a lot. Creation Kit - Downloaded from Steam and installed into the same folder as Skyrim. Archive.exe - comes with the Creation Kit (I believe) and is also in the same folder as Skyrim. Used with Wrye Bash to package a mod for upload to Steam. Useful Console Commands - These are indispensable for testing a custom quest to ensure it is functioning properly since almost all of what a quest does is behind the scenes. Open the console with the tilde (~) Commands contained in <brackets> indicates a variable that must be specified. Page Up and Page Down keys can be used to scroll up or down the Console gui getstage <quest ID> - returns the current stage of the quest movetoqt <quest ID> - moves you to the location of the current target of the quest, eg. where the map marker is pointing. setstage <quest ID> <stage #> - manually sets the stage of a quest. Setting a quest stage will begin the quest if it has not already begun. sqs <quest ID> - Shows quest stages in a quest and if a stage has been achieved. sqo - Shows a human friendly list of active and completed quest objectives for currently active quests. resetquest <questid> - Sets all quest stages in a quest to 0. coc <cell ID> - teleports the player to the cell specified. player.moveto <reference ID> - teleports the player to the reference specified, eg. an NPC or unique item. Part II: Preparation Now that you have your tools there are a few things you will need know more about. Script Fragments - used by a quest to determine how it behaves, when objectives are displayed/completed, when dialogue occurs, quest completion and advancement, ect. The Creation Kit has a default prefix it attaches to all fragments. For convenience you will want to change this default to be able to tell your own script fragments apart from original ones. To do this go to File>Preferences>Scripts>Fragment File Prefix in the CK window and fill it in with something that makes it yours. Hit Apply. Smarty Says: Use the same prefix for any files you create inside your mod! This will help you locate them in the Object Window and elsewhere. You also need an outline for your quest. Each bullet in your outline will become a Quest Stage. Quest Begin Stage 0 The quest has started but the Player has not spoken with Archmage Savos Aren Quest Objective Assigned Stage 10 The Player has spoken with Savos Aren or is the Archmage Quest Completion Stage 20 The Player completed the previous Objective and ended the quest The beginning of a quest is always invisible to the player. Without the quest having already begun quest objectives cannot be assigned. Quest dependent dialogue, items, events, and anything else included in your quest will not be enabled and quest stages cannot be advanced. Part of quest creation will be determining how your quest will start. Will it start when the game starts (Unbound)? Will the player find a long forgotten tome that leads them to your quest (Rebel's Cairn)? Will they walk into a room ( The Golden Claw)? Will it be a combination of these things (Boethiah's Calling)? Quests that start when the game starts can be a strain on someone's save game and even corrupt it over time. Reading a book requires the creation and placement of said book and making sure the player knows how to find it in your mod description. Picking up an item has similar problems. Walking into a room, however... Can be done easily. I recommend using an interior cell to minimize conflicts with other mods and finding an interior cell your player will have to pass through during normal game play in order to complete your quest. Then you need to know how many objectives there will be - ours only has one objective. You can always add more and once you know how to manage one, adding more is simple. And lastly you need to end your quest which is more complex than it sounds. More on this later. Part III: Turning on the Creation Kit You thought I'd never let you. Well, now's your chance! We're finally ready. Turn on the Creation Kit and load the Skyrim.esm only. The default settings on the Creation Kit do not allow multiple master files to run simultaneously. It is possible, but not covered here. Starting the Quest: This tutorial quest involves only locations and NPC's from the Mage's College. There's no reason for this quest to begin running silently in the background until the player is there so we will put our quest's jump start in the Hall of Elements - the first interior cell in the Mage's College the player will enter. Find it in the Cell View window under Interior World Spaces and double click it to load it in the Render Window. We want the player to activate our quest as soon as they enter the room and the easiest way to do that is with a trigger. You'll need to be able to see Triggers to do this so enable them by hitting "M" on your keyboard. Your view should be of the main entryway of the Hall of Elements. Notice the big orange box taking up the entire room. This is a trigger. We're not going to use it though, except as a nice large object to create our own trigger around. Triggers when created will appear in the render window around an object that is selected so click on the big orange box. When you do you'll notice MG06SceneTrigger will now be highlighted in the Cell View window in the loaded cell's object list. Look for the Create Trigger button on the top bar of your Creation Kit Window and click it. A new window will pop up asking you to select a form. Double click NEW and name your new trigger. VainSQTrigger = My modder prefix, what my trigger is for (Sorcerer's Quest), and that it's a trigger. A good naming convention will be vital for what we're doing due to the sheer number of almost identical things involved in a quest. Once we reach dialogue creation you'll understand more. Hit okay and a nice friendly box will appear that is your new trigger! Looks complex but the only thing you do here is add a script to it. Just like with the trigger select [New Script] and name it something sensible. Since we're adding it directly to the trigger the CK has politely filled in what our script extends already for us. From Papyrus 101 you should know basic script construction. Declare Properties at the beginning, put in your events and conditionals, end everything properly and COMPILE. Now we get to use Notepad++! If this option is greyed out for you then you need to locate your Scripts folder in the Skyrim>Data folder. You should have a Skyrim>Data>Scripts>Source folder. The top folder Scripts will either be empty or contain .pex files (the scripts we are working on may be in here). Don't touch .pex files, they are generated when a script is compiled by the CK. They are what the game looks for when seeking out custom scripts. The scripts that you can look at, modify, extend, and otherwise mess with are in the Scripts>Source folder. If this option is greyed out for you and you already have a Scripts>Source folder then the scripts you are trying to modify is more than likely compressed in the Scripts.rar and you should extract the files with 7 zip to your existing folder. If prompted to overwrite any files, DO IT. As mentioned, the scripts in your Source folder are the untouched versions of the scripts and the game doesn't even use them - they are for documentation only. The Scripts.rar doesn't have any .pex files so all your mods will still work fine. Smarty Says: Never modify a source file script directly. As with all resources, duplicate and rename all the files you use, even scripts! Note* There are some cases where this will not work (changes in the shapeshifting mechanics for werewolves and vampries) - proceed with extreme caution and back everything up. This should open up your script in Notepad++. If it doesn't, you'll need to go and make Notepad++ the default editor for .psc files. The only line that should be visible is the first line. You'll have to fill in the rest. Here's a good example - Here's a rundown of what you're looking at with this script. AND SAVE! Once you have saved you can now compile it. In the main CK window there's a drop down menu for Gameplay. On it is the Papyrus Script Manager and this is where you compile. If your syntax is correct a box will pop up for a moment and then disappear. If you have any mistakes then the compiler will throw errors at you until you fix them. They are usually helpful errors such as "Missing L Paren at 31, 2" which means you forgot a left parenthesis on line 31 column 2. This will not tell you if your script does anything, it will only check to make sure that your syntax is correct. And that's all we'll do with this for now. Once our script has an actual quest to refer to we can come back and make sure the properties we set fill properly. The last bit of setup is placing the quest objective. The objective is an amulet in the Archmage's Quarters. In the Object Window under Items>Armor>AmuletsandRings find one you like the look of, duplicate it, and rename it to stick with your naming convention. Then load up the Archmage's Quarters in the Render Window and drag the amulet into the room. Edit it and select Don't Havok Settle (so it won't go flying or get shouted into a wall) and UNCHECK Respawn. What's the point of making a unique amulet you can only get with this quest if it keeps coming back?