DOWNLOAD MODS
Are you looking for something shiny for your load order? We have many exclusive mods and resources you won't find anywhere else. Start your search now...

LEARN MODDING
Ready to try your hand at making your own mod creations? Visit the Enclave, the original ES/FO modding school, and learn the tricks of the trade from veteran modders...

JOIN THE ALLIANCE
Membership is free and registering unlocks image galleries, project hosting, live chat, unlimited downloads, & more...

Search the Community
Showing results for tags 'tutorial'.
Found 9 results
-
Index: Part 1: Understanding Skin Partitions - NifSkope Part 2: Understanding Skin Partitions - Blender Part 3: Preparing an Existing Nif for Blender Part 4: Modifying an Existing Nif in Blender Part 5: Clean up the Nif in NifSkope Part 6: Adding Armor to the Creation Kit Part 7: Creating NEW Armor in Blender Addendum: Skin Partitions / Body Parts / Biped Objects Reference Sheet In my bid to understand why none of my modified armors worked in game, I've delved deep into the steaming underbelly of Nifskope to dissect every miniscule part of how the Skyrim body works. I've discovered some very interesting facts that I hope will help any others who decide to try their hand at new armors/clothing for Skyrim. Thus is born this series of tutorials that describe the process of creating/modifying armor and/or clothing for Skyrim in detail with plenty of pictures. Each tutorial is written in a 'classroom' way for you to follow along in the tools yourself. Don't be afraid, get in there and try it. Make a cup of tea, grab some cookies and take your time, there's a lot of information here. Each part is also available in a Word document version for those who prefer to have a printed copy. Download here (soon). Tools required: * Blender 2.49b (not tested on higher versions, but do not use 2.6x versions - the Nifscripts aren't up to the task yet) * NifScripts 2.5.9 * PYFFI 2.1.11 * NifSkope 1.1.0 Knowledge required: These are advanced tutorials that assume the reader knows and understands NifSkope and their way around in Blender. They also assume basic knowledge of the Creation Kit. Disclaimer: Please be patient. While most of the tutorials are written in rough draft, adding them to this forum and uploading the pictures takes time.
-
Hello and welcome to my little tutorial. We're going to be creating new WARPAINT tintmasks and adding them into Skyrim via the Creation Kit. For this tutorial you'll need; - a graphics editing program, either Photoshop or GIMP (I'm using Photoshop in this tutorial) and the proper .dds plugin for that program - the Skyrim Creation Kit - NifSkope - my warpaint templates (optional but helpful) - imagination Jump right to the tutorial. Introduction ------------- Warpaint was introduced for the first time in Skyrim. In its basic form, they are layers overlayed onto the face/head of NPC's and/or the player character called TintMasks. TintMasks also include the cosmetics and dirt layers used during character creation, but that's another tutorial. In general, a warpaint tintmask is a black and white layer texture file with a design on it. Colour is controlled in the CK. These textures can be added to any race to provide a preset option in the character creation menu. Vanilla warpaint tintmask textures are sized at 256x256px. The game understands this and this is the size we'll be creating for the purpose of this tutorial. You may have noticed many mods out there with HiRes warpaints at 2048x2048px for sharper detail. I'll discuss this method below. About my warpaint templates ----------------------------- The first thing I realized as I was creating my own warpaint mod was that I while I could follow the UV map of the head texture for general placement, there was nothing really detailed for specific placements. Thus, my warpaint templates were born. The templates are colour-coded for every part of the face and are intended to be used as a placement guide for all races. They look like trippy voodoo tribal masks. In order: femalehead, malehead, Argonian malehead, Argonian femalehead, Khajiit femalehead, Khajiit malehead http://tesalliance.org/forums/index.php?/gallery/image/30884-nifskope-full-view-female/ http://tesalliance.org/forums/index.php?/gallery/image/30887-nifskope-full-view-male/ http://tesalliance.org/forums/index.php?/gallery/image/30885-nifskope-full-view-male-arg/ http://tesalliance.org/forums/index.php?/gallery/image/30882-nifskope-full-view-female-arg/ http://tesalliance.org/forums/index.php?/gallery/image/30883-nifskope-full-view-female-kha/ http://tesalliance.org/forums/index.php?/gallery/image/30886-nifskope-full-view-male-kha/ In the CK as a properly converted warpaint, they look like this. http://tesalliance.org/forums/index.php?/gallery/image/30888-ck-full-view-female/ http://tesalliance.org/forums/index.php?/gallery/image/30889-ck-full-view-male/ The differences between Man and Mer and Orc races ---------------------------------------------------- Human or Man heads (as shown above) include the Breton, Imperial, Nord and Redguard races. You may be wondering where the Elf or Mer (Dark, High and Wood) and Orc races are. There isn't any. All the Mer races and the Orc race use the same basic human femalehead and malehead mesh and texture files. However, there are extra details and nuances between each that you need to understand. The different shapes of the heads come from .tri files rather than a new mesh like the Argonian and Khajiit races. Because Elf races are similar to Human races, this helps cut down on the number of files needed. The tri file contains "shape" information for each race, allowing for the differences. The pointy ears, elongated chins, sunken cheeks, exagerated jaws of the Orcs, all come from the tri shapes. This does pose an issue for us regarding placement of our warpaint. What appears on the cheek of a Human race might end up on the jaw of the Orc race, for example, but this can be worked around. The following pictures show the differences of each Mer (and Orc) race compared to the basic Human head. As long as you are aware of these differences you can work around it by creating individual warpaint textures per race, with adjustments. The tutorial will explain it more. Dark Elf Female; http://tesalliance.org/forums/index.php?/gallery/image/30890-racecomparedarkelf-f/ Dark Elf Male; http://tesalliance.org/forums/index.php?/gallery/image/30891-racecomparedarkelf-m/ High Elf Female; http://tesalliance.org/forums/index.php?/gallery/image/30892-racecomparehighelf-f/ High Elf Male; http://tesalliance.org/forums/index.php?/gallery/image/30893-racecomparehighelf-m/ Wood Elf Female; http://tesalliance.org/forums/index.php?/gallery/image/30896-racecomparewoodelf-f/ Wood Elf Male; http://tesalliance.org/forums/index.php?/gallery/image/30897-racecomparewoodelf-m/ Orc Female; http://tesalliance.org/forums/index.php?/gallery/image/30894-racecompareorc-f/ Orc Male; http://tesalliance.org/forums/index.php?/gallery/image/30895-racecompareorc-m/ I'm not forcing anyone to use these templates. Feel free to just use the head texture files as your guide if you wish, but they are helpful and I will be using them throughout this tutorial. How to use the texture templates --------------------------------- This will become clearer during the tutorial but I wanted to explain them first. Each .psd file contains the head textures and a coloured layer per face part. Some of the layers overlap (chin/jawline for example) so hide/unhide layers as you wish to see them fully. The file also contains a single UV map layer, if you prefer to just work with that. The files are the same size as the face textures. This is not the size we use for warpaint but it's like this for ease of use when creating. The final warpaint texture will be resized. More on that in the tutorial. As you've seen above, the overall template covers the face and partial neck areas. I highly suggest you do not go outside this overall area or your warpaint may be covered by hair or cut off by the UV map area. Determine where you want to place your warpaint design. For example; * If you want to place a design only on the nose, use the nose layer as your guide. * If you want to place a design only on the upper cheek, use the upper cheek layer as your guide. * If you want to place a design across the eyes and up into the brow area, use the eye and brow layers as your guide. You can go outside of each face part layer if you wish, nothing is stopping you. These templates are simply a guide. You can use the entire face area if you wish with one large design much like Bethesda did if you wish (again, I suggest not going outside the overall area). It's entirely up to you. You said there were no Elf or Orc head meshes - what are these then? --------------------------------------------------------------------- Included in the template package are new meshes for every Mer race and the Orc race. I created them in the CK and exported (much like you do when you create NPC's and export facegen). THESE ARE GENERAL MESHES (shown in the pics above), and are NOT DETAILED for every single shape that can be created in chargen but are exagerated enough to show the oddities. These are a guide only, like the texture templates. They are meant to be used in NifSkope only to show your progress as you adjust warpaints per race. For Human, Argonian and Khajiit, use their head meshes from the skyrim files. I do not guarantee that some configurations won't stretch or distort. More on how we'll use these mesh templates in the tutorial. Creating HiRes versions of warpaints -------------------------------------- As the trend seems to be, everyone wants HiRes 2048x2048px textures. The game, however, will not display tintmasks at this size. To use these textures SKSE is required. If you're not using it already, get the latest version here. When you release your HiRes mod, make sure to advise people of the same requirements. After installing, locate the SKSE.ini file in your Data\SKSE folder. Open in any text editor and copy/add the following; [Display] iTintTextureResolution=2048 This will only allow for better images in game. YOU WILL NOT BE ABLE TO SEE YOUR TINTMASKS IN THE CK. Follow the tutorial as is. I have not provided hires templates. You can still use them by copying the guide layers into a new 2048x2048 workspace and resizing. This will look bad as you test your creations but since it's only a guide and not used in the final product, it'll do. If you decide to create both a normal vanilla version and a HiRes version, then create your texture versions individually. Do not try to just downsize your 2048 version down to 256. It will look horrible. And whatever you do, never upsize that much. Support ---------- Please feel free to ask any questions in this thread. Now, on to the tutorial.
-
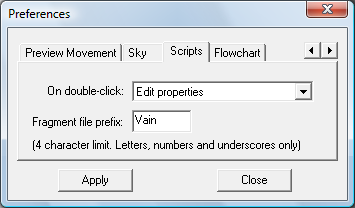
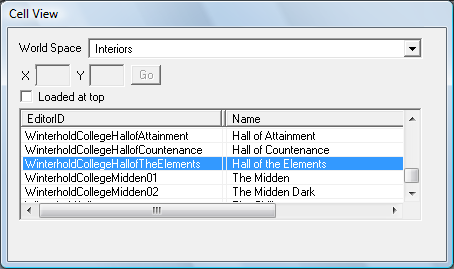
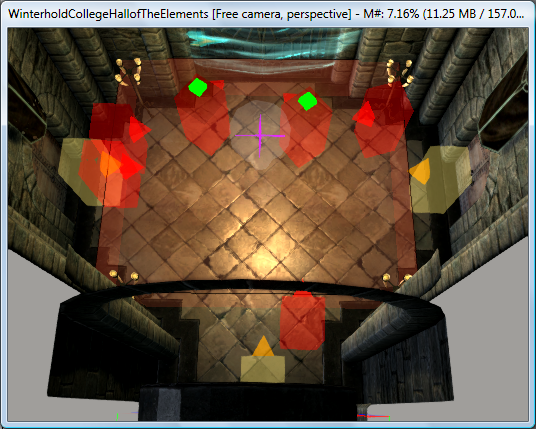
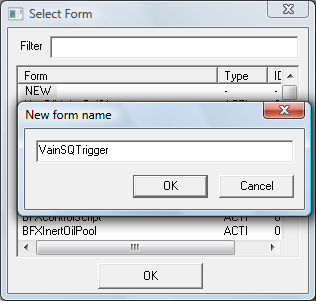
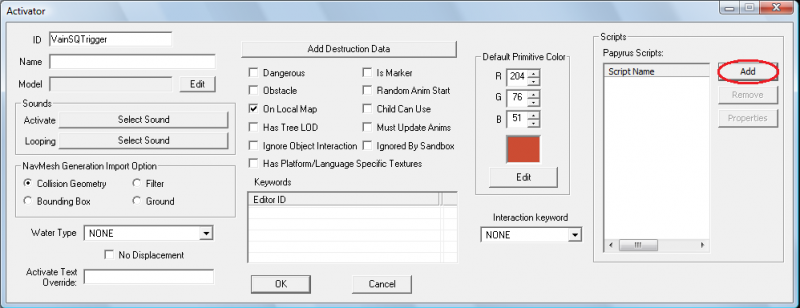
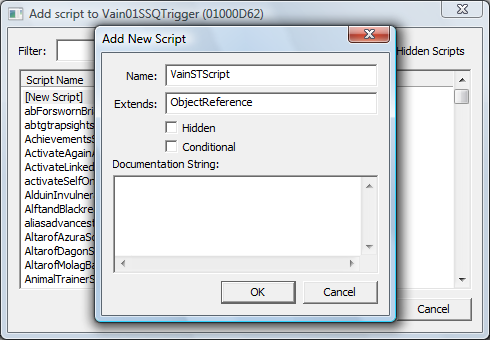
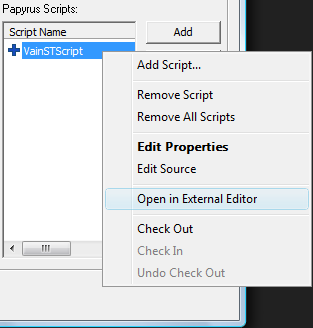
Modding Workshop: My First Quest Welcome to the Modding Workshop: My First Quest. In this tutorial we will be discussing how to create a lore-friendly quest using existing NPC's and recorded dialogue and how to package it properly for upload. We will briefly discuss item creation, triggers, and scripting, but this workshop will not cover every aspect of these topics, only what is needed for this task. Coming into this tutorial, you should already be familiar with the basics of navigating the Creation Kit and some knowledge of Papyrus syntax. Part I: Tools You're going to need several tools for this job in addition to the Creation Kit. BAE - Allows you to view the contents and extract from Skyrim BSA and ESM files. Voice File Reference Tool - Allows you to view and search the voice files from Skyrim without needing to extract them and shows file name, dialogue, and voice type. Unfuzer CPP Edition - Allows you to decompress FUZ files from Skyrim to WAV and LIP and compress WAV and LIP files to FUZ. Wrye Bash - Takes care of most of the hoop jumping needed to get your mod packaged for release to Steam. Not necessary for other mod sites who allow uploads of loose files. TES5Edit - Shows you what files are included in your mod and how they are interacting with their respective masterfiles and/or other mods. Useful for finding mistakes and conflicts. Experimental. Clean Saves - make your own or use my resource. Probably both. You'll want saves made at key points around the area and time frame in game that you'll be modding. For example - if your quest doesn't start until after a certain event, make a clean save before and after that event. This way you will be able to test if your quest triggers properly even if a downloader installs it on a game that has already passed that checkpoint. Notepad ++ - Text documents on steroids. Infinitely helpful for scripting. It numbers lines, helps you line up indented code properly. Such nice, much syntax. 7 zip - File compressor and extractor. Skyrim scripts now come packaged in a .zip file and need to be decompressed to be edited Dialogue Length Extender - A quick guide for how to extend the 80 character limit on dialogue lines for the Creation Kit. Tools you should already have Skyrim - Downloaded from Steam or installed from a disc. I recommend making a shortcut to this directory. You'll be going here a lot. Creation Kit - Downloaded from Steam and installed into the same folder as Skyrim. Archive.exe - comes with the Creation Kit (I believe) and is also in the same folder as Skyrim. Used with Wrye Bash to package a mod for upload to Steam. Useful Console Commands - These are indispensable for testing a custom quest to ensure it is functioning properly since almost all of what a quest does is behind the scenes. Open the console with the tilde (~) Commands contained in <brackets> indicates a variable that must be specified. Page Up and Page Down keys can be used to scroll up or down the Console gui getstage <quest ID> - returns the current stage of the quest movetoqt <quest ID> - moves you to the location of the current target of the quest, eg. where the map marker is pointing. setstage <quest ID> <stage #> - manually sets the stage of a quest. Setting a quest stage will begin the quest if it has not already begun. sqs <quest ID> - Shows quest stages in a quest and if a stage has been achieved. sqo - Shows a human friendly list of active and completed quest objectives for currently active quests. resetquest <questid> - Sets all quest stages in a quest to 0. coc <cell ID> - teleports the player to the cell specified. player.moveto <reference ID> - teleports the player to the reference specified, eg. an NPC or unique item. Part II: Preparation Now that you have your tools there are a few things you will need know more about. Script Fragments - used by a quest to determine how it behaves, when objectives are displayed/completed, when dialogue occurs, quest completion and advancement, ect. The Creation Kit has a default prefix it attaches to all fragments. For convenience you will want to change this default to be able to tell your own script fragments apart from original ones. To do this go to File>Preferences>Scripts>Fragment File Prefix in the CK window and fill it in with something that makes it yours. Hit Apply. Smarty Says: Use the same prefix for any files you create inside your mod! This will help you locate them in the Object Window and elsewhere. You also need an outline for your quest. Each bullet in your outline will become a Quest Stage. Quest Begin Stage 0 The quest has started but the Player has not spoken with Archmage Savos Aren Quest Objective Assigned Stage 10 The Player has spoken with Savos Aren or is the Archmage Quest Completion Stage 20 The Player completed the previous Objective and ended the quest The beginning of a quest is always invisible to the player. Without the quest having already begun quest objectives cannot be assigned. Quest dependent dialogue, items, events, and anything else included in your quest will not be enabled and quest stages cannot be advanced. Part of quest creation will be determining how your quest will start. Will it start when the game starts (Unbound)? Will the player find a long forgotten tome that leads them to your quest (Rebel's Cairn)? Will they walk into a room ( The Golden Claw)? Will it be a combination of these things (Boethiah's Calling)? Quests that start when the game starts can be a strain on someone's save game and even corrupt it over time. Reading a book requires the creation and placement of said book and making sure the player knows how to find it in your mod description. Picking up an item has similar problems. Walking into a room, however... Can be done easily. I recommend using an interior cell to minimize conflicts with other mods and finding an interior cell your player will have to pass through during normal game play in order to complete your quest. Then you need to know how many objectives there will be - ours only has one objective. You can always add more and once you know how to manage one, adding more is simple. And lastly you need to end your quest which is more complex than it sounds. More on this later. Part III: Turning on the Creation Kit You thought I'd never let you. Well, now's your chance! We're finally ready. Turn on the Creation Kit and load the Skyrim.esm only. The default settings on the Creation Kit do not allow multiple master files to run simultaneously. It is possible, but not covered here. Starting the Quest: This tutorial quest involves only locations and NPC's from the Mage's College. There's no reason for this quest to begin running silently in the background until the player is there so we will put our quest's jump start in the Hall of Elements - the first interior cell in the Mage's College the player will enter. Find it in the Cell View window under Interior World Spaces and double click it to load it in the Render Window. We want the player to activate our quest as soon as they enter the room and the easiest way to do that is with a trigger. You'll need to be able to see Triggers to do this so enable them by hitting "M" on your keyboard. Your view should be of the main entryway of the Hall of Elements. Notice the big orange box taking up the entire room. This is a trigger. We're not going to use it though, except as a nice large object to create our own trigger around. Triggers when created will appear in the render window around an object that is selected so click on the big orange box. When you do you'll notice MG06SceneTrigger will now be highlighted in the Cell View window in the loaded cell's object list. Look for the Create Trigger button on the top bar of your Creation Kit Window and click it. A new window will pop up asking you to select a form. Double click NEW and name your new trigger. VainSQTrigger = My modder prefix, what my trigger is for (Sorcerer's Quest), and that it's a trigger. A good naming convention will be vital for what we're doing due to the sheer number of almost identical things involved in a quest. Once we reach dialogue creation you'll understand more. Hit okay and a nice friendly box will appear that is your new trigger! Looks complex but the only thing you do here is add a script to it. Just like with the trigger select [New Script] and name it something sensible. Since we're adding it directly to the trigger the CK has politely filled in what our script extends already for us. From Papyrus 101 you should know basic script construction. Declare Properties at the beginning, put in your events and conditionals, end everything properly and COMPILE. Now we get to use Notepad++! If this option is greyed out for you then you need to locate your Scripts folder in the Skyrim>Data folder. You should have a Skyrim>Data>Scripts>Source folder. The top folder Scripts will either be empty or contain .pex files (the scripts we are working on may be in here). Don't touch .pex files, they are generated when a script is compiled by the CK. They are what the game looks for when seeking out custom scripts. The scripts that you can look at, modify, extend, and otherwise mess with are in the Scripts>Source folder. If this option is greyed out for you and you already have a Scripts>Source folder then the scripts you are trying to modify is more than likely compressed in the Scripts.rar and you should extract the files with 7 zip to your existing folder. If prompted to overwrite any files, DO IT. As mentioned, the scripts in your Source folder are the untouched versions of the scripts and the game doesn't even use them - they are for documentation only. The Scripts.rar doesn't have any .pex files so all your mods will still work fine. Smarty Says: Never modify a source file script directly. As with all resources, duplicate and rename all the files you use, even scripts! Note* There are some cases where this will not work (changes in the shapeshifting mechanics for werewolves and vampries) - proceed with extreme caution and back everything up. This should open up your script in Notepad++. If it doesn't, you'll need to go and make Notepad++ the default editor for .psc files. The only line that should be visible is the first line. You'll have to fill in the rest. Here's a good example - Here's a rundown of what you're looking at with this script. AND SAVE! Once you have saved you can now compile it. In the main CK window there's a drop down menu for Gameplay. On it is the Papyrus Script Manager and this is where you compile. If your syntax is correct a box will pop up for a moment and then disappear. If you have any mistakes then the compiler will throw errors at you until you fix them. They are usually helpful errors such as "Missing L Paren at 31, 2" which means you forgot a left parenthesis on line 31 column 2. This will not tell you if your script does anything, it will only check to make sure that your syntax is correct. And that's all we'll do with this for now. Once our script has an actual quest to refer to we can come back and make sure the properties we set fill properly. The last bit of setup is placing the quest objective. The objective is an amulet in the Archmage's Quarters. In the Object Window under Items>Armor>AmuletsandRings find one you like the look of, duplicate it, and rename it to stick with your naming convention. Then load up the Archmage's Quarters in the Render Window and drag the amulet into the room. Edit it and select Don't Havok Settle (so it won't go flying or get shouted into a wall) and UNCHECK Respawn. What's the point of making a unique amulet you can only get with this quest if it keeps coming back?


-
From the album: FPI Research
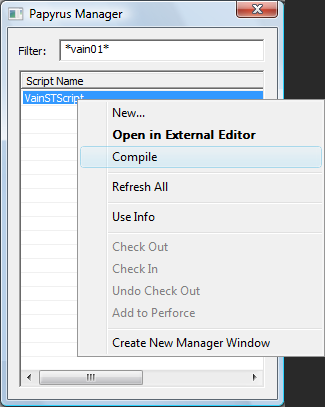
Image for tutorial. -
From the album: FPI Research
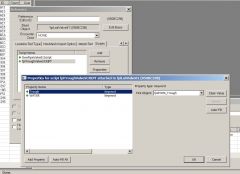
Image for a scripting tutorial on script communications. -
From the album: FPI Research
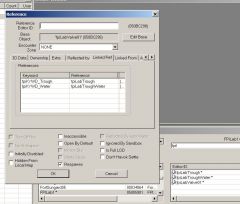
Image for a scripting tutorial on script communications. -

From the album: FPI Research
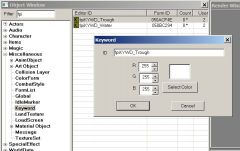
Image for a scripting tutorial on script communications. -
Hello all, I am working on a Skybrary project amongst actual mods for Skyrim. I am out of touch with programming. I am from the 'old' school, not mainframe, but from GWbasic, D.O.S,TurboPascal, Apple ][ e. The new school confuses me and is giving me such a headache. I am in this forum to hopefully, change my luck for the better. I have 5 mods published on Nexxus, but they were more for adding functionality and familiarizing the kit; except for the 5th project which is the Skybrary. I have a sixth project {not put in WIPz yet} with story lines, history, action, immersion friendly dialogue, marriable, faction friendly. I want to make sure I can advance my WIPz in the Alliance but also get participation with my library. It is a collection of my work and other peoples, put into ONE place. I have been on the internet falling asleep and getting a little upset that I have to wait between 20 minutes to 40 minutes to get 5 minutes worth of information. I would do the work and notate it in Clipmate and .odt, doc form. I am asking if this seems feasable to anyone here, to share information based on Short Version and in depth LONG Version methods on modding? I am also wondering whether or not the modding school format with lessons and homework was a one year only project. Is it still being offerend? Thanks in advance. Ashenfire
-
Hello people, i don't know if this is the right place to post these kind of stuff, but i need some help! I recently downloaded the Centaur mod for Oblivion. I also downloaded the Oblivion Unofficial patch, and some Custom Races fix. I got Oblivion Mod Manager and this is my "Setup": -TOCP .esm - Oblivion .esm -Unofficial Oblivion Patch .esp -KT_CustomRacesFix .esp -TOCP - Playable Centaur .esp -UOPS Additional Changes .esp The Centaur mod contains TOCP .esm, TOCP - Playable Centaur .esp and a Meshes folder. I copy pasted them into my BethesdaSoftworks/Oblivion/Data But when i try to begin a new game i cannot find the Centaur race. I only get the default ones. I don't know if i did something wrong, because in the Meshes folder there is a folder named 'DMCentaur' with in all the Armour, characters, clothing, Creatures. I don't know if i need to put the DMCentaur folder in the Meshes folder or the content of the DMCentaur. If this is a little bit confusing, i understand. I was never that good at modding... If someone could explain this to make, make a tutorial video or something...THAT WOULD BE GREAT! Deems (And again, i don't know if this is the right place to post it, i already posted it on the author's mod page (Da Mage) But i don't get a respond, which i understand because his last post on the mod was in like 2009/2011 [sadface])