

DOWNLOAD MODS
Are you looking for something shiny for your load order? We have many exclusive mods and resources you won't find anywhere else. Start your search now...

LEARN MODDING
Ready to try your hand at making your own mod creations? Visit the Enclave, the original ES/FO modding school, and learn the tricks of the trade from veteran modders...

JOIN THE ALLIANCE
Membership is free and registering unlocks image galleries, project hosting, live chat, unlimited downloads, & more...


Vince
-
Posts
469 -
Joined
-
Last visited
-
Days Won
13
Content Type
Profiles
Forums
Downloads
Tutorials
Gallery
Store
Events
Everything posted by Vince
-
There was a recent topic in the Mods subforum of the OF about making or modifying bows. trollf made a post that was so informative that I'm posting it here since the topic will eventually roll off the forum. This is a direct quote from trollf. I gave it a try and to me any modifications to current bow shapes are easy, and making bows with completely new shapes aren't that hard either. Now while the scripts can handle everything perfectly the most important thing is that we finally can focus on the look and design of the bow itself than to spend a lot of time instead to figure how it all exactly works. This is my first quickly modified daedric bow - that's a POC so forgive that crappy design ;] All modifications of the bows in Blender relay on Shape Keys. There are two of such keys respectively named Base and BowMorph. Former is the basic shape of the bow in its resting position, and the latter is the shape of the bow with its bowstring drawn to maximum. The switching between the Shape Keys is done through the Shapes Tab. It's the tab in the same section as Modifiers tab - all accessible from panel in edit mode (F9). To make this story short - you just need to import one of existing bows, chose Base Shape Key and modify this bow or replace its shape with the new one, texture it, etc. and then switch Shape Key to BowMorph and in edit mode reposition all necessary vertexes and edges to final morphed position. And there you go its all ready to export. So altering existing bows shapes is possible quite easily, and replacing existing models with completely new ones is not that much harder. But if you want to make a tutorial how to make bows completely from scratch in Blender I think that would be a waste of the time and it will be like reinventing the wheel for the second time. Utterly unnecessary. My way of making new bows will be importing existing ones, and using their shapes as reference, then replacing the model with the new one. This way you already have all those bow and arrow morphs imported and present in your nif and you can focus on design solely which is the best thing under the sun for every bow maker ;]
-
It's the familiar Bezier curves, referred to as paths in Inkscape. As you know, Blender has a very good implementation of Beziers. Inkscape does all that and a lot more, making smooth, editable lines easy. Almost everything in Inkscape can be converted to paths, including drawings made with the pencil or calligraphy tools, text, and shapes. You can do almost anything with paths: combine them, divide them, offset them, mirror them, perform boolean operations on them, and so forth.
-
I've completed the initial design of the short sword based on the sketch. I'll start working on the textures next.

-
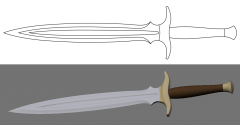
From the album: Vince's Screen Shots & Such
-
As I mentioned before, my primary interest in learning InkScape is using it to create sketches of items I want to model. I can use the sketch as a background image in Blender. After seeing several weapons that members here say they modeled in 30 minutes or so, I decided to take a break from working on the Blender2Oblivion tutorials and make a short sword that will take a lot longer than 30 minutes. In fact, the sketch (below) took more than 30 minutes. Of course, I know I don't work very fast.
-
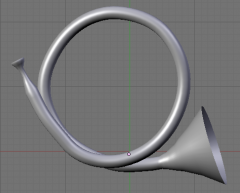
 Krylana
 -

Very first hornlike object using bezier curves
Vince commented on donnato's gallery image in Member Gallery
 Hmmm... I seems that somebody is learning about Bezier curves and how to apply bevels and tapers to them. Very good!
 -
Thanks guys. Like I said, I hate spin. Just the same, that was the best spin I've ever seen. If they can make a game half as good as they can make a trailer, we're in for a hellava ride!
-
Thanks DarkRider. I'm glad to know that I'm not the only one to be amazed by the trailer. I don't expect the game to be that intense, but from the article in PC gamer, where they actually watched someone play an alpha version of the game, it looks like it could be as good as the original--at that would be a very good thing!
-
There was an RPG disguised as a shooter a few years back called Deus Ex. It was unique it that there were multiple solutions for almost every challenge. PC Gamer magazine has voted it the best PC game of all time. It certainly was fun--I played it all the way through at least three times. Unfortunately, it's sequel, Deus Ex, the Invisible War was just a dumbed down shooter. However, now Edios is nearing completion of a new sequel that's back to the RPG roots. Like the original, you can increase your skills and find better weapons as you solve quests. Since you character is essentially a cyborg, you can get "augs", augmentations, that are very similar in effect to the perks you can get in FO. The reason I'm posting is details of the new sequel are coming out that indicates that Edios "Gets it". A new trailer is out from E3 that I find amazing, see http://www.youtube.com/watch?v=4FRWYRqaGFE. I hope you will watch it and let me know what you think.
-
I've been taking a crash course in InkScape with some success. After doing some of the tutorials, I decided I needed to try something on my own. I decided to try a little pseudo 3D, like showing a page from my Blender2Oblivion tutorial as if it were lying on a table. It worked pretty well as you can see below. I'm not sure if it's possible to do that with a paint program--at least I don't know how. Now I've got to start working on creating scrollwork. 'Not easy without talent.
-
2D Graphic Editors: Bit Mapped versus Vector Based
Vince replied to Vince's topic in Requests & Services
Actually, your "Powerpoint meets Photoshop" is a very good description. Just like you can select some text in PowerPoint you wrote earlier and move and modify it, you can do the same thing with any object your create with InkScape. Good luck with it and once you've had a chance to explore it a bit, please do post your thoughts in the InkScape Study Group. -
Since I mentioned a vector graphic editor, InkScape, the other day, I've received several questions such as "I already have the GIMP, why do I need to learn some other type of 2D editor?". The answer is maybe you don't, but it might be a good idea to have a general idea of what a vector graphics editor is and, most importantly, what it can do that you can't do with the GIMP, Paint.Net, or PhotoShop. Up until the last few years, vector graphics editors mostly ment expensive software: AutoCAD, Adobe Illustrator, Corel Draw, and so forth. Now, things have changed and there are several quite powerful, free vector graphics editors. See List of Vector Graphics Editors. So, what's the difference? The graphic editors we are familiar with: Paint.Net, the GIMP, and PhotoShop are basically pixel map editors. That is, when you perform a function, such as drawing a circle, the result is a change in the image's pixels and that is the only information saved. When you draw a circle in a vector graphic editor, such as InkScape, Corel Draw, etc., all the information about that circle is stored in the "image". Parameters such as size, color, location, and position in Z relative to other objects, can be modified at any time. What this means is you can come back later and change any of these easily--something you can not do with a pixel map editor. For example, the first two pictures below appear almost identical. One was created with Paint.Net and the other was created with InkScape. Let's say I decided that I wanted the green line to be twice as wide and behind the circle. Also, I wanted the circle to be about 2/3rds its original size and have a partially transparent center as shown in the third picture. This takes just a few seconds in InkScape, but would be difficult or impossible with Paint.Net or similar. The bottom line is detailed information about every object created in a vector graphics program is saved and available to be modified. If you were making a sketch of a shack you wanted to create and decided after the sketch was mostly complete that it might look better with a slightly curved roof, you don't have to start over, just curve the lines that depict the roof. All this does not mean you should go download a vector graphics editor today. It does mean that you now know there are graphics editors available where what you draw can be easily modified or revised as you go along. For many applications, that can be very handy. Circle and Bar Image Created with Paint.Net Circle and Bar Image Created with InkScape Modified Circle and Bar Image Created with InkScape
-
It can import a bitmap image in any of the common formats (.bmp, .jpg, .png, .gif, .tga, etc.) and export a bitmap as a .png file. Since it is not really a bit map editor like Paint.Net or the GIMP, it normally saves in vector formats like .svg, .dxf, .pdf, .wmf, etc. Enough people have as about this that I am going to make a post explaining the fundamental difference between a bit map or pixel map editor like Paint.Net, the GIMP, and PhotoShop and a vector or object based editor like AutoCAD, Adobe Illustrator, or InkScape.
-
Beana, You can use InkScape with just a mouse and keyboard. However, it does support the Wacom tablet. Vince EDIT: I finished the first three tutorials with no significant issues. I also was able to make a sketch of an axe head then use it as a background image in Blender to create a 3D axe head. I've got a lot more to learn, but I'm convinced that InkScape is worth it. Unlike my experiences with the GIMP, the manual actually makes sense and at least 98% of it works the way the manual says. I don't take that for granted anymore.
-
I would like to be able to sketch things using 2D software. Although I find "paint" programs, like Paint.Net, very useful for creating or modifying textures, I don't find them useful for creating sketches. For example, if I draw a line, the line becomes a modification to the pixels in the image. I can't come back later and move or change the line easily. By comparison, in programs, like AutoCAD or PowerPoint, the things you "draw" are saved entities that you can move or modify later. For example, if I draw a circle in AutoCAD, I can come back later and move it. If I draw a circle in, say the GIMP, I cannot come back later and move it independent of other elements in the drawing. Also, in PowerPoint I can create a line of text and come back later and move it or change the font. If I create a line of text in Paint.Net, I can not come back later and modify it. I'm not knocking paint programs, but am trying to point out a weakness when trying to create an easily modifiable sketch. I've found a free 2D graphics program where almost everything you create is saved in the program as a mathematical description of the object. What that means is you can come back later and move, scale, or otherwise modify it. The program is InkScape and it's free. It is a very powerful program and, since it works in a fundamentally different way than a raster based paint program, there is a lot to learn. So far, I've used it enough to verify that it can do what I want. I created a 3 node Bezier curve. I then created a circle, went back and modified the Bezier curve to match a section of the circle. I then deleted the circle and moved and scaled the Bezier curve to be the cutting edge of an axe head. Although PhotoShop has some of these capabilities, it costs about $700 so isn't for everybody. So, I'm proposing something that I don't think has been tried here at the TES Alliance: a study group. That is a group of people that want to learn some new software and can use the topic to exchange ideas, pose questions, and so forth. If this works out, I can imagine future study groups that want to learn other software. Xnormal for example. I realize that learning a new software tool takes a lot of work. However, I think InkScape is worth it and learning it along with others is easier than going it alone.
-
A good way to get an idea of how many polys is acceptable is to extract a similar object from the Bethesda .bsa, import it into your modeler, and see how many polys it has. Since technology, like graphics processors, has improved since the release of Oblivion, your armor could have something like twice that of a vanilla Oblivion armor. You probably don't want a lot more than that. Of course, the same thing also applies to your textures.
-
 These are beautiful. I assume you didn't make these? If you did, please write a tutorial on creating awesome scrollwork.
 -
grond has mine. And, yes, I set the path to the icon as you noted in your post. :=
-
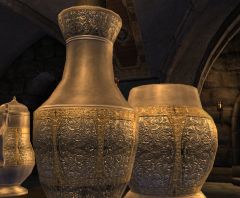
I would like to contribute a fine china vase. It's too fancy for my Abandoned Mountian Shack. Here's a screen shot: . I'm not sure what the protocol is for the folders (mesh, UV texture, and icon texture). I'll pm Grond.
-
I have been working on updating the modeling Session 1. In going over the student questions and comments, I found the most common issue was difficulty in making the transparent texture for the ruler. So, I've written a tutorial on creating transparent textures that works with most paint programs, including Paint.Net, the GIMP, and PhotoShop. It uses the small, free program DXTBmp in conjunction with your paint program. I've attached the tutorial here as a Word document. If you do not have Microsoft Word, you can download the free program: Microsoft Word Viewer. Feel free to post your comments or experiences with this tutorial or the technique it describes. Making Transparent Textures.doc
-
Actually, for things like donnato's fish eye, mirroring is quite easy in Blender. 1) Move the cursor, if necessary, so it's on the plane you want to mirror around (often the plane bisecting the overall object)*. 2) Set the Pivot to 3D Cursor. 3) In Edit mode, select the portion of the object you wish to mirror. 4) Press Shift-D and press Enter to make a duplicate. 5) With the duplicate still selected, press 'M'and choose the axis perpendicular to the plane you want to mirror around* and press Enter. 6) With the duplicate still selected, do Mesh > Normals > Flip. * For example, to mirror around the YZ plane, move the cursor to the origin in 1) and choose X in 5). It hadn't occured to me, maybe I should add something like this, with an example, to Session 3.
-
Knightofvain, the advice from grond and washington hopefully will solve your problem. If it does not, please make a screen shot of your .nif with the object filling the NifSkope render window. The larger image will help us to see the problem more clearly.
-
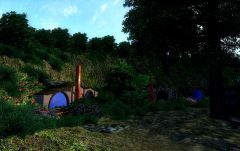 These are really nice. Are you recreating all of the Shire and surroundings? I really like a lot of your work shown here.
 -
washington, AFAIK you need a conformulator if you are making hair or helmets for oblivion. See: The Conformulator. Good luck, Vince
