

DOWNLOAD MODS
Are you looking for something shiny for your load order? We have many exclusive mods and resources you won't find anywhere else. Start your search now...

LEARN MODDING
Ready to try your hand at making your own mod creations? Visit the Enclave, the original ES/FO modding school, and learn the tricks of the trade from veteran modders...

JOIN THE ALLIANCE
Membership is free and registering unlocks image galleries, project hosting, live chat, unlimited downloads, & more...


stankirby
-
Posts
124 -
Joined
-
Last visited
Content Type
Profiles
Forums
Downloads
Tutorials
Gallery
Store
Events
Posts posted by stankirby
-
-
IS
Here are my lesson 1 screenshots. Homework and xtra credit.
I only took one in game of Elenwen @ the embassy.
If you need more in-game I'll go searching.
http://tesalliance.org/forums/uploads/1334151974/gallery_3835_324_404823.jpg
http://tesalliance.org/forums/uploads/1334151974/gallery_3835_324_46842.jpg
http://tesalliance.org/forums/uploads/1334151974/gallery_3835_324_196423.jpg
http://tesalliance.org/forums/uploads/1334151974/gallery_3835_324_79549.jpg
http://tesalliance.org/forums/uploads/1334151974/gallery_3835_324_172856.jpg
http://tesalliance.org/forums/uploads/1334151974/gallery_3835_324_37577.jpg
http://tesalliance.org/forums/uploads/1334151974/gallery_3835_324_10079.jpg
http://tesalliance.org/forums/uploads/1334151974/gallery_3835_324_43549.jpg
http://tesalliance.org/forums/uploads/1334151974/gallery_3835_324_3600.jpg
http://tesalliance.org/forums/uploads/1334151974/gallery_3835_324_55136.jpg
http://tesalliance.org/forums/uploads/1334151974/gallery_3835_324_36592.jpg
-
DarkRider,
NavMsh finalized
TY
stankirby
-
DarkRider,
Here is link to my updated V1.3 mod
TY
stankirby
-
DarkRider,
Mod re-posted with update change-log.
http://tesalliance.org/forums/index.php?/files/file/1177-skilawyndeoverlookesp/
TY
stankirby
-
DarkRider,
I will amend the mod and re-submit!
Will you need/require new screenshots as well?
Thanks for the feedback and guidance.
stankirby
-
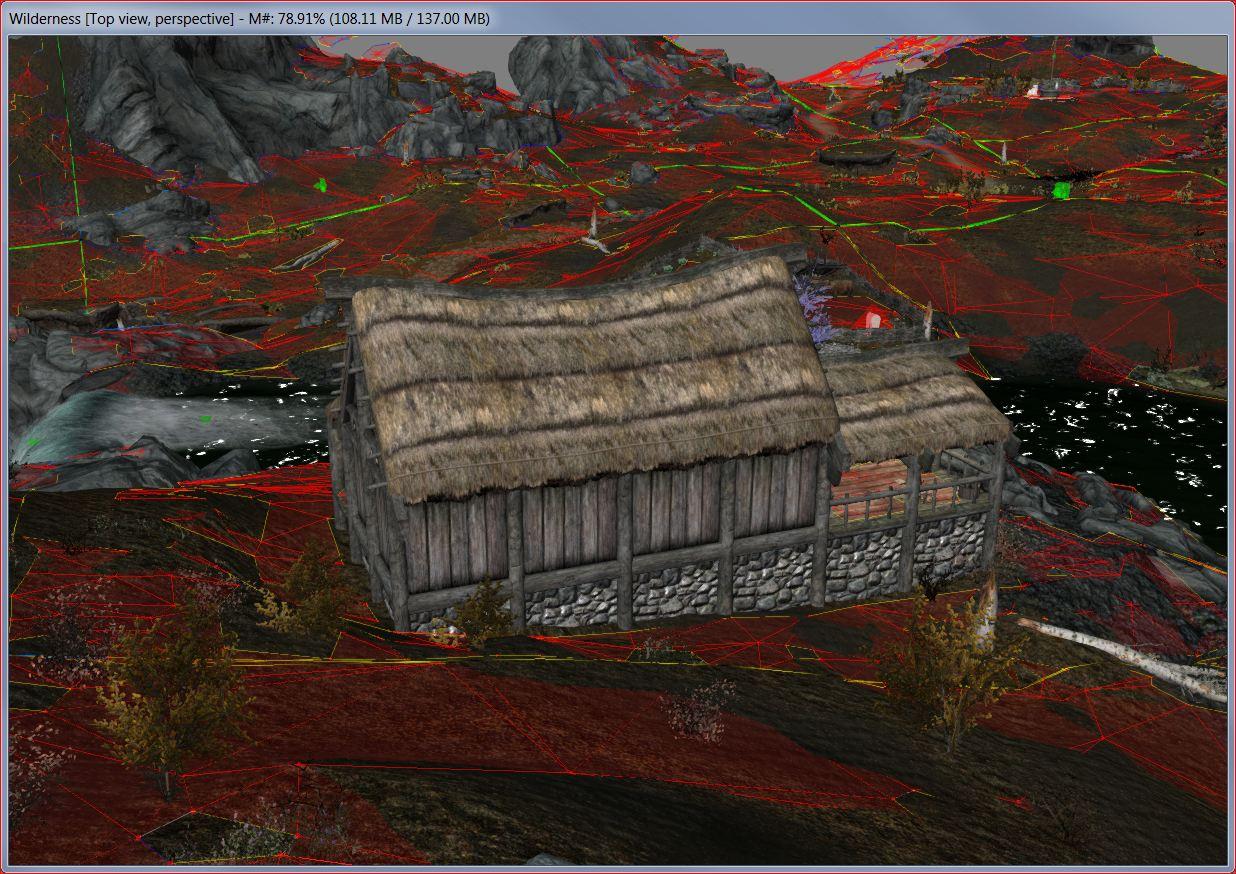
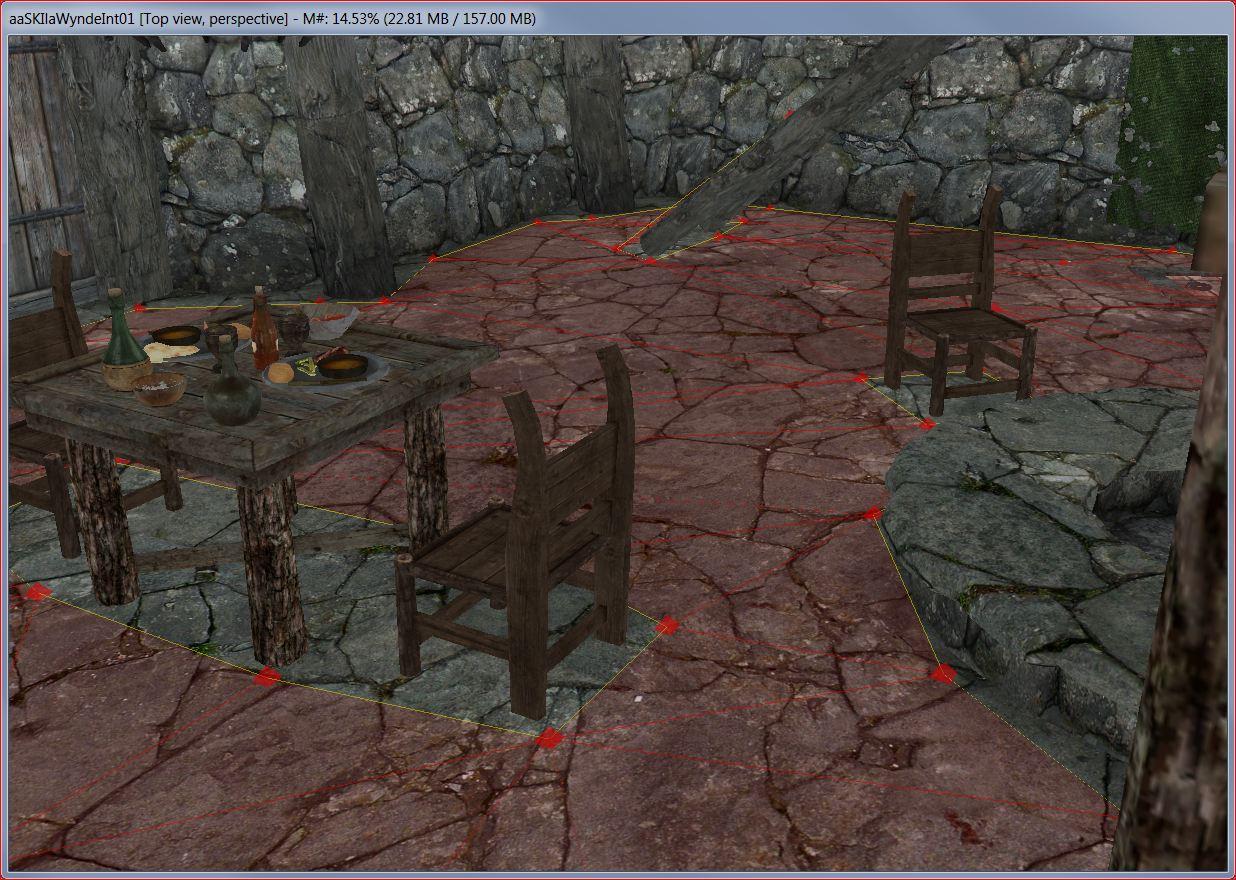
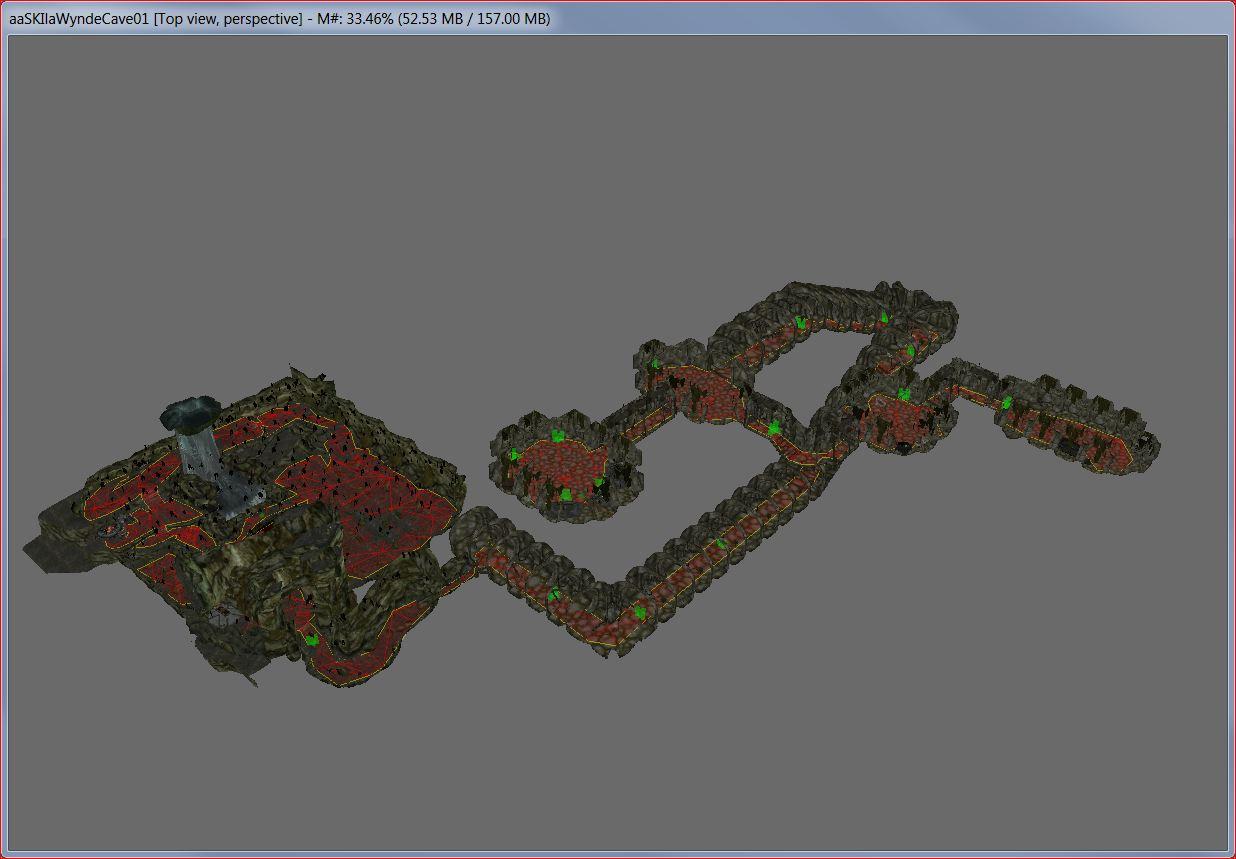
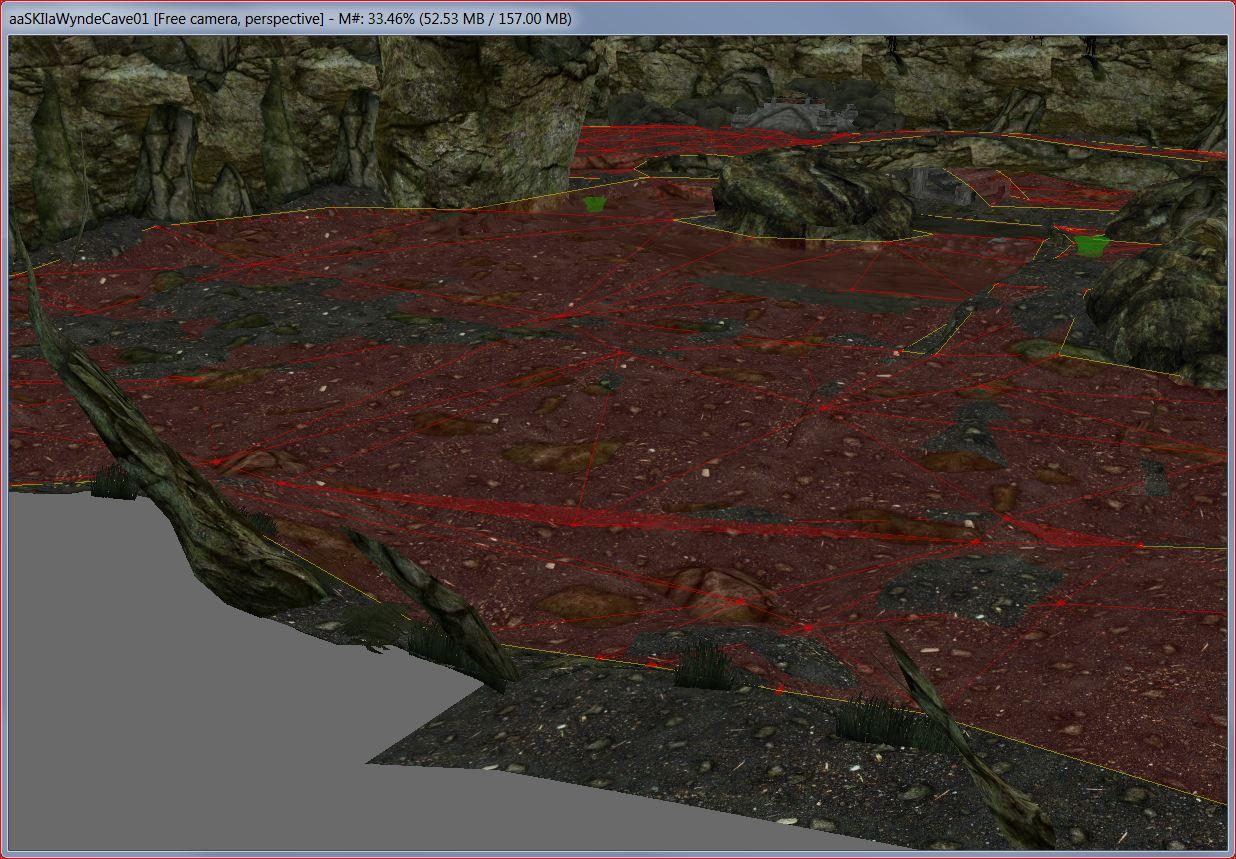
DarkRider,
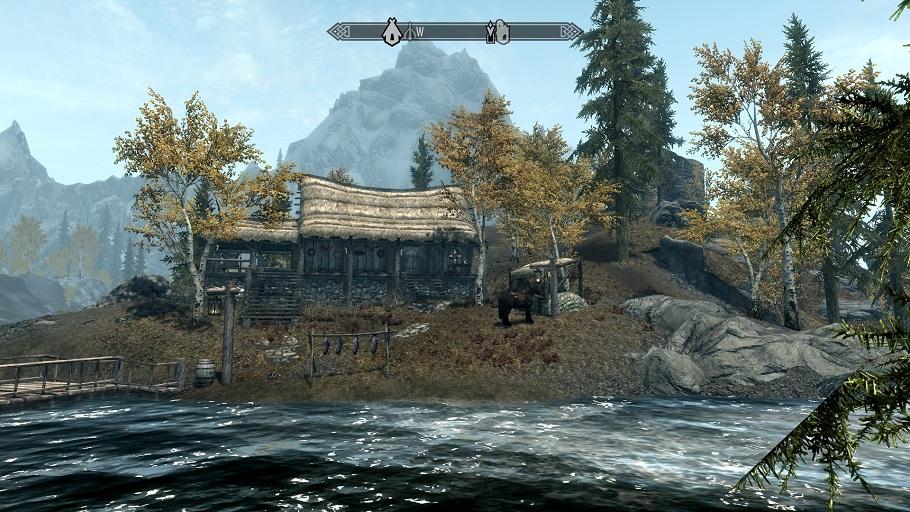
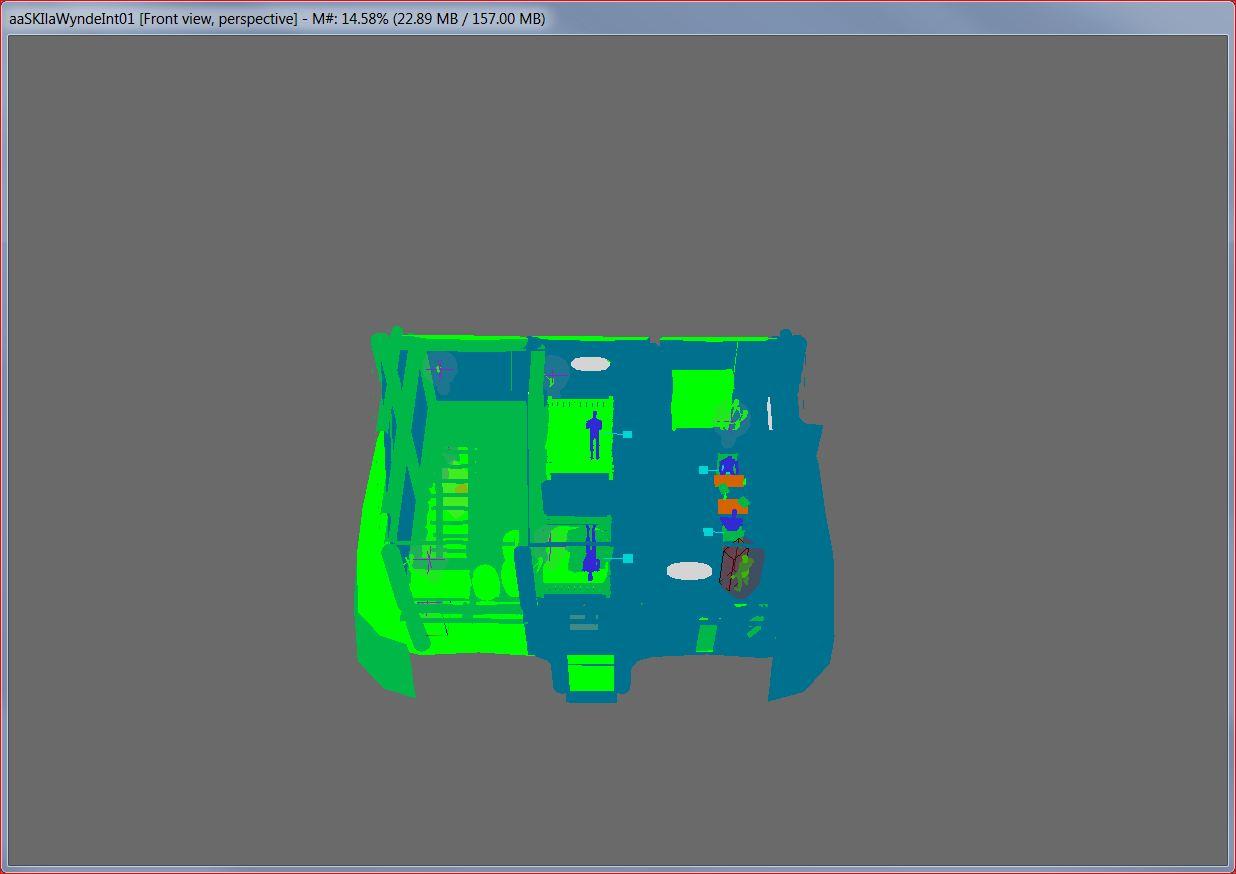
Here you go!
Mod Link:
http://tesalliance.org/forums/index.php?/files/file/1176-ilawynde-overlook
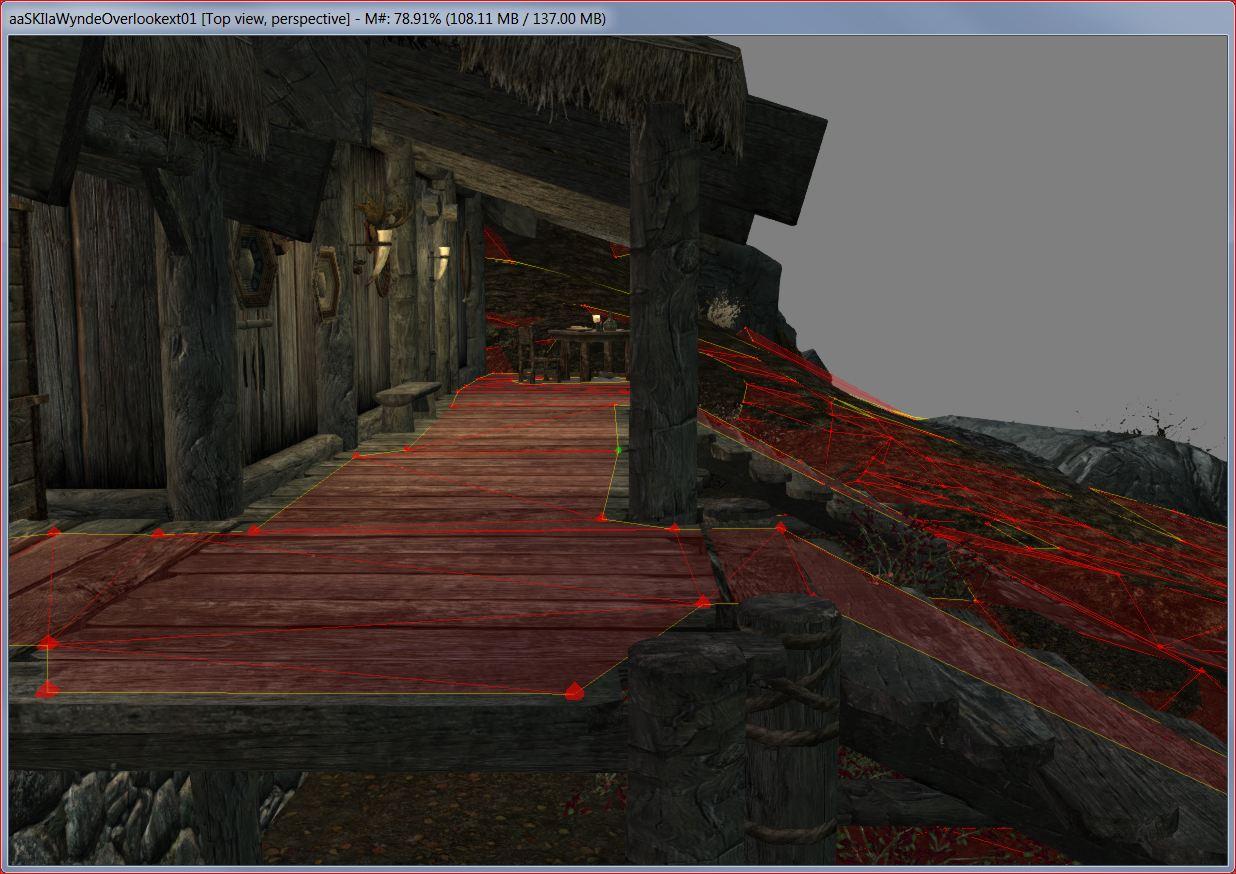
Nav Mesh Exterior and interiors:
http://tesalliance.org/forums/uploads/1332820049/gallery_3835_196_152593.jpg
http://tesalliance.org/forums/uploads/1332820049/gallery_3835_196_137654.jpg
http://tesalliance.org/forums/uploads/1332820049/gallery_3835_196_139211.jpg
http://tesalliance.org/forums/uploads/1332820049/gallery_3835_196_135754.jpg
http://tesalliance.org/forums/uploads/1332820049/gallery_3835_196_134981.jpg
http://tesalliance.org/forums/uploads/1332820049/gallery_3835_196_70147.jpg
http://tesalliance.org/forums/uploads/1332820049/gallery_3835_196_78775.jpg
http://tesalliance.org/forums/uploads/1332820049/gallery_3835_196_6254.jpg
http://tesalliance.org/forums/uploads/1332820049/gallery_3835_196_215189.jpg
http://tesalliance.org/forums/uploads/1332820049/gallery_3835_196_88637.jpg
http://tesalliance.org/forums/uploads/1332820049/gallery_3835_196_169341.jpg
http://tesalliance.org/forums/uploads/1332820049/gallery_3835_196_92519.jpg
http://tesalliance.org/forums/uploads/1332820049/gallery_3835_196_89370.jpg
http://tesalliance.org/forums/uploads/1332820049/gallery_3835_196_115039.jpg
In-game shots:
http://tesalliance.org/forums/uploads/1332820049/gallery_3835_196_98075.jpg
http://tesalliance.org/forums/uploads/1332820049/gallery_3835_196_75941.jpg
http://tesalliance.org/forums/uploads/1332820049/gallery_3835_196_209879.jpg
Shader lighting shots;
http://tesalliance.org/forums/uploads/1333069832/gallery_3835_196_28607.jpg
http://tesalliance.org/forums/uploads/1333069832/gallery_3835_196_11783.jpg
http://tesalliance.org/forums/uploads/1333069832/gallery_3835_196_17777.jpg
-
DarkRider,
My final exam release mod has been uploaded.
I uploaded my in-game shots with the plugin.
My Navmesh and lighting shots are posted in my Sr Alliance Gallery.
Hope this was correct procedure.
If you need me to post screenshot links i certainly can.
Thank you,
stankirby
-
Vometia, Trolff, Hana..............................thank you for the excellent replies!

Windmill Tilter graciously took my NIF and fixed it for me!

Now I will make me some working copies and using your responses will try and create my own.
TESA is only the BEST!!!!!!
 and to you all!
Stan Kirby
-
In Nifscope how do you make an inserted block "nested" to the block above?
In Block List I used Spells / Block / Insert
I have inserted an NIControllerManager as node 3
I want an NIMultiTargetTransformController as node 4 and want it to appear in tree as nested or shifted right in list
then
I want an NIControllerSequence as node 5 and want it to appear in tree as nested or shifted right in list
Stymied but not blocked!!!! LOL
Thank you
Stan Kirby
-
Changed my NIF per WillieSeas instructions!
Perfect in game now!!

Thank you!

Stan Kirby
-
Actually, you only need to change 2 things. The mass and inertial dont really matter, but you can make then zero as well.
1. Load NIF into Nifskope.
2. Open:
> NiNode
> bhkCollisionObject
> bhkRigidBody
3. In the "block Details" of 'bhkRigidBody':
- Motion system ->change to MO_SYS_KEYFRAMED
- Quality Type -->change to MO_QUAL_FIXED
Object will now be motionless in the game but you can still interact with it with an OnActivate block of code, for example.
Thank you all!
Now to file this away for another day.
Stan Kirby
-
Most likely it's havok. In Nifskope click on bhkRigidBody something (in block list window), then in Block Details window change where it says OL_CLUTTER into OL_STATIC, save new mesh and if I'm not wrong, it should be static.
And in CS, if you want to script it make it an activator - not static object.
Thanks Washington!
I'll go tinker with Nifscope!
Stan Kirby
-
I retextured a vanilla object with a stone texture and wanted to use CS, insert it half way into a large rock.
At this point it jumps out of the rock and disappears when I load up a save game.
I'm still learning the ins and out of modding.
Is it havok, persisitent or........................???
Not sure how to make it stay put.
Eventually i want to make it "scripted" to accept some jewels and produce a scroll for the player to pick-up, read and get a map marker or spell to go to my new world space.....
once i take DR's upcoming class.
Any help or suggestions???
Thank you,
Stan Kirby
-
Khett, Willie, and Echo,
Thanks for the replies.
Leave it alone in other words.
Just bothers me with extraneous data lurking!!!!

So, on to bigger and greater things.

Stan Kirby
-
Other than the "testing hall" is there any benefit to keeping all the TEST cells in Tamirel world?
What about all the TEST world spaces?
Just wondering if they are ever used.
Would it make the CS load quicker or run more smoothly?
TY
Stan Kirby

-
Another awesome tutorial!
Only one issue that i feel sure I have brought on myself.
My new bed is suffering from the purple mesh plauge!!!
I have deleted, re-created and reworked thru the tutorial multiple times.
The bed looks perfect in Nifscope with the proper texture paths.
The bed has purple mesh in CS and of course in game.
Other than that life is perfect!

Any suggestions?
Stan Kirby
-
Retexturing Oblivion Part 02
A Basic Retexturing Workshop for Novices
By: DarkRider (03/22/09)
Section 03: The Basic Normal Map
Normal maps can be very technical, and I won’t begin to confuse you by going too into depth in this lesson, but we’re going to cover how to create a basic and certainly passable normal map. Now, there’s a shortcut here that many beginners will want to make use of. When you retexture something like our blanket, where the color is changed but not the depth, you can simply use the vanilla normal map you unpacked with your texture. All you have to do is go into the textures\clutter\upperclass folder on your desktop, and rename blanket06_n.dds to match your new texture name.
blanket06_n.dds --> aaTestBlueBlanket_n.dds
You will be able to use this shortcut in the majority of your retextures. The exception would be things like signs, for example, where you change the name. The new name has a different depth than the old name, so you would need a new normal map, otherwise the old name will ghost under the new one!
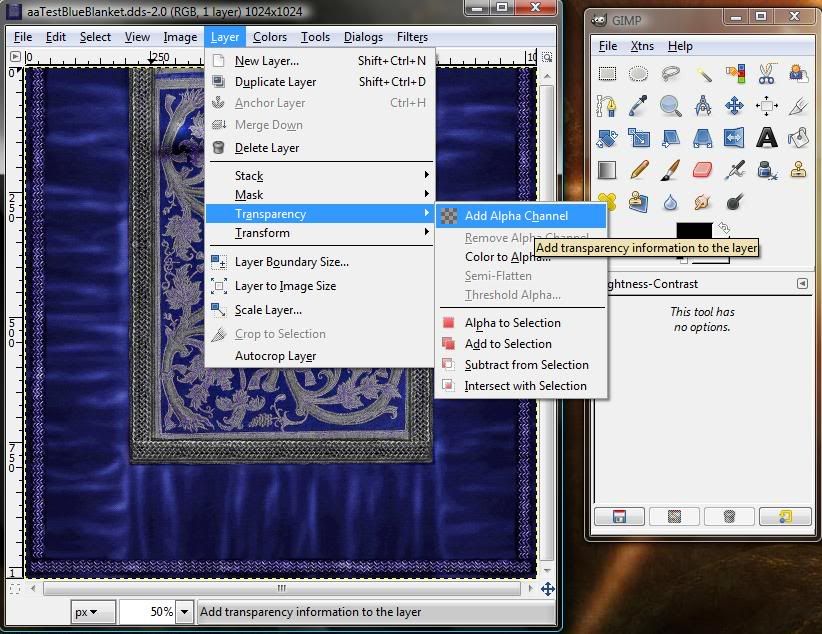
Since this is a tutorial and we have a new texture open yet, let’s go ahead and make a basic custom Normal Map. Start by clicking “Layer†then scroll down to Transparency and click “Add Alpha Channelâ€
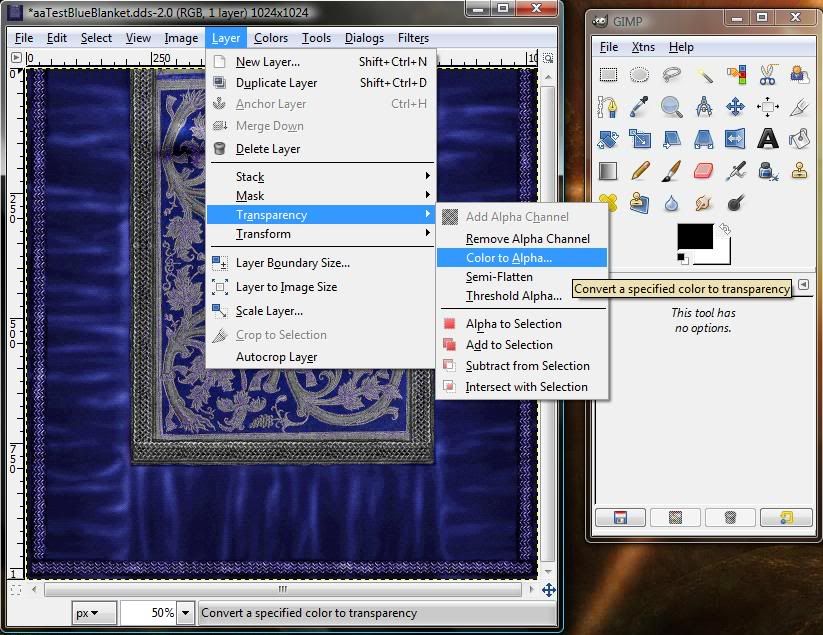
Next, you need to add a color to the Alpha Channel you just made. Click “Layer†again and scroll down to Transparency and click “Color to Alphaâ€
A Color to Alpha box will open. Where it says “From:†you’ll see a white bar, click it and select black on the color picker window and click OK.
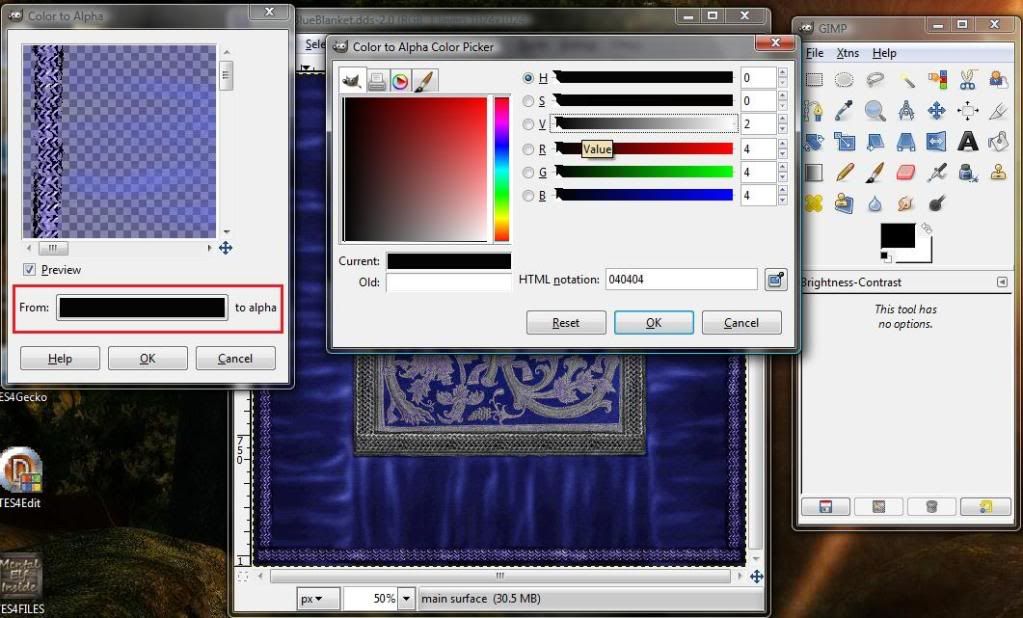
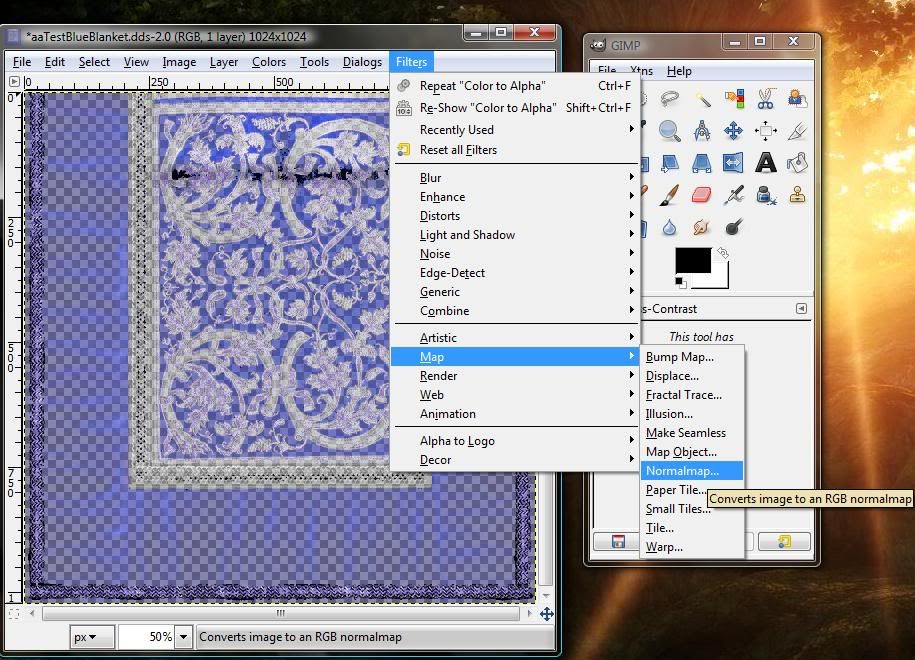
Your texture will change to an alpha/transparent version of the blanket. Once you’ve reached that point, it’s time to transform it to a normal map. On the image, click “Filters†scroll down to map, and click normal map.
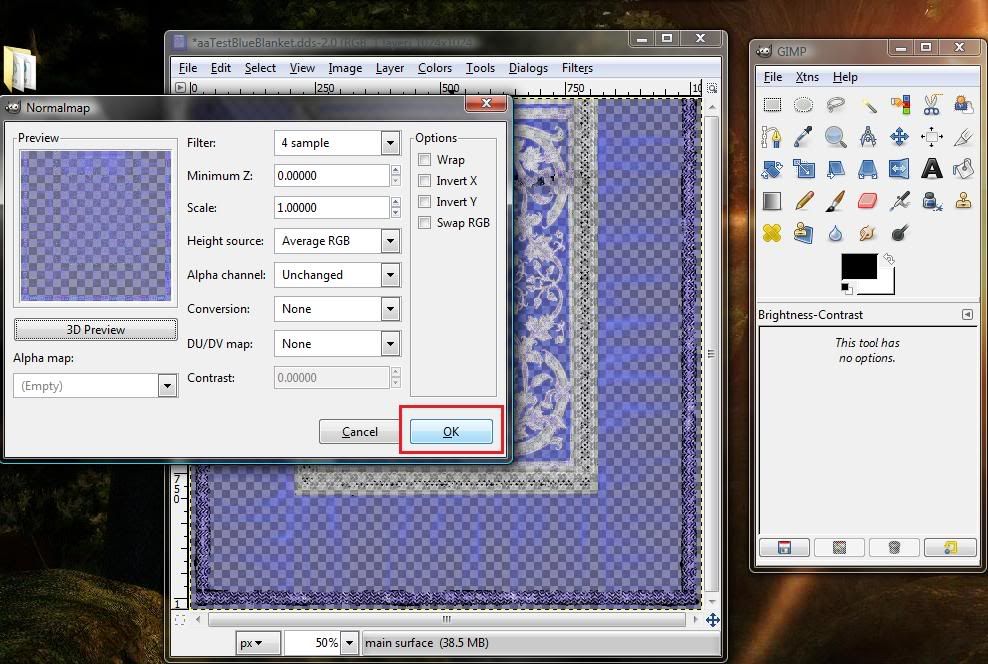
The proper settings should already be in place, so all you need to do is verify your Filter is set at “4 sample†and click ok. Your texture will be transformed into a normal map for you!
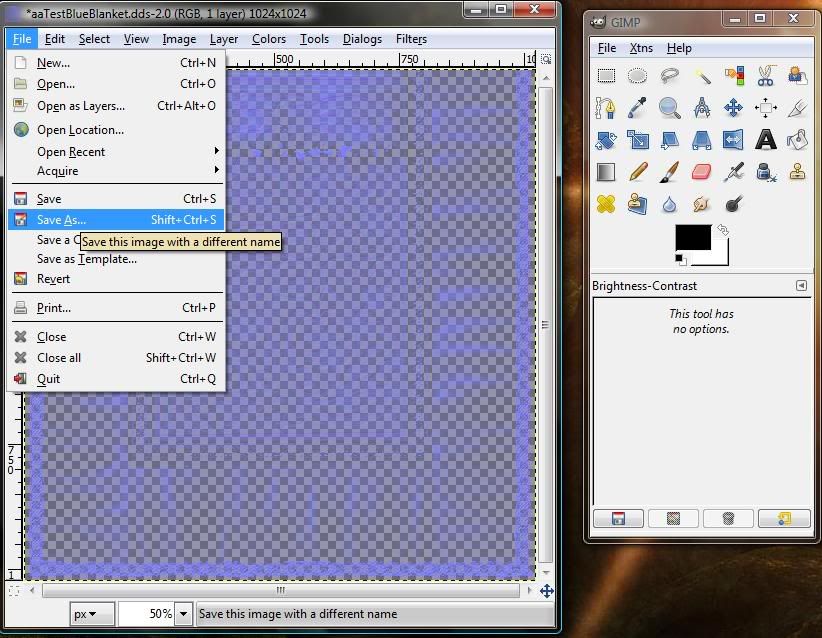
Time to Save!
Just like with the texture, click File then Save As
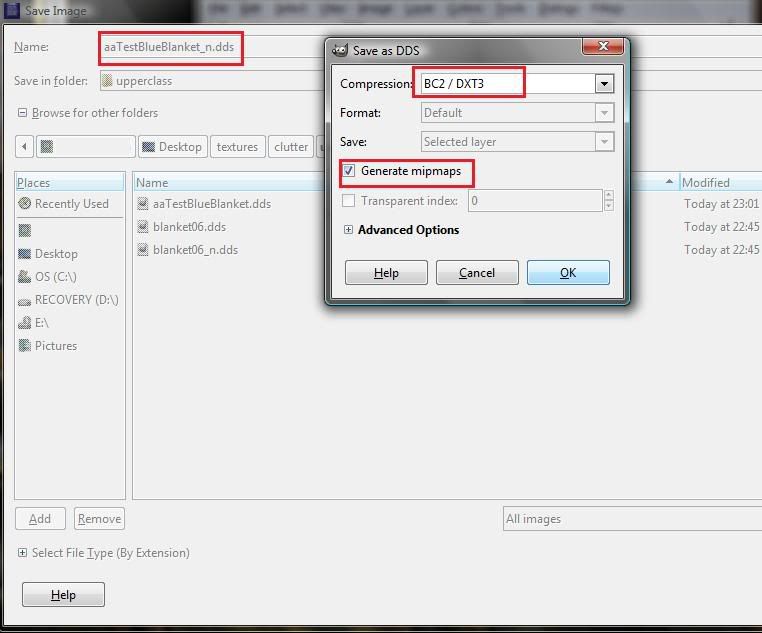
In the Name slot type the name for your normal map. Remember it MUST be the same as the texture but with _n.dds at the end. I named mine aaTestBlueBlanket_n.dds. Click save and you will get the “Save as DDS†box. This time you need to choose a different compression level. Textures with alpha channels, like normal maps, need to be saved as DXT3 or DXT5. Click Generate Mipmaps and OK to finish saving your new normal map!
That’s it! You’ve completed your texture and now your normal map, time to close up GIMP and re-open BSA Commander!
Section 04: Unpacking the Mesh!
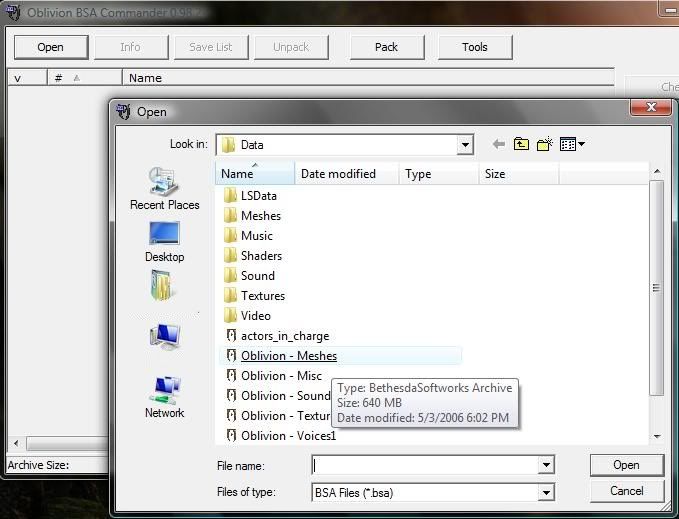
When you have mastered BSA Commander you can of course, pull your textures then your meshes without closing BSA Commander, but to make your first unpack easier in the tutorial we just did textures. Before we can see our texture in game though, we need to unpack the mesh, so with BSA Commander re-opened, click open and navigate to your data folder to open the BSA file called “Oblivion-Meshesâ€
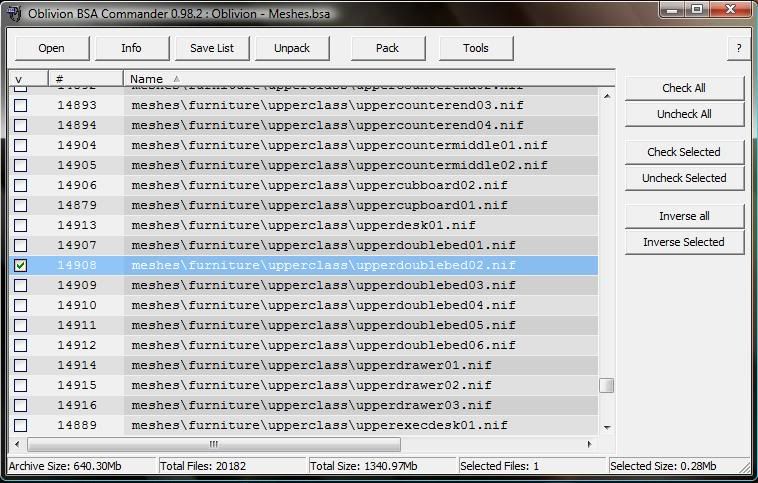
Like before, you will click “Uncheck All†and the category “Name†to alphabetize the list. Then scroll through to find your mesh. The one we want is called: meshes\furniture\upperclass\upperdoublebed02.nif
The rest of the steps are identical to Part 01 of this tutorial, refer back if you get lost. Click unpack, choose the desktop as the destination, and click unpack again to send the mesh to your desktop.
Section 05: Putting it All Together in NifSkope!
Okay Learner, we are more than halfway there! It’s time to apply the texture to the mesh using NifSkope, but before we can cue up NifSkope, we need to put the files in the right folders. Oblivion only reads folders that are in the Oblivion Data Folder. Let’s start by moving our mesh!
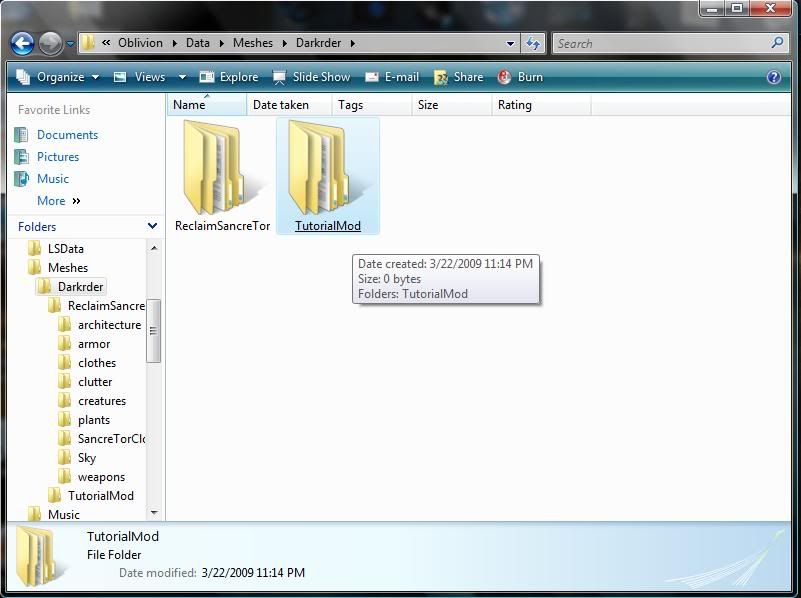
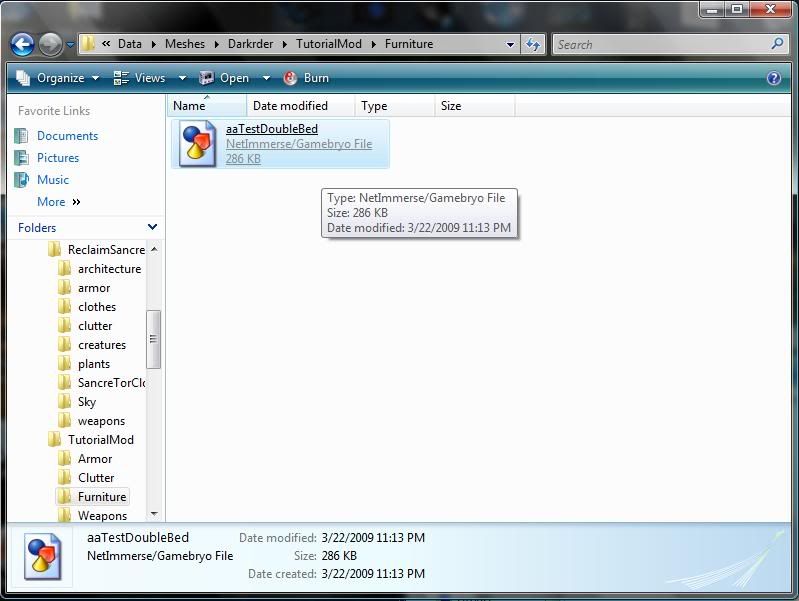
Open your Oblivion Data folder and double click on Meshes to open the meshes folder. Right click and choose New>Folder to make a new folder and give it your ID as its name (mine is “Darkrderâ€). Every mod you make will have its own folder inside this folder named for you! Inside your name folder you need to create another new folder for your mod. I called mine TutorialMod.
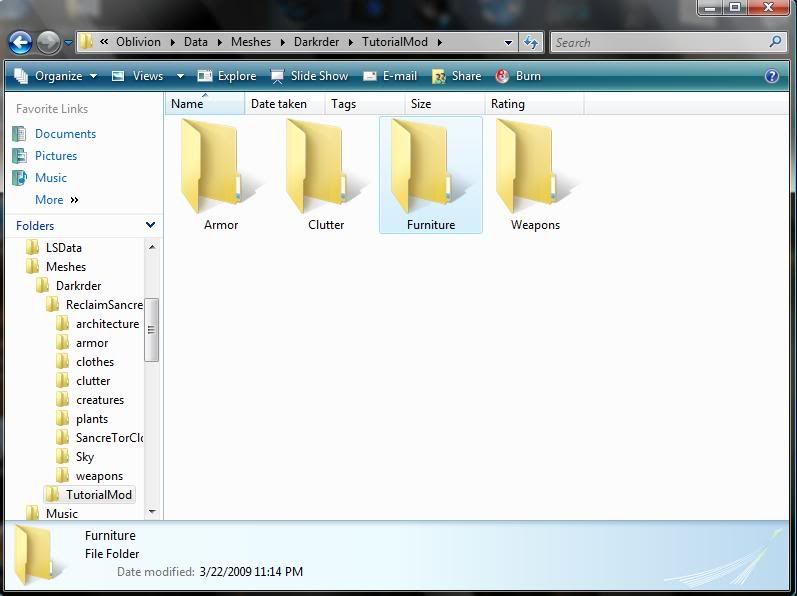
Inside every mod folder is a bunch of folders, one for each of the common categories used in Oblivion such as Clutter, Furniture, Armor, Weapons, etc.
Go to your desktop where you unpacked your mesh and rename the mesh to aaTestDoubleBed. Now copy and paste it into the new “furniture†folder you just made in your mod folder under:
Oblivion\Data\Meshes\YourName\YourModName\furniture\
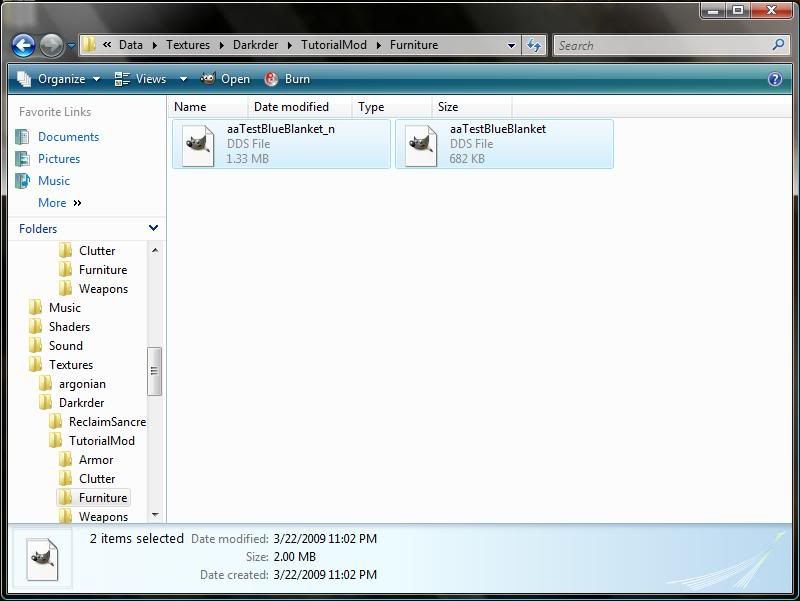
Now that your mesh is in place, you need to do the same thing in the textures folder. In Oblivion\Data\Textures you will create a folder with your name, inside that a folder for your mod, and inside that a group of category folders. Copy/Paste your texture and normal map into the furniture category folder!
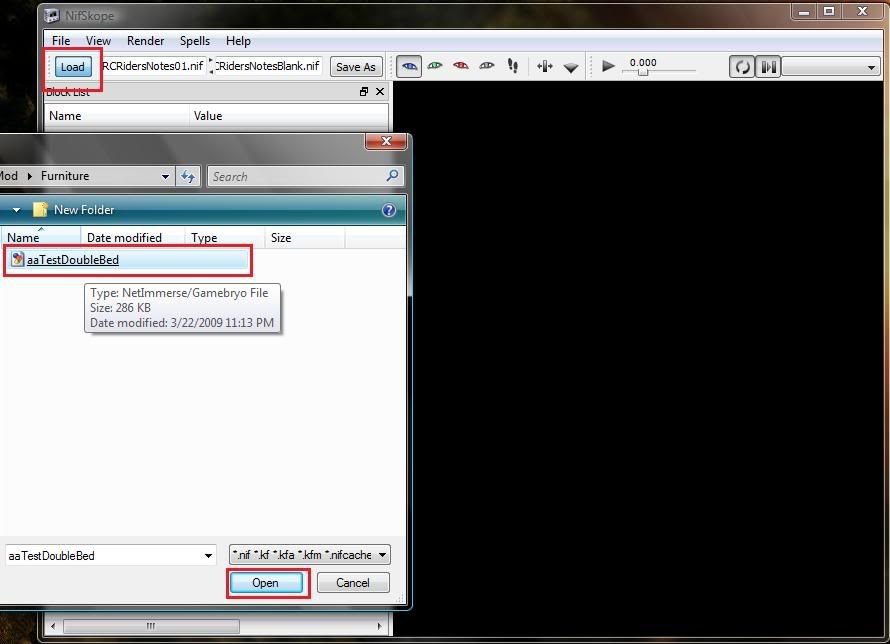
With your textures and meshes in place, it’s time to cue up NifSkope!
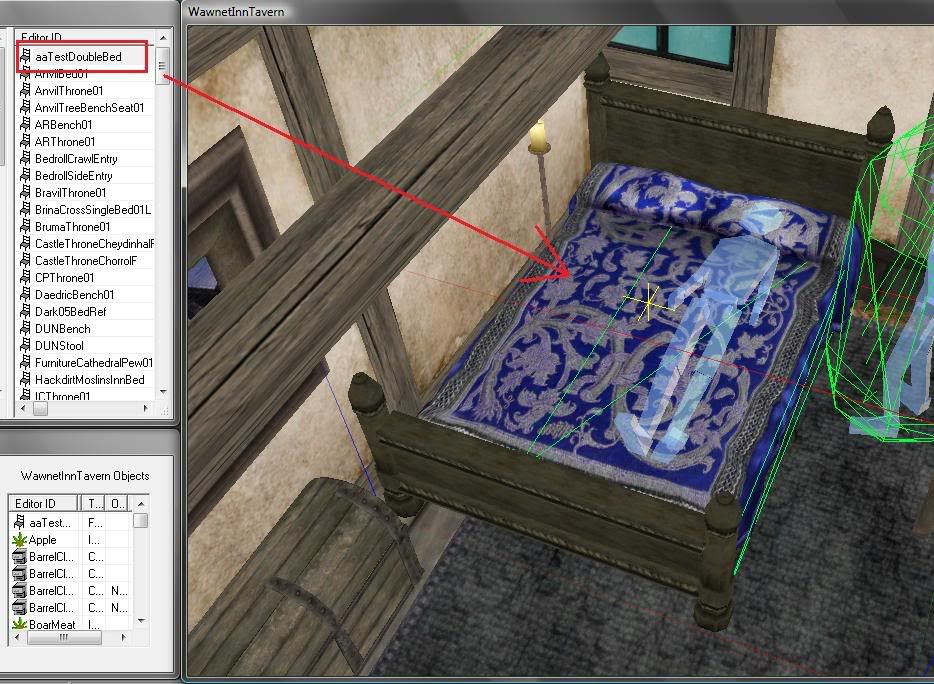
With NifSkope open, click Load and navigate to the mesh you just stashed in your Data\Meshes\YourName\YourModName\furniture folder! Then click open to open the .nif.
Your mesh will now appear in the window and in the Block List you will see a branch with a small arrow beside it called a NiNode.
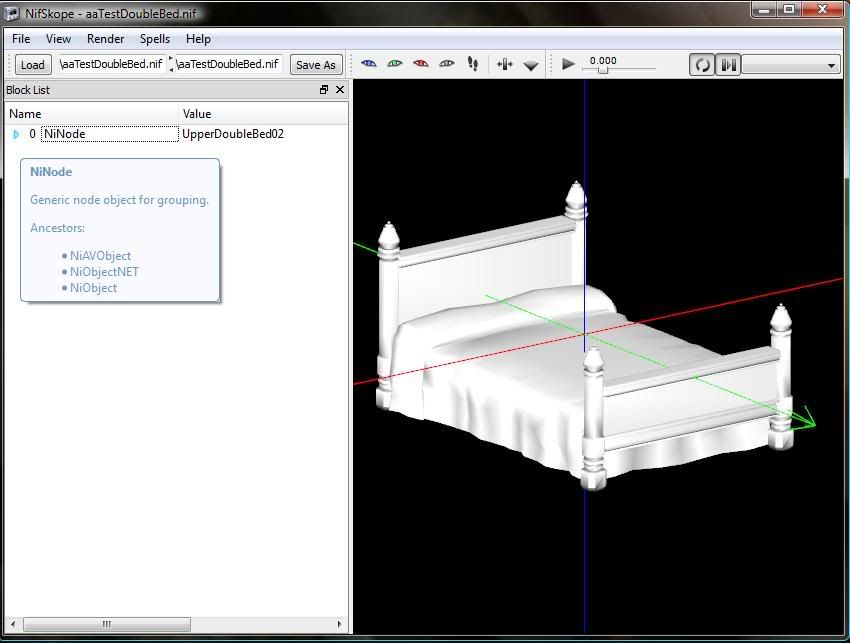
Click on the arrow to expand a tree of mesh properties.
The texture information is always located on a branch called NiTriStrips or NiTriShapes, This is called the “Texture Propertyâ€. As you can see, our bed has not one but 4 texture properties, so how do you know what to change? You can open each branch by clicking the arrows beside the, but the fastest way is to click the part of the model you want to change (in this case the blanket) and the NiTriStrip for that part will highlight in blue.
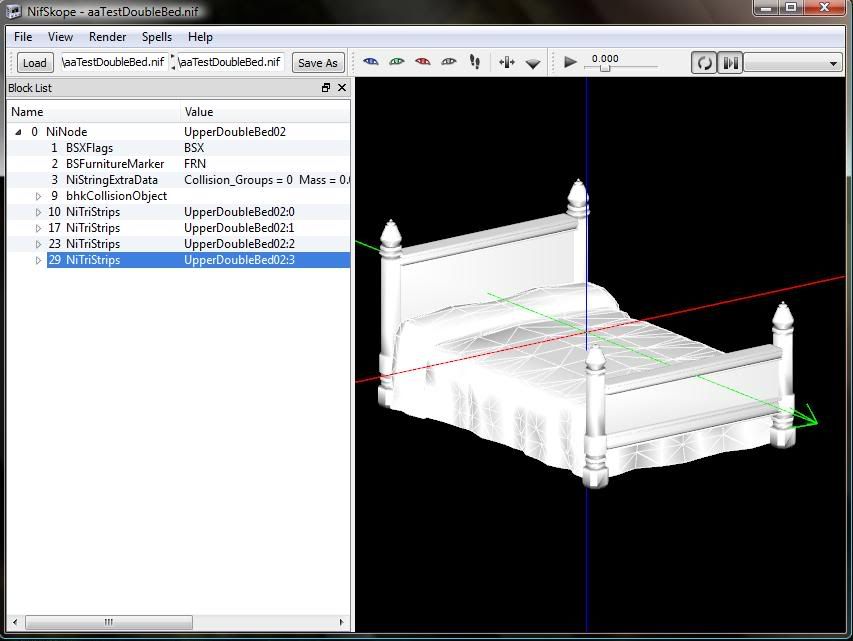
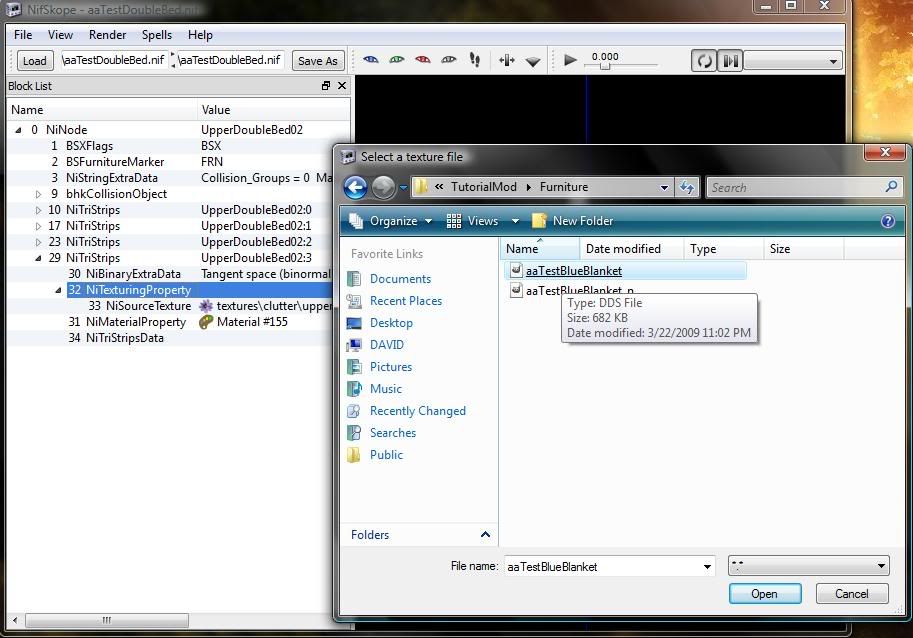
Click the arrow next to the highlighted branch to expand another tree. Then click the arrow next to the NiTexturingProperty to reveal a purple flower. Click the flower and navigate to the texture you stashed in Data\Textures\YourName\YourModName\furniture.
Smarty Says: You want to select the texture not the normal map. The game will detect the normal map automatically as long as they have the same name; you don’t need to select it.
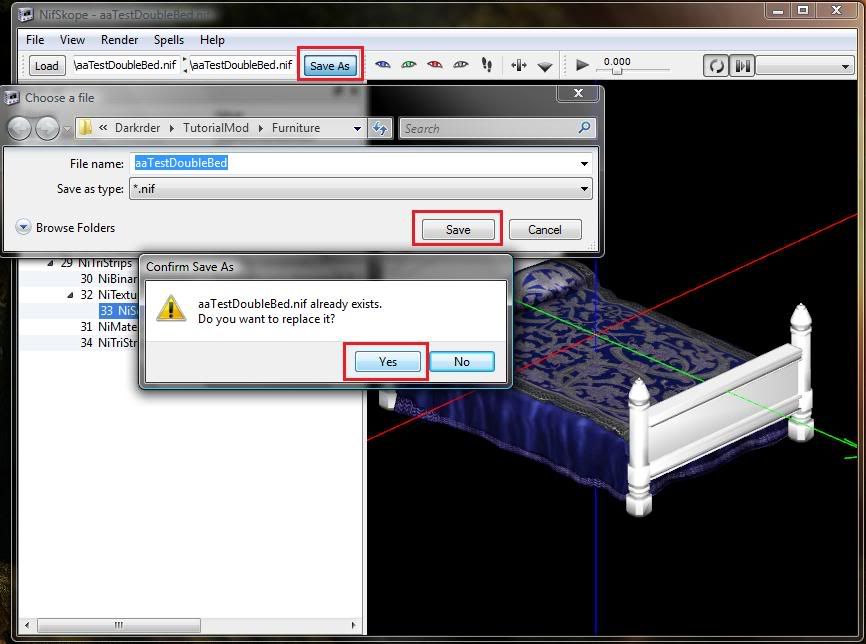
You will see the texture appear on the bed!
Now, you may have noticed that part of the model is still white, and you may be wondering “What about those textures? I don’t want a white bed!â€
Well, if a model has multiple textures (4 in this case) but you only change one, then there’s no need to unpack and add the other three textures. As long as you leave their texture property trees in tact the way they were when you unpacked the mesh, then the game will use those textures directly from the BSA without you having to do any extra work or clutter up your data folder with duplicate textures!
So, all that’s left in NifSkope is to save! Click the SaveAs button. A Choose File box will open and the name of your mesh will already be on the File Name slot. Go ahead and leave it, then click save. A message box will pop up saying that file already exists and would you like to replace it, say yes. That way the old mesh without the texture is replaced by the one you just added the texture to. When that’s done, go ahead and close NifSkope!
Almost there now! You have unpacked archives, retextured an image, made a basic normal map, and applied it to your model! Well done!
Section 06: Finishing Up in the CS!
Now that your model is in place and retextured with your snazzy new texture, it’s time to add it to a mod so you can see it in game! Now, this tutorial is NOT designed to teach you all you need to know about the CS, how it works, and why. All you will learn here are the basics of adding a furniture model. Other models follow the same basic steps, but with some obvious differences. There are plenty of tutorials out there to help you if you get confused with different objects and help is always available in the TESA Study Hall!
For this part of the tutorial, we will add the new bed model to the Wawnet Inn! To finish up, you need to cue up the CS!
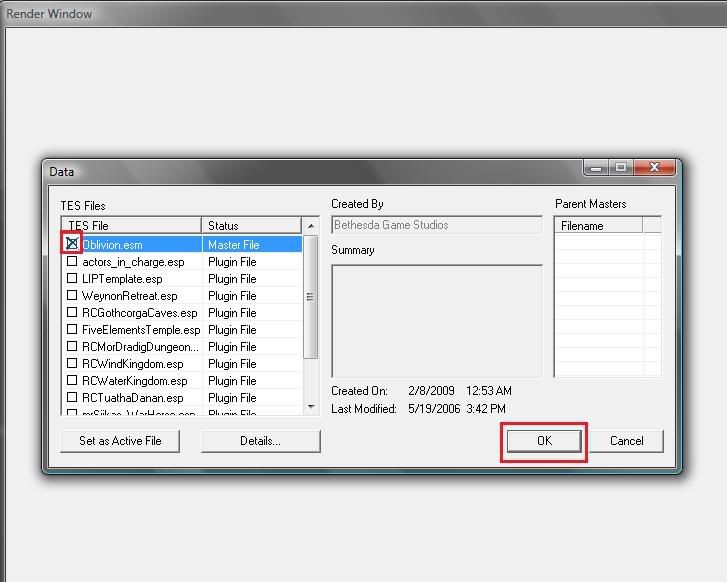
When it’s open, click File then Data so you can load your data into the CS:
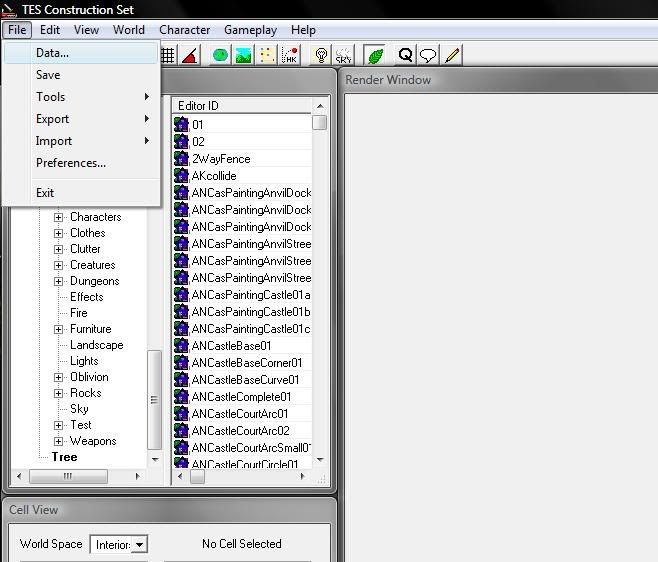
In the Data box, check the box next to Oblivion.esm only and click OK.
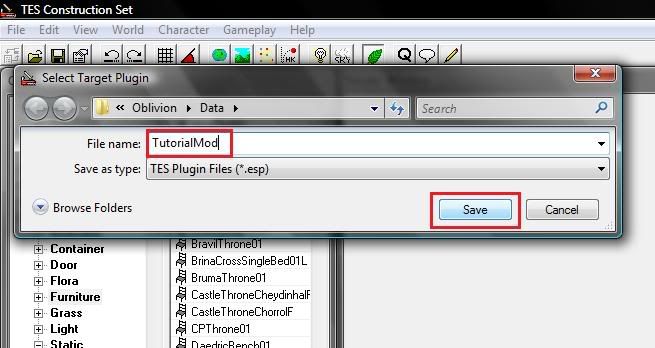
Like with the BSA Commander, the Oblivion CS might take a few moments to load, be patient. When it is loaded, begin by clicking save to create a new .esp (mod) file. Under “File Name†name your mod “TutorialMod†and click Save.
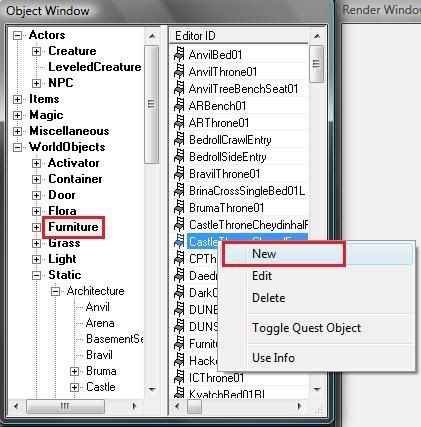
With your .esp saved, time to add the new model. In the Object Window under “World Objects†click “Furniture†to fill the list pane with furniture objects. In the list pane Right-click>New
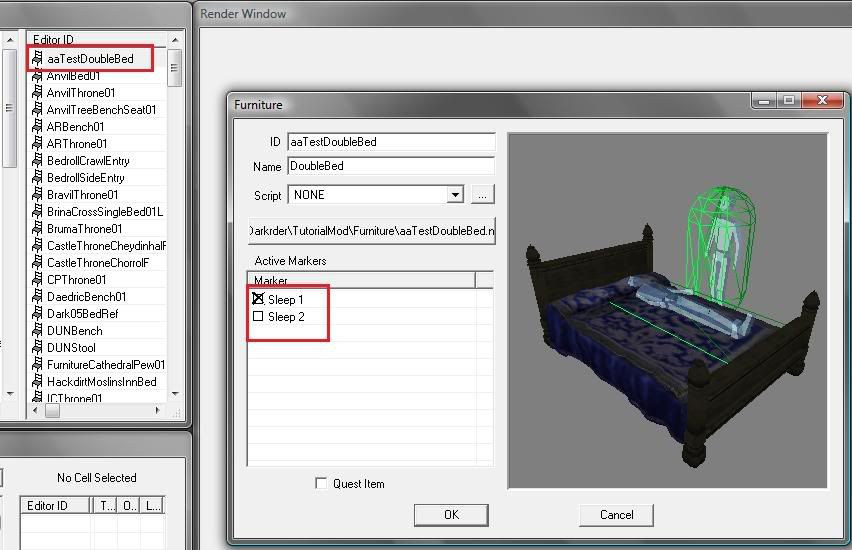
A furniture window will open. Next to ID you will type in a unique ID for your object. This is not the name you see in game, this is just its editor ID (the name it will have in the Construction set). Call it “aaTestDoubleBedâ€. Then where it says “Name†type Double Bed. This IS the name you will see in game when you get close to it. Click the button marked “Add NIF File†and navigate to your model in the data folder. Double Click on the model or click Open to add it to the window. Then Click OK.

Now, when you click ok, the CS will issue you a warning that the furniture has now markers. Click the “Yes to All†button.
Now, go back to the list pane in the object window and find “aaTestDoubleBed†in the list. Double click to reopen the furniture window for your bed. You will see the bed model has appeared in the window in all its glory. Under “Active Markers†you can choose the marker(s) that allow the player and NPCs to sleep on the bed. Check the box next to Sleep 1 and click OK.
Now you have added your model to the CS, click the disk icon on the header to save. Now there’s just one thing left, to add the bed to the game itself! In the “Cell View†window, the default worldspace is “Interiorsâ€. That’s exactly what we want. Scroll down the list and find WawnetInnTavern and double click to open the interior in the Render Window.
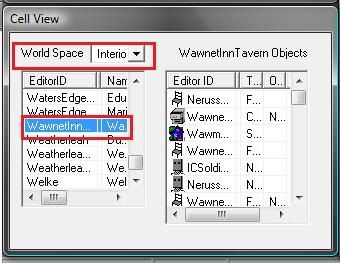
Smarty Says: For more help navigating the Render Window, CLICK HERE for a list of keyboard and mouse controls under “Part I: Creating an Interiorâ€!
Click once on the house visible in the distance, but be very careful not to move it. Zoom in on the bed in the first bedroom at the top of the stairs. Click on the existing single bed and click delete to erase it. Now, drag “aaTestDoubleBed†from the list pane and drop it in the Render Window. Use ctrl+z to gently lower the bed flush with the ground. Once it’s in place, save again, and close the CS.
You’re now ready to close the CS and go in game to see your bed! Run the Oblivion launcher and under “Data Files†check the box next to your new mod to load it when you start your game. Head to the Wawnet Inn near the Imperial City to see the new bed you retextured!
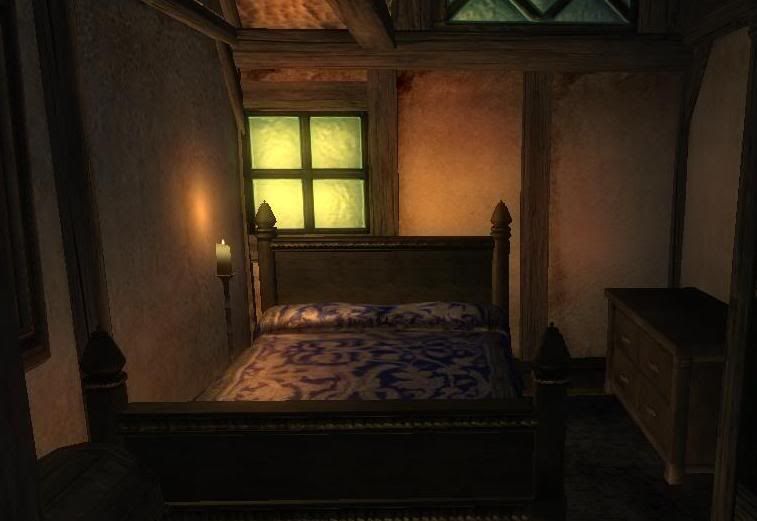
ALL FINISHED!
Congratulations! You have successfully completed the basic retexturing tutorial! You should be very proud of what you’ve accomplished and you now have the skills to expand and further explore texturing!
For Additional Tutorials on Retexturing, Check Out These:
I hope you have enjoyed this tutorial! Please post a reply and let me know if you have found it useful! If you encounter trouble navigating the CS, be sure to visit the Construction Set Class or post your questions in the Study Hall! If you encounter any issues or have questions specific to this tutorial, feel free to post them here!
Happy Modding!
DarkRider
-
Good point Echo!

That's what I ended up doing.
Thank you
Stan Kirby
-
I've installed GIMP to (x86) and I'm having no problems with it.
I'm using GIMP 2.6.11
Thanks Zay......................I meant to say 2.6.11 lol
I'm also up and running too!!!
-
General consensus is that GIMP is "easier to use" than Photoshop so I am attempting to install it and try it out.
I am using Windows 7.
I found (2) versions of Gimp: 2.6.8 (@ tesnexus) and 2.6.11 from GIMP site
Any suggestions? for install location?
Any suggestions on which version?
Thank you
Stan Kirby
Backed everything out from both versions and re-installed in Program files using 2.8.11 + dds and normal map plugins.
-
Many thanks to Hanaisse and IS!!!!

I just created the ugliest bucket known to man.
On to the classes

Stan Kirby
-
Well, no. Re-texturing items is not about the CS at all, it's all about NifSkope and your favourite 'paint' tool (ie: Photoshop, Gimp, Paint.Net).
It's actually fairly easy (and addictive!) once you learn the basics. Have a read through the Texturing section of The Enclave and perhaps take some time to go through the Classes there. NifSkope and Gimp are free tools you can download (links in the class tutorials).
In my opinion, texturing is much easier than modeling and those were the first classes I took here.
Thanks Hanaisse!
I have Nifscope loaded and working but dont know how to use it yet!! Time to dive in!
I also have Photoshop CS5 but have been waiting on the classes.
I'll give the Enclave Texturing a good look.
Thanks again.
Stan Kirby
-
I would like to "retexture" some existing items in in Oblivion.
Is there a way to do it via the CS landscape editor? I suspect not but thought I would ask.
As an example: Wooden bucket...................converted to granite, moss-covered bucket.
Is Nifscope the answer? I hope not cause I'm still not trained in it's use.
I have some ideas for a new mod/world that I want to create.
Once I get trained in modeling & worldbuilding then maybe the answers will come more easily.
Waiting patiently in the country in north Georgia, USA
LOL!!!!
Stan Kirby
-
Willie,
I changed the ini settings....................no help!
Restarted my laptop and all is GOOD!!!!!

Thank you!
Stan Kirby
Graphic Artistry: Lesson #1
in Graphic Artistry
Posted
Here are my in-game shots.
http://tesalliance.org/forums/uploads/1334292853/gallery_3835_324_523062.jpg
http://tesalliance.org/forums/uploads/1334292853/gallery_3835_324_113829.jpg
Here are my Hue shots.
http://tesalliance.org/forums/uploads/1334292853/gallery_3835_324_132733.jpg
http://tesalliance.org/forums/uploads/1334292853/gallery_3835_324_63596.jpg
http://tesalliance.org/forums/uploads/1334292853/gallery_3835_324_23309.jpg
http://tesalliance.org/forums/uploads/1334292853/gallery_3835_324_85362.jpg
http://tesalliance.org/forums/uploads/1334292853/gallery_3835_324_52722.jpg
Here are my Nvidia save as shots. They all look the same but are unique.
http://tesalliance.org/forums/uploads/1334292853/gallery_3835_324_59829.jpg
http://tesalliance.org/forums/uploads/1334292853/gallery_3835_324_67231.jpg
http://tesalliance.org/forums/uploads/1334292853/gallery_3835_324_40634.jpg
http://tesalliance.org/forums/uploads/1334292853/gallery_3835_324_31290.jpg
http://tesalliance.org/forums/uploads/1334292853/gallery_3835_324_4008.jpg
stankirby