DOWNLOAD MODS
Are you looking for something shiny for your load order? We have many exclusive mods and resources you won't find anywhere else. Start your search now...

LEARN MODDING
Ready to try your hand at making your own mod creations? Visit the Enclave, the original ES/FO modding school, and learn the tricks of the trade from veteran modders...

JOIN THE ALLIANCE
Membership is free and registering unlocks image galleries, project hosting, live chat, unlimited downloads, & more...


Vain
-
Posts
157 -
Joined
-
Last visited
-
Days Won
4
Content Type
Profiles
Forums
Downloads
Tutorials
Gallery
Store
Events
Everything posted by Vain
-
Ah you'll want https://discord.gg/ZAgDGTS I keep meaning to make a tutorial for what you're asking but haven't found the time.
-
I have no idea what you're talking about. I know Gamebryo is a game engine used by multiple Bethesda games. I know the Creation Kit exists for modding multiple Bethesda games. I know Havok Physics, Havok Animation, and Havok Behavior were used in the development of Skyrim and by extension I assume Skyrim Special Edition. I have no experience on needing to convert products or files the game was designed with...
-
Very true, I actually use a second hard drive for 90% of my computer needs now. That's just the default directory I think.
-
Blank .ESP Files and You If you are packaging a mod that would normally use only loose files and not need an .ESP - in order to make it use a blank .ESP it requires a few additional steps. Your .ESP should require Skyrim.esm as a masterfile. Once you have loaded your blank .ESP, save it Once you have saved your blank .ESP, reload the mod in the Creation Kit You may now package your loose files with a blank .ESP and should not encounter any problems for console or other users
-
The new Creation Kit for Skyrim: Special Edition is available directly from Bethesda.net rather than through Steam but is a little trickier. First download the Bethesda.net Launcher Run the installer as Administrator. The publisher should be verified and should be Zenimax. It will prompt you to select your language and the next screen asks you where you want to install it. The default file path is C:\Program Files (x86)\Bethesda.net Launcher. I typically use C:\Programs\Bethesda.net Launcher or D:\Bethesda.net Launcher because of the UAC complications you can encounter otherwise. Once you’ve selected your language and install location it actually installs it. Once installed it will typically go through an automated update at the same time. Just wait, eventually the application will open depending on how decrepit your computer is feeling. You'll then be prompted to sign in or create an account. This will be your credentials for their website and for the direct upload functionality to Bethesda.net from the new Creation Kit. Feel free to toggle Remember me Note* If you cannot download/install and are not in the contiguous United States of America, you may need to use a VPN! If you are having difficulties logging in (stuck on the spinning square) On windows 10 while you have a spinning square, open network and sharing center. Click change adapter settings. Right click on your active internet connection, select disable. Re-enable the connection in a few seconds and hope it works. If you have only a giant grey box Check to see if there is a sysinfo.dat file (under 1kb) in the launcher directory. If there is not, create a sysinfo.txt If your launcher is sliced in half/sideways/summoning Chattur'gha Make sure you meet the minimum system requirements Update your GPU Accept madness Bethesda considerately adds a large list of favorites to your sidebar, none of which are the actual program you’re looking for. Remove these extraneous icons by clicking the next to each title. Thankfully the Creation Kit starts with one of the first letters of the alphabet. Click the big button after selecting Creation Kit: Skyrim The installation box will pop up and display the default file path ...bethesda.net launcher\games. Change the directory to ...bethesda.net launcher\games\Creation Kit by selecting Change Location > Make New Folder and naming it Creation Kit. I hope you remembered to install the Launcher not in Program Files or Program Files (x86). It will also provide a link to read the EULA located at ...Bethesda.net Launcher\EULA\10\CKSSE_EULA.txt. I strongly recommend you read it. There is a lot of very important information regarding your rights and what Bethesda demands from you when you use their software. Failure to read the EULA and determine exactly what those things are places you at significant risk for the industry standard policy of “guilty until proven innocent” when it comes to perceived EULA violations. Once done with your reading material, clicking install will begin the download. Once completed, it’s installed. You’re not done. Shut down the Bethesda.net Launcher. Ensure it is not running in your System Tray. The only time you will ever use the Launcher with regards to the Creation Kit is if you have issues and need to update or reinstall the Creation Kit. If you use the Bethesda.net Launcher of other programs I recommend backing up the Creation Kit folder. Updates may occur without your knowledge and they are rarely beneficial for the end user. This can be done by simply copying the entire contents of ...Bethesda.net Launcher\games\Creation Kit and pasting it in ...Steam\steamapps\common\Skyrim Special Edition. Overwrite when prompted. Already properly installed? Start here! I recommend using Notepad++ for the next bit. You’ll want to edit the CreationKit.ini and CreationKitPrefs.ini. Open up the CreationKit.ini to start with. You’re going to be adding a lot of info into this in order to make the Creation Kit usable. Out of the box it doesn’t actually work. *Note: Many of these fixes seem to not have any effect. Using SSE CreationKit Fixes and placing the appropriate lines and sections in the Fixes ini file does. If you remember the old Creation Kit for Skyrim, setting up this .ini is similar. There's a [General] section, [Archive] section, and [Papyrus] section (among others). You can tweak this setting in your [General] section if you wish. [General] uGridsToLoad=5 This setting already exists and 5 is the default value. You can increase it (recommend not going higher than 7) if you want to load more of an area in the Render Window immediately (performance hit) or decrease it to 1 or anywhere in between to improve cell load times and performance. Also add the following line anywhere under [General] bAllowMultipleMasterLoads=1 Without this you will be unable to edit or create any mods that involve more than vanilla Skyrim including its own update file. But wait, there's more! There isn't an [Audio] section, so add that line right above the [MAIN] line and underneath the last option in [General]. Your [Audio] Section should look like this. [Audio] bEnableAudio=0 This stops 99.9% of all crashes in the Creation Kit. Don't ask me why, I don't even care, it works and it's beautiful and you'll love it. [MESSAGES] bBlockMessageBoxes=1 Turns off the annoying (but informative) popups when loading files in the Creation Kit. No more need to click through them all! The worst error messages will be preserved in the Warnings text box and EditorWarnings.txt file which is a new addition with the Special Edition Creation Kit. Now can we turn on the Creation Kit? Yes! Well, almost. You can, but do one last thing first! BACKUP YOUR CREATIONKIT.INI OR YOU MAY HAVE TO DO THIS WHOLE RIGAMAROLE OVER AGAIN. I mean it. Make a backup. I just compress the file in 7z in the same folder the original is in for ease of restoration in the event something bad happens to my CreationKit.ini. Running as Administrator should be second nature by now. It will pull up a prompt. Doesn’t matter. Unless you’re planning on actively working on scripts immediately there’s no need. You can always do it later. The Scripts.zip folder will remain in your Data folder whenever you need it. Once it's done the familiar Creation Kit splash screen will pop up and a blank gray box. After just a few seconds it will disappear and the default layout of the Creation Kit will pop up. No master files or mods are currently loaded. Everything is identical in appearance to the original Creation Kit except for a little 64-bit after the title and some menu changes. Feel free to adjust the layout of the various menus and boxes and then click the red X to close it. Optional INI File Tweaks Now we’re going to work on the CreationKitPrefs.ini file. This file remembers the window positions, Render Window settings, your account login for uploading, and numerous other important convenience and performance tweaks. [MAIN] bShowSoundMarkers=0 bShowActivators=0 bShowLightMarkers=0 bShowMarkers=0 I change all of these to 0 because toggling markers off is the first thing I do when I load a cell in the render window. [Bethesda.net] sUsername= Stores your Bethesda.net username in the Creation Kit for easier mod packaging/uploads to their website. [Bethesda.net] uiDefaultNumSearchResults=98 This is the number of mods visible in the upload/edit menu of the CK. It’s default setting is 98 so any mods over that number will no longer be able to be viewed or edited unless you increase the numerical value of this setting. [Papyrus] SDLCPrefix= This sets script fragment prefixes. Any script fragments you generate will have this in front of them to identify them as yours. It may only be 4 characters long and consist of only letters, numbers, and underscores. Now’s a good time to think about what you want your modder prefix to be. [Scripts] iOnScriptDblClk=0 This tells the Creation Kit what to do when you double click on a script in the Creation Kit. 0 (the default) value opens the script in the external editor you have associated with .psc files. 1 value opens the script in the Creation Kit (I do not recommend). 2 value opens the properties of the script in the Creation Kit. [Movement] iAutoSave Time= Sets how frequently the Creation Kit will autosave your plugin. The units are measured in minutes. I have personally never used this setting but it could be helpful if you are having an especially difficult time with lost work. Don't forget to backup the CreationKitCustom.ini if you modify it! It will make for easier restoration if anything happens to the .ini or your settings! Happy Modding! Blank .ESP Files and You If you are packaging a mod that would normally use only loose files and not need an .ESP - in order to make it use a blank .ESP it requires a few additional steps. Your .ESP should require Skyrim.esm as a masterfile. Once you have loaded your blank .ESP, save it Once you have saved your blank .ESP, reload the mod in the Creation Kit You may now package your loose files with a blank .ESP and should not encounter any problems for console or other users
-
-
Does it count as using a team if I just tell you how to put stuff in places? Now I kinda wanna do some of the subjects for the level design lesson...
-
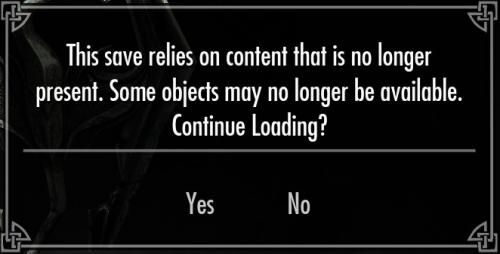
You may be able to skip the unfuzing and just rename the file... but doing it this way is a better showcase for a tutorial. And the voice files have been modified and will only work with this quest s'far as I know that's the definition of modding and no one's called me on breaking any rules yet.
-
From everything I've learned, not that I've looked it up anywhere, Skryim does not use .psc files and the CK does not use .pex files (except insofar as they are generated during compilation, a necessary step in order to get the CK to recognize player-made scripts).
-
I dunno what MO is... The .pex format is what is generated when a script is compiled. When compiling scrips that extend another script, the CK does not look at a .pex file, but searches only for the .psc. I ran into a similar problem with the vampirism scripts in skyrim. Dawnguard added new variables that were not present in the original script and so any changes to the Dawnguard script could not compile because they were not present in the original script. You see here where the .pex file is not used. Built in scripts do not have .pex files, these are only user generated. And I could not add the missing variables then compile the vanilla vampirism script without breaking the game. I had to add the missing variables to the original .psc file, NOT compile it again, save it outside the CK, and then compile my new Dawnguard script. Read the first post of this thread if you have any questions - it explains in further detail and may have your answer. So the issue here is you have all these variables that are not defined. You will need to define them either in your script or in the CampTent script. Since you only have the .pex file for CampTent you can only add the variables to your script but if the undefined variables are contained in the CampTent script, you are out of luck and will have to rewrite the CampTent script so that you will have a .psc for it.j
-
When you compile through the CK click on the failed script (nothing selected is why no helpful error message is visible) and post the actual error text here if you could.
-
A whole new world just opened up between this and google... I... I don't know what to do anymore... I will never play Skyrim again... I will only mod it...
-
Download from TESA! Current Build 3.0 What It Is Ever accept the gift of Lycanthropy from the Companions? Love running around as a wolf? Hate using the Wait function? Now you can be the ALPHA Werewolf! All other werewolves are just childish puppies in comparison to your glorious might! This mod enables you to leave Beast Form at will! It also continues the vanilla Werewolf leveling progression to Claw Damage up to level 100 (up from 50). The Ring of Hircine will also grant you the Blessing of Hircine - a constant buff that allows unlimited transformations regardless if the ring is equipped or not! You must equip the Ring at least once to gain this ability. How it Works After you turn into a Werewolf, change back at any time by holding the F key (by default your Point of View key). Recommend only using after you have completed the Deadric quest for Hircine and obtaining his ring as a reward. This ring removes the cooldown on Beast Form allowing unlimited transformations to the still-wet-behind-the-ears pup. Optional Files Dawnguard version continues leveling not only the claw damage but the damage resistance to level 100 (up from 50). Manual Installation Extract the file to your Steam>steamapps>common>Skyrim>Data folder. Manual Uninstallation Remove the .esp and the .bsa file. Bugs Report possible bugs via PM or comment. Future Development Possible upgrade to damage/damage resistance/feed healing depending on popular opinion. Functionality for the removal of the Blessing of Hircine if Lycanthropy is cured. Xbox 360 controller compatible. Tester Needed! Compatibility and Requirements Will not be compatible with any mods that modify these files - PlayerWerewolfQuest DA05HircinesRing Requires the following programs to run - The Skyrim Script Extender Also available on Steam and The Nexus and AFK Mods Thread for detailed script/quest discussion HERE.
-
Going to be messing with the script fragment now building a compatibility patch for someone who's been messing with it already... BY OUR POWER COMBINED... Start by either owning Dawnguard or making a backup of the QF_PlayerWerewolfQuest_0002BA16.psc Open up the PlayerWerewolfQuest in the CK. Quest Stages tab>Script Fragments>Advanced>Renamed Script I'm going to name it Vain_QF_PlayerWerewolfQuest This should leave the original script untouched - Yay! You didn't break the game! Duplicate and rename the PlayerWerewolfChangeScript.psc as well. VainWerewolfChangeScript.psc will do nicely. Nope - Crash to Desktop if you try all this... SkinNakedWerewolfBeastPlayer is undefined - define it by editing our new script in an external editor and add Armor Property SkinNakedWerewolfBeastPlayer Auto ;Vain01 Underneath the last line of code. You'll also have to change the kMyQuest drop down box above each script fragment for each stage on the quest to VainWerewolfChangeScript. Modifying Stage 1 scripts on the PlayerWerewolfQuest Under the already present kmyQuest.InitialShift() Adding Game.GetPlayer().AddItem(SkinNakedWerewolfBeastPlayer, 1) ;Vain01 Game.GetPlayer().EquipItem(SkinNakedWerewolfBeastPlayer) ;Vain01 These will now be lines 18 and 19 in the fragment. Modifying Stage 100 scripts on the PlayerWerewolfQuest Under the already present kmyQuest.ShiftBack() Adding Game.GetPlayer().UnequipItem(SkinNakedWerewolfBeastPlayer) ;Vain01 Game.GetPlayer().RemoveItem(SkinNakedWerewolfBeastPlayer, 1) ;Vain01 These will now be lines 82 and 83 in the fragment. Other functions have been moved around in the script fragment as opposed to the original not doing those changes unless I find any problems... the Dawnguard script fragment appears identical only included with the source code since the quest itself was altered.
-

Help with a script - how to spawn a non-hostile actor?
Vain replied to andrewmyles's topic in Papyrus 101
Well since you've only posted twice... I'm not sure you have a sufficient data pool to discuss unnecessary post moderation. As for occasional non-hostile draugr... this is what is known as an error. These creatures should always be hostile and it is when they are NOT that it is a mistake. Solution! Make a unique creature for NPC1. You want a draugr? Make a draugr that is not a member of player hostile factions. Such as when you reanimate a draugr with conjuration magic - not hostile unless you slap it around a bit. -
About objectreference functions enable/disable/reset used on multiple objects
Vain replied to Aqqh's topic in Papyrus 101
Or use a keyword! -
I know how to get quests to work, trigger properly, fix possible breaks the player may encounter (skipping stages, objectives, ect). No experience with character AI or boss fights but they are probably not more complex than quest scripting since... well... AI is usually governed by something a great deal like a quest.
-
 You might use an existing texture for the flow like a recolored light effect. Think Arvak in Skyrim. His skin is just a spell effect that was applied to a horse shape. Or my mod for Boerhiah's armor effect (sorry still skyrim). But I imagine its possible in oblivion. Chameleon and Mage armor spells put a skin over the player's armor you'd just be putting an opaque one over a flow of water that is either collidable or lights you on fire.
 -
Dangit with you and your... MOTIVATION!
-
I'm okay, I try to avoid scripting when possible
-
Gross. Quests suck. That script references yet another script - aaaFortMainQuestScript And at this point I'd have to be able to see the quest 'cause I'm really not that good at this. What did you think of my suggestion to just skip any scripting and simply modify one of the captains? Or maybe contacting the author who - since they released their scripts - may be okay with helping you add an additional captain since they could just tell you how they did it.
-
Well now that you mention it I don't know how to delete a post either. But spoiler tags are [spoiler]Text to be Spoiled[/spoiler]
-
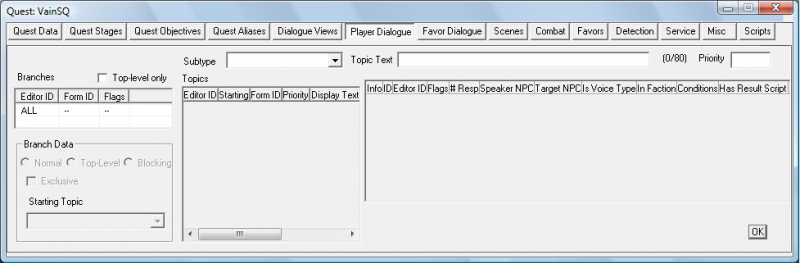
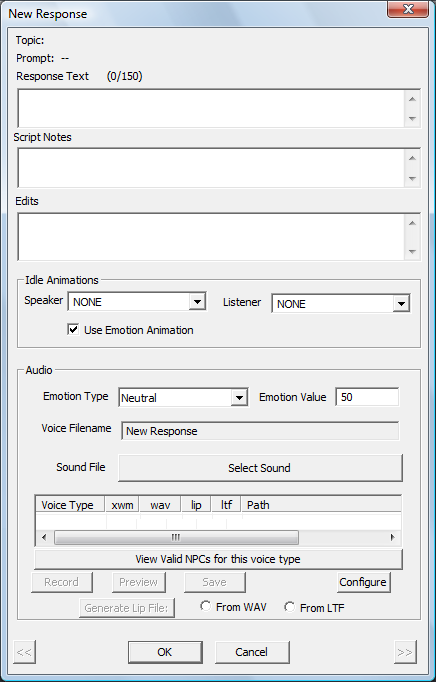
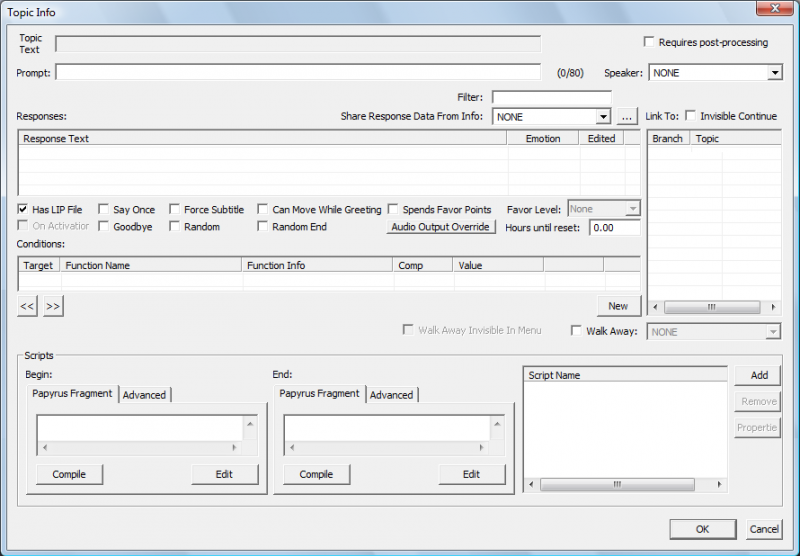
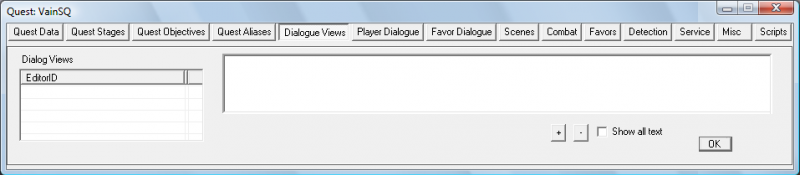
Part V: Dialogue Dialogue Views This is possibly the most difficult part of quest creation. Half of it is broken. We're not going to do anything on this tab until the very last possible second. Note* Conversations beginning from the NPC (Having them say "Yes, what do you want?" when activated or them initiating the conversation) will require that information placed here. But again... TO THE NEXT TAB! Section A: Player Dialogue In order to create fully voiced dialogue there are no less than THREE different programs in addition to the Creation Kit needed. Voice File Reference Tool (VFRT) - Allows you to look up dialogue in an easy to navigate GUI by word or file name without extracting anything. BAE - Allows you to extract BSA files - in order to use any dialogue (as with any vanilla file) you should duplicate and rename it and package it as part of your mod. This is how you do that. Requires Windows Vista or later. Unfuzer CCP Edition - Allows you to decompress the FUZ files for Skyrim's vanilla dialogue into LIP and WAV files and/or recompress LIP and WAV files into a FUZ. Your new best friend. You need to know how to use each of these programs for this next section. They are not difficult to use and do just about everything all by themselves. Dialogue Branch: Groups Topics together. They allow the dialogue system to: Organize and distinguish between dialogue trees. Each Branch represents a line of the conversation. Account for the fact that the player can enter and exit dialogue at any time, providing a means for the player to reenter an interrupted conversation. An individual branch can only have one NPC speaker and can have infinite topics attached to it. A new branch is required for every different NPC speaker. On the Dialogue Views tab color for these matters. Yellow = top level. Green = blocking. Blue = normal. Topic: Holds and organizes Infos. Info: NPC dialogue lines. Say Once: Buggy. Avoid when possible. Tends to break quests. Now that we're here we need to know a little more about the voice our NPC is using. The Archmage Savos Aren uses the voice type MaleCondescending. That jerk. Using this data we can use the VFRT to go through all the lines that voice type can speak and construct a conversation from them. Like the following: The .FUZ are the file names in the Skyrim - Voices.bsa - what we will be extracting with BAE. Go ahead and do this now. Using Shared Dialogue is supposed to be easier, but life is pain, Highness. Anyone saying otherwise is trying to sell you something. Now that we have our very stilted and contrived conversation structure, let's create it! Create a new branch in the Branches section. The name that pops up is the name of your quest. If you hit OK the CK will remind you that it is already in use by the editor so add Branch1 to the end of it. Hit OK and another prompt for the first topic name pops up. Feel free to shorten it but make sure to number your topic. Do not delete your branch and remake it once you have created it. Reload your plugin instead. Deleting a branch doesn't delete it. Sometimes the CK can remove deleted items from plugins... usually not. More on that later. Now you can choose your topic subtype. This dialogue isn't a Rumor or a ForceGreet package so select Custom. With your topic selected, fill in the Topic Text (our player's first line) and create a new Info in the big box on the right. If you find you have to click twice sometimes, that is because the first click is the CK running a spellcheck on what you just wrote! Big friendly box! Can't do much here yet so hit OK! Woah... new box such big much options. Topic Text: The Topic Text inherited from the Info's Topic, if any. Can't be edited from this box has to be done on the Player Dialogue tab. Prompt: If left blank, the prompt leading to this Info will be the Topic's Topic Text. If filled in, this text will be used instead. Useful if your Topic Text instead contains a summary of what is being said instead of the actual dialogue. Speaker: Choose from a drop down list the NPC speaking this line. Share Response Data From Info: Select a SharedInfo ID to acquire the response lines from that Info. This allows you to reuse the same lines in multiple places. This is why shared dialogue is easier. The Filter box, immediately above the dropdown, filters the SharedInfo IDs by the text you specify. The elipses (...), immediately to the right, will open the selected SharedInfo form. Responses: The list of Responses (individual, sequential lines) that the NPC will say. Flags: Has LIP File: Whether the game should expect a lip-data file for this line. We're going to have these since our vanilla dialogue comes with .LIP files. On Activator: Not used. Say Once: If checked, this Info can only be said once by any given Actor. As with Run Once you only want to use it his if you never want the player being able to see this ever again. Goodbye: If checked, when this Info (line of dialogue) is completed, the conversation will end. Force Subtitle: If checked, the subtitle for this line will always be displayed, regardless of the player character's distance from the speaker. DOES NOTHING! WOOO! Random: If a Random Info qualifies, it isn't said immediately. Instead, the Info is put onto a stack. If the next Info is also Random, it's put on the stack. The stack keeps building until an Info that is not marked Random is found, or an info marked Random End is found. The final Info is then added to the stack, and one of the Infos is selected randomly. Can Move While Greeting: If checked, if this Info is a Hello, the Actor can continue to move while speaking the line. Has no effect on any other line. Random End: Used to mark the end of a set of Random Infos. Technically, Random End is only necessary if the next qualifying info is also Random. However, it's good practice to end all Random Info sets with a Random End. Spends Favor Points: Not used. Favor Level: Not used. Audio Output Override: Allows you to select an Audio Output Override. The most common use of this feature is to select a different audio falloff radius (for example, SOMDialogue3D8000), which will allow the dialogue to be audible at a much larger radius than usual. Hours Until Reset: After this line is spoken, the speaker will not say it again until the specified time has elapsed. Conditions: The conditions that must be satisfied before this line will be spoken. VERY IMPORTANT! I recommend: GetStage: Dialogue triggers on a specific quest stage or even disappears when another stage triggers. GetQuestCompleted: Dialogue goes away when the quest is done or won't trigger until a quest is completed. GetIsID: Dialogue will only be spoken by this actor - you don't want every bartender to say these lines meant only for the Archmage. Copy All Conditions and Paste Conditions right click options. Save you time if you have a conversation taking place with the same conditions. Link To: The next line of dialogue that will be spoken in the conversation. When this Info is finished: If there are no Topics in this list, or none of the Topics have a valid Info, the Actor's top-level Topic List will be displayed. If one or more Topics with valid Infos in this list, a Choice List will be presented, allowing the player to select the next Info. If Invisible Continue is checked, only one Topic may be placed in this list. When this Info is finished, the next Info will begin automatically; no player prompt will be displayed. If Walk Away is checked, the dropdown becomes enabled, allowing you to select one of the Topics from the list above. If the player backs out of this Info's Choice List, the Walk Away Topic will be spoken as dialogue ends. If Walk Away Invisible in Menu is checked, the Walk Away Topic will not appear in the Choice List. Scripts: Don't worry. These will be nothing as scary as the first script, more like the little objective scripts we made. Begin Script: This script runs when the Info is played, when the Actor starts saying the line. End Script: This script runs when the Info is finished, when the Actor finishes speaking. In practice, it may take a second or two after dialogue has ended for this script to trigger. Script Add/Remove/Properties: Allows you to add, remove, or edit the properties on any Papyrus scripts attached to this Info. Here's a good example: GetOwningQuest().SetStage(10) GetOwningQuest().SetObjectiveDisplayed(10) This tells the script to look at the quest it's assigned to (scripts are very stupid, have to be told everything) and what to do. I want the last Info in this conversation to advance the quest to Stage 10 and to display the Objective on the screen for the player. We're still making the first one so let's get back to that. Set the Speak to Savos Aren and set up your conditions. Condition == 1 means it has to be true. Once you're done make a new Response which will pop up in a new box. This box looks familiar! From our conversation outline we know Savos' first response to the player will be: Let's just hope it stays this way for a long time. Uncheck Use Emotion Animation and skip down to the Audio section. If you View Valid NPCS for this voice type only Savos Aren should appear. Hit OK and then open it up again. There should now be an entry for the audio file. Record a few seconds of silence to actually generate the file and SAVE (optional). Note the file name and path. It will be something along the lines of: Data>Sound>Voice>Mod Name.esp>Voice Type>Filename.xwm Hit OK Now remember when we made our Branch it prompted us to make the first Topic? Right click in the Topic list and make a new one for each line our player will say. Four in all. Fill in the lines for both player and Savos as we did for the first topic and record a few seconds of dialogue for each and note each file name. Now we get to go through and use the Unfuzer on those extracted .FUZ files of ours... I recommend doing this one at a time as it is easy to get mixed up moving back and forth between files and folders so much. UnFuze the .FUZ files into their .LIP and .WAV files and rename them to their corresponding files in your mod's Voice Type folder and replace them. Once they are there, reFuze them. There is a rare bug where the Skryim engine will not play back files in a different format. Best to head it off. Don't forget the script on the last Info to trigger the quest to advance to stage 10! AND SAVE! 'Cause we're going back to the Dialogue View tab... Create a new View keeping the same name convention we've been using... and right click in the big empty field next to it. Select Insert Branch into current View and the branch we created should be the only thing on the list. Make sure Current Quest Only and Current Dialogue Type Only are checked and hit OK. That's all you have to do but if you want you can drag your different Topics around and see how they all connect. Check Show All Text at the bottom if you want - this is just for the editor. Hit OK. Now go back through all of your files and double check the scripts. You'll want to make sure that all the properties have filled properly (editing them and telling it to auto-fill should fix it, if not... you may have bigger problems). Smarty Says: Not all Creation Kit errors are nonsense! If you encounter errors when loading your plugin that are specific to your plugin then follow up on them! And you are done. Save. Go quest. Also - Uploading to Steam is hard... Arthmoor has saved us! Arthmoor has pretty pictures on his tutorial. Find where Wrye Bash installed, usually something along the lines of Steam>steamapps>common>Skyrim Mods>Bash Installers From there create your mod's folder including all subfolders such as meshes, voice, scripts, ect. Copy all the loose files used in your mod into their appropriate subfolder (For scripts you only need the .pex files but can include the .psc files for documentation if you so choose) Now open Wrye Bash and switch to the Installers tab where Sorcerer's Silence (or whatever you named your mod) should show up and make sure it has no errors. Anneal if it says it's not in the proper state and Install Missing if it complains it's missing files. Open Archive.exe in your Skyrim directory and click on the ellipses (...) next to the Root Dir and find the mod folder we just made in the Bash Installers folder. Select Misc, Voices, Retain Directory and File Names. When in doubt on if you need a folder, check the box. The Archive will ignore folders you don't have box check or not. Leaving the Archive.exe open switch to the Bash Installers folder and drag all your files EXCEPT for the .esp into the Archive window. Now you want to Save As using the same name as your .ESP Now you can upload the .ESP and the .BSA to the Steam Workshop through the Creation Kit Extra Credit: Clean your mod with TES5Edit Test it in-game
-
This looks like pretty complicated stuff... I've indented it to make the IF statements easier to point out... What this tells me is that we have multiple scripts dealing with this not to mention the quest and fragments attached to that. You are biting off a really big piece of work here. Stuff that looks like what you're looking for - Message Property GuardCaptain Auto ActorBase Property CaptainA Auto ActorBase Property CaptainB Auto ActorBase Property CaptainC Auto Quest Property RandomQuest Auto Quest Property PlayerQuest Auto bool Property hasCaptain = false Auto aaaFortRandomQuestScript - We're going to need this script. It seems to actually handle the Captain information. This script that we're looking at here seems to control if, when, and how it starts running. MapMarker.PlaceActorAtMe(CaptainA) ElseIf (captain == 1) MapMarker.PlaceActorAtMe(CaptainB) Else MapMarker.PlaceActorAtMe(CaptainC) EndIf This I'm not sure how it works (again, I suck at this) but there's probably a reason one line says ElseIf and one line only says Else but adding your captain (CaptainD) into this little bit of the quest is not going to make him appear. We need to modify at least one other script AND the quest(s) involved. What I recommend... is actually taking Captain A, B, or C and changing them into your Captain D - instead of adding an entirely new captain just reuse all the old forms - no need to jump into this giant tub of flesh eating slugs. P.S. You may wish to delete your double post and throw that big long script into some spoiler tags.