DOWNLOAD MODS
Are you looking for something shiny for your load order? We have many exclusive mods and resources you won't find anywhere else. Start your search now...

LEARN MODDING
Ready to try your hand at making your own mod creations? Visit the Enclave, the original ES/FO modding school, and learn the tricks of the trade from veteran modders...

JOIN THE ALLIANCE
Membership is free and registering unlocks image galleries, project hosting, live chat, unlimited downloads, & more...


Vince
-
Posts
469 -
Joined
-
Last visited
-
Days Won
13
Content Type
Profiles
Forums
Downloads
Tutorials
Gallery
Store
Events
Everything posted by Vince
-
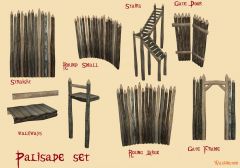 Washington, if you don't get a resolution soon, I should be able to solve your problem when I get home from work. Is it a load door (which transports you to another location) or an animated door that just swings open and closed?
 -
Is this something you UV mapped yourself?
-

From the album: Vince's Screen Shots & Such
-
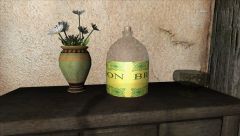 Nice work. Try changing the apply mode for the translucent glass part from APPLY_MODULATE to APPLY_HILIGHT. Once you do, you may want to tweak the transparency of the normal map to get just the right amount of reflection. Also, a glossiness of around 20 would be a good start.
 -
I found both links in your topic on the OF broken. You might want to have someone else check to make sure it's not just me. They both work correctly from here.
-
 This is very nice work, washington. When I first saw the thumbnail, I thought it was more clutter by Meo. If you made the well in Blender, you might try an experiment. Try using Mark Sharp along the vertical edges of your octagonal well and adding an Edge Split modifier. Set Smooth and see how it looks. If you like it, apply the modifier and export it. Alternately, you could see how a small bevel would look on those edges. Since all the vanilla wells are round, a polygonal one would be a nice addition.
 -
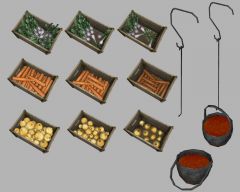 Nice Onions. As donnato said, maybe you're being a bit too thrifty with polys (referring to the hooks and pots). Overall great work (I would expect no less).
 -
From the album: Vince's Screen Shots & Such
-
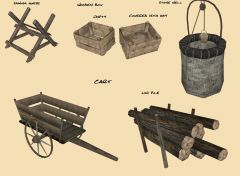
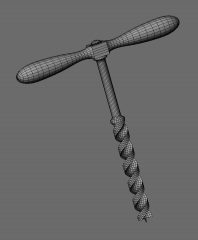 Thanks for the kind words everyone. Washington, yes it's more polygons than one would normally want for a clutter item. I tried it with less and it really didn't look good at all, especially the helical surfaces. In this particular case the auger will spend most of it's time in a tool box or the player's inventory. In fact, the player can remove it from the toolbox into his inventory and never see the actual model, only its icon. (Although I hope at least some will look at the actual item ). Donnato and John, I'm really working to improve my modeling technique. Quads have several advantages, especially when modeling a humanoid head. I'm also trying to vary the poly size according to the curvature of the surface. Quads or not, having a really "clean" wireframe is essential for complex models to look their best.
 -
From the album: Vince's Screen Shots & Such
I'm working on a revision to my shack mod. The forge I was working on is too complex, lowering the FPS which is already challenged by the exterior home (the forge has more that a half-dozen animations running). So, I'm adding another fixup. If the player mounts an anvil on a stump out back, he can get a boost to his armorer skill when nearby. The fixup requires drilling holes in the stump to mount the anvil. So, I made an auger. I'll work on the texturing next. -
I'm not sure that's true. Although usually no normal map means the texture doesn't show or doesn't show properly, that's not true of animated textures. There are two kinds of animated textures supported in Oblivion: transform and flip. Transform textures change the UV mapping in real time. Flip textures require a set of individual textures that are shown in sequence. I believe you can do what you want with a transform animated texture. If you're interested, I can wip up a working one this weekend that should give you a head start. EDIT: 'Sorry, I didn't read your original post as carefully as I should. Have you tried your flip texture without normal maps and verified it doesn't work?
-
There were some questions on the shouty recently concerning exactly what texture baking is. I've included some notes, examples, and links here that may help clarify the issue. Relative to the initial question, one useful answer can be found at: Answer to "What is Baking". For our modding applications, baking normal maps is especially useful. There are two basic methods: baking a normal map from a high poly model to applying to a low poly version and creating a normal map from a 3D model for application to an unrelated model. If you wish to save polys for faster frame rates in game, you can create a low poly version of your 3D model, bake a normal map from the original hi poly version, and apply it to the low poly version to get a rendered image that looks almost as good as the original with many fewer polygons. You can do this directly in 3D modelers like Blender (see: Baking Bump and Normal Maps in Blender). You can also do it with either of two powerful, free programs: xNormal and NVIDIA's Melody. You will find many tutorials on this method on the web. You can also bake a normal map from a 3D model for use on other, unrelated, models as a texture. Say you wanted to create a vase with a vine texture. You could create a 3D model of the vine, bake texture maps from it, and map the texture to the vase. See for example: . As a second example, I needed a coarse metal mesh for a device I was making for a mod. I created the model in Blender, but it was around 700,000 polys, certainly not practical for use in game. So I baked texture maps from it and applied the texture to a simple plane. The final result is reasonably convincing and only two polys, as you can see: . This method can be accomplished in Blender by rendering the model in a particular way, using a special material. There is a relatively brief description of the process in the Blender manual, see: Creating Normal Maps from a Model. There is a detailed tutorial on the process at: Creating Normal Maps from a Model. There was another detailed tutorial that appears to no longer be available on the net. I have the full tut and can upload it if the Blender manual and tutorial listed are not enough. BTW, if you use this process, make sure to save your Blend file so you can use the special material and rendering parameters with other models later.
-
From the album: Vince's Screen Shots & Such
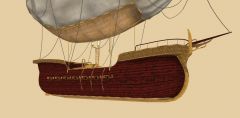
I've uploaded this to give others some idea of what FF can do. BTW, you can use FF standalone as a procedural texture generator. You don't have to have PhotoShop. -
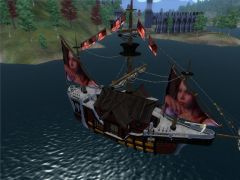 Red sails in the sunset. There must be a storm coming.
 -
You can create .bsa files with BSA Commander using the default compression that are readable by all. I've used .bsa's created with BSA commander, following the steps listed on the CS Wiki at: Creating BSA Files with BSA Commander for my Abandoned Mountain Shack. At present, the .bsa is around 75 MB uncompressed and just under 40 MB compressed. There have been more than 20K downloads so far and, although there have been hundreds of comments, there have been no complaints about the .bsa. If you find OBMM works for you, that's great. I just want people to know that BSA Commander is a reliable option for those not using OBMM.
-
 Very nice. I do remember how it looked before and this is better.
 -
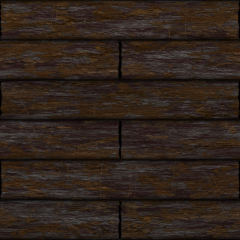
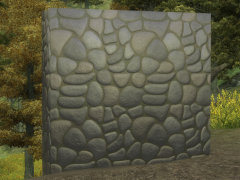
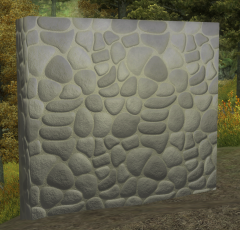
 donnato, This image is a screen shot in Blender. So, only the diffuse map is applied. The surface contour is the same as that of the previous stone wall images. Those were screen shots in game so do show the 3D surface texture.
 -
From the album: Vince's Screen Shots & Such
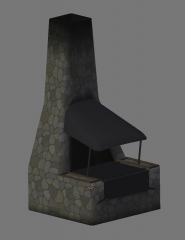
Well, I've finished the initial modeling and textures. Now all I have to do is make it look old and used with dents in the hood, scorch marks on the wooden tray boxes, whitish ash stains on the grill, smithing tools all around, etc. Oh, and add the animated bellows and the embers with animated texures. 'Shouldn't take more than a couple of months. Sigh -
From the album: Vince's Screen Shots & Such
This is the best I can do right now. Once I see the texture applied to the forge in situ, I may tweak it further. -
 Thank you for your comments. For things like weapons, I do want that brand new look. After all, they are fantasy weapons. However, for the forge and its stone texture to fit in with the Abandoned Shack and surrounds, it needs to be more realistic, worn and dirty. So, 'more dirt on the way!
 -
From the album: Vince's Screen Shots & Such
I've made some subtle improvements to the texture to make it a bit less bland. Combined with the smoke and heat stains of the forge, this should be about right (I hope). -
John, As you implied, loading the GIMP or PS just to view an image takes too long. Besides NVDIA's thumbnail viewer, NVIDIA has a .dds viewer, WTV. It's fast and free; see: Windows Texture Viewer . The other option is XnView which is free, loads quickly, and reads many formats, including .dds. Vince
-
Meo, I'm glad to see you here. In Modding Schools > The Enclave > Modding General there is a Clutterers Guild. You might look it over and find some things missing that you could contribute. One with your modeling skills is always welcome here. I hope you'll stick around.
-
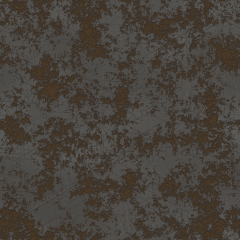
From the album: Vince's Screen Shots & Such
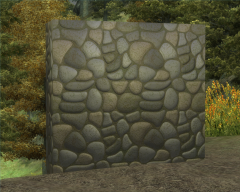
I'm working on an interactive forge and decided I wanted a new stone texture. I created this one from scratch. I believe it will be a bit more lively when stained by the ground along the bottom and by smoke and heat on many parts of the forge. We'll see as there's lots left to do. -
Tosky, you can change the glossiness by changing the Glossiness parameter in the block details of the NiMaterialProperty block in NifSkope. Alternately, you can change the glossiness, as donnato suggested, by changing the Hardness parameter in Blender. The Glossiness in the .nif file is 1/4th the Hardness parameter in Blender. You need to use a 2D graphic program to change the alpha value of the normal map. If you have trouble changing the alpha value in the GIMP, see: Creating Transparent Textures, an Alternate Approach here at the Alliance. Note: when you make the normal map partly transparent, you do not need to add a NiAlphProperty block. Looking at your screen shots, it appears that you changed the Apply Mode from APPLY_MODULATE to APPLY_HIGHLIGHT. I notice horizontal streaks in the texture of the blade. Maybe there's an issue with the UV map?