

DOWNLOAD MODS
Are you looking for something shiny for your load order? We have many exclusive mods and resources you won't find anywhere else. Start your search now...

LEARN MODDING
Ready to try your hand at making your own mod creations? Visit the Enclave, the original ES/FO modding school, and learn the tricks of the trade from veteran modders...

JOIN THE ALLIANCE
Membership is free and registering unlocks image galleries, project hosting, live chat, unlimited downloads, & more...


eqlipse
-
Posts
27 -
Joined
-
Last visited
Content Type
Profiles
Forums
Downloads
Tutorials
Gallery
Store
Events
Everything posted by eqlipse
-
So I decided to create a better Ohmes-Raht race...
eqlipse replied to eqlipse's topic in Skyrim Mods
Derp. The last upload contained an outdated esp, which was pointing to the wrong head tri's, as well as having incorrectly loaded presets, etc. Correction to this problem: http://www.mediafire.com/download/pjokbbwzxtepe3z/ABOR_alpha_003.rar -
So I decided to create a better Ohmes-Raht race...
eqlipse replied to eqlipse's topic in Skyrim Mods
I've got an alpha build up for this. REMINDER: the male part of this mod is completely unfinished, and thus looks shitfaced. -
So I decided to create a better Ohmes-Raht race...
eqlipse replied to eqlipse's topic in Skyrim Mods
To-do list: Male half of the mod. This will be a lot of work, since the mesh is currently Vanilla. I know, I know, there are already mods out there for nude male bodies; I might borrow a bit from them, but I was going for a different feel and appearance for the males in my mod. Sort of a whipcord, lean and lethal build, rather than bulky, muscled, or smooth-and-muscled. The textures are also going to need a LOT more work for this part of the project. tail (model and textures... I've worked on the textures a little bit already, but I want to do more, and the positioning for the tail is slightly different in game than it is when I've got it loaded in the paint program). There is a male and female tale, so the textures will probably vary a bit between them, but I'm mostly concerned with the mesh. I'm not sure what I'm going to do with it, but I wanted something different from the Vanilla mesh, and a wee bit more unique (Like a tapered end instead, perhaps? Or tufts of fur along the length?) Hair. I'm not sure if I'm going to do this or not... it looks like it will be a pain in the ass. But I wanted the race to come packaged with its own unique hairstyles, since not every one uses hair mods and I want something which works a bit better with the ears (rather than have the ears magically stab through the hair, I'd like the hair to flow around the ears). -
My work in modding skyrim.
-
-
From the album: Modded Skyrim
-
From the album: Modded Skyrim
Almost forgot! This is what came of re-working the ears' UV set and redoing the textures. -
From the album: Modded Skyrim
Re-uploading, with some censorship for the naughty bits I've banished the seems for the character model! Decent bit of texture work, if I do say so myself ^_^ Said seems should remain banished for any body type within the UNP family, but I'm currently working with the UNPBB, UNPC, and UNPCM models (the last one being accessible at http://mod.dysintropi.me/unpc-modest/), which means it will probably work best with those. -
So I decided to create a better Ohmes-Raht race...
eqlipse replied to eqlipse's topic in Skyrim Mods
Small update. I banished the seems from the female model for the feet, hands, neck, and ears: I've also finished work on the head tris (chargen and racial morphs) for the female model, with heavy inspiration for the chargen eye morphs from the Ashen Race's slanted oriental morphs (no I didn't copy them, but I liked them enough to make something quite similar). There's only one thing left that I was considering working on for the female model, and that's some custom hairs, but I don't feel like doing that right now... ... because I took a look at the character model for the males. Seriously, Bethesda? You were so lazy with the character that there was literally NOTHING under the loincloth? FFS, that loincloth has more polys than it would have cost you to make a proper hip box, even with genitals! >_< Yeah, there are no hips; there is nothing but empty space between the lower abdominal area and the top of the thighs. ... so I'm probably going to create an entirely new UV map and completely custom textures for the male model. Blech. -
So I decided to create a better Ohmes-Raht race...
eqlipse replied to eqlipse's topic in Skyrim Mods
After further inspection, it seems that it's not forcing the Breton morph on the face, but just the normal map. The shape of the head is exactly as it should be, but it's rendering features that are not on the normal maps it's pointed toward, or on the mesh/tri being used. I got the face tri's working properly; turns out it's MUCH easier to fiddle with the racial tri's than to create a new mesh once you know how to, since the import/export for nif files is still buggy and outdated (in particular, it tends to remove verts when exporting to blender, though not faces or edges; regardless, this screws up the vert order and then how it works with tri morphs), but tri import/export protocol works just fine. Anyways, creation kit shows the face with the Breton normal maps, seemingly ignoring my normal maps (the excessive frownlines on a vanilla Breton really annoy me). It makes no sense to me why it would start doing this, especially since it did not used to: the diffuse, specular, and subsurface are all being displayed properly on the creation kit. It also does not display any error messages, or any indication that it is not using the normal maps it was pointed toward. I've tried using other normal maps, including a blank white image, just to make certain there was nothing wrong with my normals, but it does the same thing every time. Other things I've tried: using a different head mesh, different race morph tris, selecting different options under the "general" tab for the race (setting the race morph to none, or something else), double-checking the texture pointers on the different head meshes used (making sure the nif file's textures pointed to the desired textures). Can anyone help me with this? EDIT: Never mind, the issue seems to have resolved itself after I shutdown my system for the night and started it back up again. While I'm still not certain what was causing it in the first place, the involvement of a full system shut down and restart implies that some cached data was being stubborn and refusing to clear itself from the buffers. Regardless, the face is rendering properly now. -
So I decided to create a better Ohmes-Raht race...
eqlipse replied to eqlipse's topic in Skyrim Mods
I've got a question about the head morphs. For whatever reason, it's started to default the morph to the Breton race, even though there is absolutely nothing that I can see which would point the head toward using it. I've tried a variety of different things, from clearing the pointer on the headpart data (making it so that the race's headpart data has an empty field for the race morph), clearing the pointer in the race window (within the "general data" tab, setting the race morph to blank), and even setting the race morphs to some specific race other than breton (nord, imperial, etc.). Now, it didn't used to do this; previously, it had no racial morph, and just used the basic head (which is what I preferred it to use, and set things up around). And I've had it using tri data for a while now. So, what in the world could cause it to suddenly force itself to use the Breton race morph, even when it says that it's using something else? -
So I decided to create a better Ohmes-Raht race...
eqlipse replied to eqlipse's topic in Skyrim Mods
*EDIT: Nevermind, I found out how to get the tri files to work properly... and it mostly involved ignoring the how-to guides telling me to use conformulator, inspecting the tris myself in Blender, and then messing around with them. -
So I decided to create a better Ohmes-Raht race...
eqlipse replied to eqlipse's topic in Skyrim Mods
Remember when I re-did the UV's for the ears? While having the UV's overlay is fine for the texture map, well... that's not so good for the normal map. It means that both ears receive the same lighting map, so the ear on the right is being lit as though it was on the left. If the left ear is in darkness, then the right ear will be, too, even if it's facing a lamp; if the left ear is well-lit, facing some kind of light source, the right ear will also be well-lit as though struck by the same light source, even though it's on the shaded side of the character. So, now I'm off to redo the UV's again. -_- EDIT: I forgot to post the results Here they are: -
So I decided to create a better Ohmes-Raht race...
eqlipse replied to eqlipse's topic in Skyrim Mods
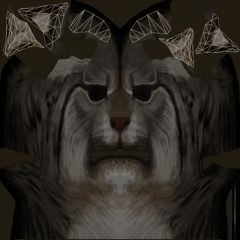
Normal mapping is done for the ears and female head. Having some issues trying to create tris for the cat ears (a "catears.tri" for it), though I'm not sure if that's really necessary... I know nothing about tris, or how to use them! Also, there's a small issue with this odd brown-black semi-circle around where the back of where the ears would have been. I'm not sure what's causing it, though it's certainly not the textures. I had previously thought that the normal map might be the culprit, but I've since ruled that out (it's almost on top of the UV seam). Any suggestions? -
 Jewelry? What witchery is this?!
 -
 I LOVE that hair! Where'd you get it?
 -
 What animation poses are you using?
 -
 Nice I'm working on making a significant improvement on the original (fixing the textures, creating custom body meshes/tri's etc), and possibly contacting the people from which it came to turn it into a custom race... It's been a lot of fun so far! Currently, I'm tracking it through a forum thread. You can follow along, if you'd like: http://tesalliance.org/forums/index.php?/topic/6586-so-i-decided-to-create-a-better-ohmes-raht-race/
 -
So I decided to create a better Ohmes-Raht race...
eqlipse replied to eqlipse's topic in Skyrim Mods
Worked on normal mapping today. Short story, and a lesson... If there's one thing that pisses me off about artists, it's that many of them don't seem to understand the coordinate plane. For centuries, the xyz coordinate plane used by engineers, mathematicians, and scientists has had x=horizontal(-x=left, +x=right), y=depth (+y=toward you, -y=away from you), and z=height (+z=up, -z=down). However, artists, and art modeling programs, all seem to have their own versions of the y and z axis, which can make porting models between one program and another a pain. Especially when it comes to normal mapping. Explanation: using STANDARD universal XYZ coordinates, having the head "facing toward you" would mean the face is pointing in the +y direction, and the top of the head is pointing toward the +z direction, while the left and right ears are pointing in the -x and +x directions, respectively. In both Modo and Blender, that's how I have it oriented. But apparently, Zbrush reads those same coordinates differently, a fact you will not likely realize until you either draw the tool on the canvas, or try to tell zbrush to render a normal map: the face is pointing in what would be the +z direction on the other two programs, and the top of the head is pointing in the +y direction. Since normals are linked to the direction in which the faces are pointing (with the red-green-blue corresponding to x-y-z), how different programs interpret the "XYZ" coordinates suddenly becomes extremely important, and a matter of much head-pounding. \\\\\\\\\\\\\\\\\\\\\\\\\\ Moral of the story: ////////////////////////// Specific to Skyrim, and how it reads normal maps... you want the colors to be coming FROM the following directions: Red = -x (left) Blue = +y (front) Green = +z (top) To properly generate normal maps using Zbrush, make sure that the object is pre-oriented in Blender (or Modo) with the "top" pointing in the +y direction, and the "front" pointing in the +z direction. To properly generate normal maps using XNormal, without changing the orientation of the object before porting it to zbrush and creating the hi-res mesh, then set the coordinates for the normal map to "X+ Z+ Y+" (reverse the y and z). Edit: I use the second option, because I don't like having to re-orient my meshes every time I want to port them over to Zbrush for detailing. -
So I decided to create a better Ohmes-Raht race...
eqlipse replied to eqlipse's topic in Skyrim Mods
Small side note on my learning curve: never try to use .obj files with nifskope. You'd think that the most universal and common model data format would be supported properly, but NOOOOOOOO! I was trying to do some normal mapping and painting in Zbrush, and getting frustrated, because the mesh was split everywhere where the UVs were. Apparently, nifskope reads the UVs as mesh seams when exporting the tridata as a .obj file. Took me most of the day, trying to figure out what I was doing wrong, only to find that the problem was actually with nifskope this time, and not my usage of it (unless there's something no one is saying...). So, new pipeline: nifskope: pre-edit the .nif for blender, because nifscripts is dated and can't handle skyrim data Import to blender Clean-up the mesh: re-export as .obj file (blender can do this correctly, without splitting the mesh along the UV seams, by simply grouping things by object or material). Import the .obj to Zbrush. NOW I can subdivide without the mesh tearing itself apart! They really need to update these niftools -_- Anyways, now that I've got a properly working .obj file which can be exported to every other modeling program in existence, I can now finish up texturing the head and making new normal maps ^_^ -
So I decided to create a better Ohmes-Raht race...
eqlipse replied to eqlipse's topic in Skyrim Mods
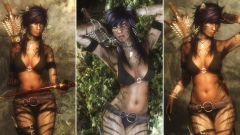
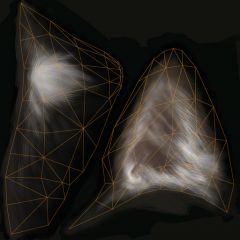
For everyone else curious, this whole thing started when I saw a particular screenshot.... Of course, the first thing to run through my mind was ".... want." And, not surprisingly, no information was posted beside the picture, leaving no means of finding the origin. Took quite a bit of searching to find out that it originated from Eiries: http://skyrim.nexusmods.com/users/35431/?tb=images&pUp=1 A little bit more searching, and I find that this wasn't actually a custom race. It was just a texture pack, which you use to replace the textures of whatever custom race you want (Eiries seems to prefer using the Ashen race). You can download it yourself here: http://mod.dysintropi.me/eiries-and-honeyvanity/ At first glance, the textures seemed nice. I mean, how couldn't they look nice with screenshots like that? But there are some glaring issues. For one, you tend to get a neck seem on most races and settings, unless you set it up just right, or do a wee bit of editing of the dds files for each race you use it on. But much worse, the textures for the head and ears were not setup correctly! The ears and tail are wearable armor, and draw their textures from the head and body texture files, respectively, of the khajiit. The UV's for the ears are highlighted, to make it clearer. This presents a clear problem: if you want ears with better (non-soupy) textures, then you'd have to blow up the original image to almost 5x or 10x its original size, just so you can cram enough resolution into the tiny area the ears occupy. And then the head texture, in particular, has a lot of... "interesting features," which require clever arranging of hair to conceal: Yes, those are ear textures for the ear meshes. No, the ear meshes are still drawing from the khajiit vanilla files for their sources. Even if they did draw from this, it wouldn't align properly. And since one is still using a human head mesh, you still have human ears with weird texturing on them, so this also requires clever selection of hairs to cover them up. And don't even get me started on the males. Ewwww. They're just... they look like someone pooped in a cup, mixed it with some dead grass, plastered it on themselves, and then rubbed a cat over their skin to pick up some actual fur, just for good measure. \\\\\\\\\\\\\\\\\\\\\\\\\ BLARG!!!! ///////////////////////// I've endeavored to improve upon, or even replace, the original texture work, and go even further than that: I'm working to make a fully playable, complete custom race. Male and female, with as much properly done uniqueness as possible (head, face, hair, proportions, etc). I want a nice custom, lore-friendly, khajiit race filled with sexiness, damnit! And with males that don't look like crap. I count myself a fairly decent artist, even if I haven't done any art in a while (eqlipse.deviantart.com), and I have a lot of experience with modo, .obj files, and some experience with maya and blender. So the first thing I did was to re-do the UVs for the ears, because the texture file they were using was a gigantic waste of space, and... well, since they sit atop your character's head, and you get to stare at them all the time, the discrepancies started to drive me insane: And, related to this post, I did what should have been a very simple edit of the head mesh, without any fuss or issue... relaxing the faces/verts of the area where the ears are, smoothing it out nicely. No deleting or adding of mesh properties; just nudge things around a bit. Alas, all the tools for importing/exporting nifs (and especially .obj files) are terribly dated, and there are a lot of unmentioned caveats that go along with the specific process I was trying to do. So it took an entire day of trudging through the internet (yay for unemployment!), and finally a forum post here to resolve the issue. But still, success! Actually, I had the texturing done yesterday; it was the issue with editing the mesh that halted everything. Texturing still isn't finished: I focused on just fixing the main trouble spots, and clearing the most obvious seem issues. Just because... ok, alright! So my OCD was twitching every time I looked at it! There, I said it! \\\\\\\\\\\\\\\\\\\\\\\\\\\\\\ What's all this mean? ////////////////////////////// Originally, I was just doing this for myself. But after all I've done, I've decided that, if I finish this and get it working right, then I may consider contacting certain people (like Eiries... depending on whether I actually use his (or whose ever it is) skin, or just use it as a base reference), and getting a mod posted for everyone to enjoy. Next on the todo: re-acquaint myself with Zbrush. I haven't used that thing in almost a decade, so I'm sure there's a lot which has change. Once that's done, I will create proper normal, specular, and detail maps for the head, body, and ears of both the male and female textures. Change the meshes for the male and female tails. Look deeper into this whole ".tri" and facegen/chargen thing. I might want to apply it to the ears, instead of having them be static objects which sit ontop of the head... Look into building animations. I never was satisfied with the vanilla tail animations. Do more texturing. I'll probably come back to this thread and post a screenshot or two.... and to ask "What the hell did I **** up this time?" questions. -
From the album: Modded Skyrim
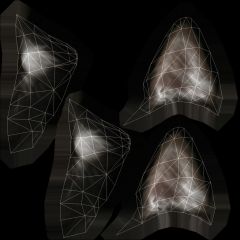
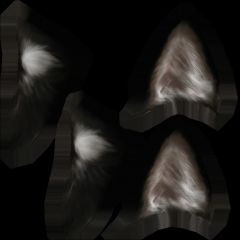
I also redid the ears, giving them a unique UV map, and their own texture file. I haven't gotten around to making the normal, specular, or detail maps yet; need to re-learn Zbrush, because it's been forever since I last used it. The UVs for the ears are the highlighted overlay. -
From the album: Modded Skyrim
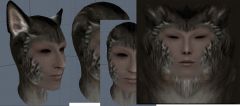
I fixed both the head mesh (removed the ears via a simple mesh relaxation/smoothing), and the texture for it. FYI, this was far more a pain in the ass to do than it should have been, simply because of the dated nature of all the tools used to deal with .nif files. And the terribly kludgy way in which Bethesda has the Skyrim engine working.- 1 comment
-
- 1
-

-
- texturing
- troubleshooting
- (and 1 more)
-
From the album: Modded Skyrim
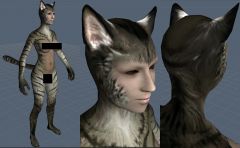
The "ears" (included in the original pack as a wearable nekomimmi headband) make use of the original Khajiit skin textures... which is horribly inefficient, loading a texture file for which the mesh only uses a tiny portion. This means that, if you want to cram any more detail/resolution into the ears (for example, a 1-2k diffuse), then you would have to blow-up the texture to almost 10x its original size, just to get that resolution into that tiny little corner >_< The UVs for the ears are the highlighted overlay. -
From the album: Modded Skyrim
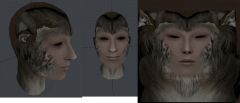
The original head mesh, and the way the original texture maps around it. Note that it has texturing for ears... which isn't used, and in fact wraps around the head in areas the ears wouldn't cover. -
So I decided to create a better Ohmes-Raht race...
eqlipse replied to eqlipse's topic in Skyrim Mods
Hmmm... this implies to me that you may be able to ignore texture sets entirely, if the texture references are built into the .nif file properly. If it's "hardcoded" into the game, then it should default to the .nif file's references, should none other exist. Is this an accurate assumption?