

DOWNLOAD MODS
Are you looking for something shiny for your load order? We have many exclusive mods and resources you won't find anywhere else. Start your search now...

LEARN MODDING
Ready to try your hand at making your own mod creations? Visit the Enclave, the original ES/FO modding school, and learn the tricks of the trade from veteran modders...

JOIN THE ALLIANCE
Membership is free and registering unlocks image galleries, project hosting, live chat, unlimited downloads, & more...


Ashenfire
-
Posts
565 -
Joined
-
Last visited
-
Days Won
12
Content Type
Profiles
Forums
Downloads
Tutorials
Gallery
Store
Events
Files posted by Ashenfire
-
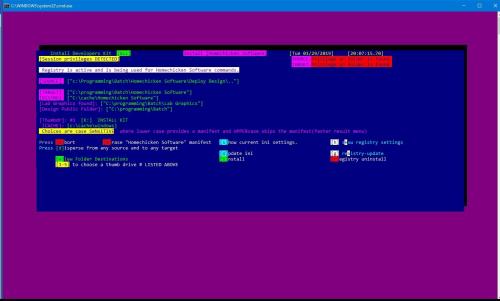
InstallHCS-SDK.exe and InstallDeployDesign.exe
By Ashenfire in Student Projects
UPDATE:
Ver 1
Items are no longer inferred to be installed first.
Now, there is an install utility that detects if no aniscon is installed and will install it immediately. If another version of ansicon is installed, the program ignores ansicon install and proceeds to installation of the kit. Only ansicon is installed in the kit, however, if the designer has ANSI emulation already installed, the kit will still work.
The install is for developers and normal users.
Design Purpose
The Homechicken Software Developers kit (HCS-SDK) is designed for developers and also for common users who want to enjoy the programs created via the HCS-SDK.
The HCS-SDK must be installed first to allow all other programs to function as expected. It hosts 'libraries' and functions than any program can borrow to get their work done.
A normal USER just installs the KIT and then installs any software designed by another developer/designer. The newly installed programs must adhere to HCS-SDK parameters.
The normal user is now finished at this point and can IGNORE the DESIGNER secition and everything below this line.
1. It is a small set of programs that support ALL designer projects or operate on their own as handy utilities for common tasks. It is a requirement for any other template to work.
For example:
ANSICON.COM, SPCCOUNT.BAT ,BOX.BAT, SeekerBrowser.bat, StatesDir.bat, SaluteBrowser.bat, Clear Icon Cache.bat,
BOX1.BAT, CURSOR.BAT, COLORR.BAT, ConfigMessenger.bat, ConfigOneDrive.bat, ConfigUpdates.bat, ConfigUpdatesentry.bat, manifest.bat.
These programs make ALL other KIT programs operational but it is not desirable to copy them to multiple locations for each
project. They are installed once and the common path is recognized in the environment.
2. It is an environment for the common user or designer, to share resources for multiple programs made by the HCS-SDK (aka. the KIT).
3. It is a developer / designer starting lab for newbies and pro designers. It contains templates of common menus that are designed to be easily changed to create a whole new program within 2 minutes.
See example later on; as Exhibit A Retooling Example.
INSTALLING
Download installHCS-SDK.exe Download installDeploy Design.exe Copy both programs to a cache folder. Execute / double click on installHCS-SDK.exe and uncompress its contents. Execute / double click on the Homechicken Software program (it installs and runs normal operations). Agree to the source and target locations. If not, use the [d]isperse option to change only the target location. Press 'I' to install. Press 'U' to update. Press 'A' to abort. Press 'v' to open a new explorer window with the installed folder and its readme. At this stage (icons are installed in Windows 10 Startup Menu) and the folder is open ready to run the new program. Execute / double click on installDeploy Design.exe and uncompress its contents. Execute / double click on InstallDeploy Design utility. Agree to the source and target locations. If not, use the [d]isperse option to change only the target location. Press 'I' to install. Press 'U' to update. Source and target will now be the same to signal end of install. Add to registry if you like the extra 'security' for your new projects that rely on this program for normal operations. Press 'v' to open a new explorer window with the installed folder and its readme. At this stage (icons are installed in Windows 10 Startup Menu) and the folder is open ready to run the new program. Press [a] to abort the install. At any time, the user can run install again and change the icon location; without re installing or copying files from the cache folder.
All other functions are for people who want extra power or knowledge in their install and want to do more
than just install and leave.
Designer Section
Exhibit A, Retooling Example:
A designer wants to create a program called "Singing Lights"
EXTERNAL Prep (list is sort of long, but EASY)
The designer already installed HCS-SDK. The designer then, installed Deploy Design and updated its configuration. The designer knows where the LAB folder is. Quick way is to open START. Click on PROGRAMMING in the all apps menu. Click on HOMECHICKEN SOFTWARE. Pressing v to open explorer windows the designer will see the LAB as one of the folders inside the Homechicken Software folder. This is the Dashboard and the soul of the kit. If you don't have a programmers keyboard or mouse that opens the Homechicken Software folder on shortcut/ hotkey, then now is the time to create a shortcut to this folder. The kit is already installed for this scenario, so the designer runs the Deploy Design program. The designer presses [t] for new task. The designer presses the appropriate number corresponding to 'create new design'. The designer enters a new name for the design. In this example the designer types the words "Singing Lights" and presses the enter key. The designer presses enter. If the program is new, the menu will display that new creation it doesn't exist yet. It is not an error. The designer observes the results window that displays the target now has new items (success). In this case "Singing Lights" folder shows as a new project in the lab. The designer opens the LAB folder as mentioned in step 4 through 6. The designer opens the new project Singing Lights. Two new phases were created. The designer opens phase 1. There are six templates to choose from, so it is like tile or paint shopping for a kitchen, the designer chooses one that seems best for the current idea. The designer will run each template that does not have 'install' in the title and play around with the template. The idea is to run all 6 and choose the best 'feel'. Once a template is chosen, the steps to personalize are easy to perform. For example the designer chose template 2. Template 2 has 3 parts, the INI, the MAIN, the INSTALL and are labled as Template-rename to programid.ini
Template 2-Production-Rename to Install+Program ID.bat
Template 2 -Production-Rename to Program ID.bat
20. The programmer/designer would then rename the 3 templates to have these results:
Singing Lights.ini
Install Singing Lights.bat
Singing Lights.bat
21. The programmer has the option to create notes in the ProjectTemplate.odt by renaming it Singing Lights Version 1.odt
This concludes EXTERNAL prep, which just means all modifications made without opening any files.
INTERNAL Prep Retooling your new program (making it recognize installation and config files)
Scenario: Templates were renamed to be modeled for the new design called Singing Lights
Edit Install Singing Lights.bat
FIND (search) the FIRST occurence of the program name your program was modeled for. It will be whatever is in the variable 'INIFILE' or 'PROGRAMID'
Example: set inifile="Disperse Batch.ini"
Replace that line to: set inifile="Singing Lights.ini" (using the quotes).
FIND (search) the SECOND occurence of the program name your program was modeled for.
Example: if not defined programid set programid=Disperse Batch
Replace that line to: if not defined programid set programid=Singing Lights
FIND (search) the THIRD occurence of the program name your program was modeled for.
Example: if not defined passchoice set passchoice=Disperse Batch
Replace that line to: if not defined passchoice set passchoice=Singing Lights
Retooling the header and the footer.
Do not just change the header/footer directly. Doing so will ruin the manifest log readout; since variables %date%, %time% will EXPAND their values in the header/footer.
FIND (search) the Fourth occurence of the program name your program was modeled for.
Example:
if %synmenu% equ 1 echo +--------------- START [%date%] [%time%] Disperse Batch Version 3 ------------+
You must keep a copy of the ORIGINAL header/footer in a REM statement so you can measure or keep track of exact character length.
Example: REM if %synmenu% equ 1 echo +--------------- START [%date%] [%time%] Disperse Batch Version 3 ------------+
Replace that line to: if %synmenu% equ 1 echo +--------------- START [%date%] [%time%] Singing Lights Version 1 ------------+
*NOTICE* This scenario ligned up perfectly, if your titles are shorter or longer, you have to delete spaces or the border to make it match length of the REM statement.
Do the exact same procedure for the footer at the end of the program.
Retooling the default locations (:skpappend)
If the registry, the INI config file, or the 'best guess' steps ALL FAIL, then a hardwired location will be assumed.
You don't have to change them, however if something out of the ordinary happens during operation, the user most likely will have to edit his/her INI file to fix the issue.
Also, certain attempts to use the wrong hardwire directory will cause errors and cause erroneous output for the user.
FIND (search) the Fifth occurence of the program name your program was modeled for.
Example:
if not defined targetA if not defined deftargetA set targetA="C:\Programming\batch\Homechicken Software\Disperse Batch"& set deftargetA="C:\Programming\batch\Homechicken Software\Disperse Batch"& set deftarg="C:\Programming\batch\Homechicken Software\Disperse Batch"
Replace the folder destinations to match where YOU WANT.
Retooling the extension that is used to separate manifest logs from other program logs.
FIND (search) for the extension variable.
Example: if not defined ext set ext=PRG
Replace : if not defined ext set ext=SNG
The MANIFEST.BAT program has a list of extensions it will recognize, you will have to ADD your exension (SNG) if you aren't using its built it extensions.
Available extensions pgu ear psc bkm skc tsk msk nsk nex tvl clz boi drm est mse pcb slb bst stn dpl
prg bsu thb ddr upd dpg pad prl
Retooling the cache folder.
FIND (search) for the cache variable.
Example: if not defined tcachepat set tcachepat=%temp%
Leave alone, or if you wish, you can hardwire it (not recommended).
You can also change the path %temp% by using the operating systems control panel, ENVIRONMENT settings.
FIND (search) for the USER cache variable. This is the main cache file and it allows the designer to switch out cache locations depending on an operation.
It utilizes the BASE cache file (tcachepat) and appends whatever the designer requires.
Example: if not defined cachetouse set "cachetouse=%tcachepat%\usrcache.%ext%"
Replace: (whatever your needs are). Verify quotations are utilized (to trap spaces in folder names, etc).
This whole procedure takes around 5 minutes or less.
Repeat the above steps for the INSTALL program.
Deploy Design INI file and the Normal INI
Deploy Design.ini is for a designer to package a project for burning to a cd or also known as DEPLOYMENT.
It contains ONLY items that a user can see. This helps the design lab separate items used for PROCESSING and items for the ACTUAL program execution.
If Deploy Design.ini does not exist in the phase folder, the program Deploy Design will not know what programs/files are for the LAB and which are for the real install folder. and packaging will fail.
Phase inclusion option from the Deploy Design program handles this issue so that phase 1 items can be transferred to phase 2 items; assuming the designer/programmer followed retooling operations.
It should ALWAYS have a list of the items that were retooled. In this scenario, it was Singing lights.bat, Singing Lights.ini, Install Singing Lights.bat, Deploy Design.ini
Here is an install Singing Lights.ini before installation.
programid=Singing Lights
source=
targetA="c:\Art"
DeployDesignUtility=
altcache=
configdir="C:\Art"
browsesrch="*.*"
passchoice=Install Singing Light
ext=SNG
cachetouse=
defsource=
deftargetA=
deftarg=
stamptag=ALL
PhaseInclusion="c:\programming\batch\Phase Inclusion"
Distribution="I:\Windows 10\Business, Banks & Financing\package"
{"Install Singing Lights.bat"}
{"Singing Lights.bat"}
{"Singing Lights.ini"}
{"Deploy Design.ini"}
{"Readme.txt"}
{*.lnk}
{["Project Logos"}
{~"Snap Shots"}
Bracketed items (control commands) will be REMOVED once the install completes.
Example of Deploy Design.ini (assuming designer/programmer retooled for deploy design.ini from a template)
{"Install Singing Lights.bat"}
{"Singing Lights.bat"}
{"Singing Lights.ini"}
{"Deploy Design.ini"}
{"Readme.txt"}
----- - -- Usage -- -- -
TargetA, configdir, deftargetA, deftarg, Distribution are configured inside the program to append %programid% to them.
Example: You specify the target to be c:\art
It will append the id (at this time it is Singing Lights)
Thus: Target will be "C:\art\Singing Lights"
Paths must contain quotes, except cachetouse and altcache.
cachetouse must have a suffix file name.
altcache is an over ride and must not have a suffix filename.
browsesrch must not be in quotes.
Do not put 'expandable variables' in this project list.
Please encase your project list (what to be copied) in brackets {} and verify filenames are in quotes if they have spaces.
Example: {"figure skating.doc"}
The order of the project list does not matter.
If NORMAL copying a folder in the project list, please use ~ to notate a folder. Example: {~docs} or {~"figure skating"}
If NORMAL treeing a folder in the project list, please use [ to notate a folder. Example: {[docs} or {["figure skating"}
If SPECIAL copying a folder in the project list, but NOT to target, use ] to notate destination is DeployDesignUtility, which
is in the path statement and used for a COMMON programs/files location. It will copy CONTENTS of the folder but NOT
the actual folder. Example: {]docs} or {]"Figure skating"}
If SPECIAL copying a folder in the project list, but NOT to target, use + to notate destination is DeployDesignUtility, which
is in the path statement and used for a COMMON programs/files location. It will copy CONTENTS of the folder, and the actual folder.
Example: {+docs} or {+"Figure skating"}
Previously: Required items to make programs work were inferred to be manually downloaded:
Free ANSICON 1.66 utility from GITHUB, or any shell command that utilizes ansi.sys, ANSI emulation. Free COLORR.bat utility included with this download. Free PRIVILEGE.BAT utility included with this download. Free SPCCOUNT.BAT utility included with this download NOW they are automatically installed via HCS-SDK and Deploy Design (which is part b of the kit).
ENJOY!
14 downloads
- batch templates
- package
- (and 1 more)
(0 reviews)0 comments
Updated
-
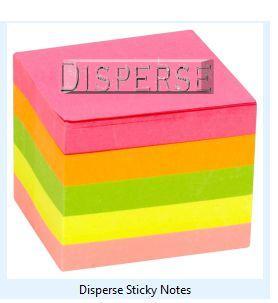
installDisperse Sticky Notes
By Ashenfire in Student Projects
Title: Disperse Sticky Notes
Version: 3
Created: 2017
Lab: HomeChicken Software
Required: HCS-SDK and ANSICON, or some other ANSI emulator.
Author: Ashenfire
Type: Hybrid (DOS and Windows 7-10)
O.S Tested: Windows 10.
=================================================INSTALL===========================================================
A. The Homechicken Software Developers kit is a small set of programs that support ALL projects and MUST be installed before utilzing ANY other program designed with the kit.
It is found here:
B . Shell to D.O.S. with admin rights.
C. Verify a new path is installed for the kit.
Example: c:\programming\batch
D. Type: Colorr def 37 44
This will create eyecandy and will be fixed on a later update. No one is supposed to do this manually.
4. Follow the Setup for pleasant experience. This is mainly resizing windows shell window.
The extras inside the menu for install is for developers but can be utilized by any user as long as the user knows the fast way:
1. Agree to the source and target locations.
2. Press 'I' to install.
3. Press 'U' to update.
4. Press 'A' to abort.
All other functions are for people who want extra power or knowledge in their install and want to do more
than just install and leave.
Pressing zero [0] brings up a small help menu with some extra information.
=================================================Description========================================================
The registry update is optional. It is to save the installed location to be utilized later. It is not necessary unless a new project does
not detect path statements and relies on the registry to correct this.
The registry can be useful also, if the user removed the DeployDesignUtility path statement which is appended to the SYSTEM path.
In this case, any project using the SDK will HEAVILY rely on a registry statement; instead of the INI declared path statement.
This program is identified by the PROGRAMID variable and must match the name of the INI file and the name of the
main project batch file.
Main Menu
Task Menu. It can handle three sticky programs: Andre, Win 7 and Win 10.
Search result for Windows 10 sticky location.
Backup configuration or make a duplicate so it can be turned into a swap configuration for flex mode.
Dashboard Main Location
Three sticky notes can be backed up to a sticky server or alternate location.
=================================================Main Menu Options========================================================
DISPERSE option in the INSTALL and the main program menu:
[d]isperse There is a 'disperse' option which asks the user to specifiy a new folder location.
Do NOT use quotes when specifying a folder with spaces in it. It will be taken into account by the program.
If a user presses the option to change locations of the source or target, the install program will ask
the user to specify a location.
This allows the user to open any folder in their 'file explorer' and copy that location, spaces and all,
then paste it, spaces and all, into the disperse window.
If a user has a thumb drive inserted into the computer and the computer recognizes / allows thumb drives, the user
can choose a number assigned to the thumb drive and the dispersal program will update the users thumbdrive as the
TARGET without the user activating the dispersal menu.
=================================================Configuration file(s) (INI and SWP) ========================================================
- ----- - -- Usage -- -- -
TargetA, configdir, deftargetA, deftarg, Distribution are configured inside the program to append %programid% to them.
Example: You specify the target to be c:\publishing
It will append the id (at this time it is Disperse Sticky Notes.)
Thus: Target will be "C:\Messaging\Notes\Disperse Sticky Notes".
Paths must contain quotes, except cachetouse and altcache.
Cachetouse must have a suffix file name.
Altcache is an over ride and must not have a suffix filename.
Browsesrch must not be in quotes.
Do not put 'expandable variables' in this project list.
Please encase your project list (what to be copied) in brackets {} and verify filenames are in quotes if they have spaces.
Example: {`command character`"figure skating.doc"}
The order of the project list does not matter.
If NORMAL copying a folder in the project list, please use ~ to notate a folder. Example: {~"figure skating"}
If NORMAL treeing a folder in the project list, please use [ to notate a folder. Example: {["figure skating"}
If SPECIAL copying a folder in the project list, but NOT to target, use ] to notate destination is the location of your lab or common folder, which
is defined in the install and is labled as %DeployDesignUtility%. It will copy CONTENTS of the marked ]folder but NOT
the actual folder name. Example: {]"Figure skating"}
If SPECIAL copying a folder in the project list, but NOT to target, use + to notate destination is the location of your lab or common folder, which
is defined in the install and is labled as %DeployDesignUtility%. It will copy CONTENTS of the marked +folder, and the actual folder name.
Example: {+"Figure skating"}
If SPECIAL copying a folder in the project list, but NOT to target, use $ to notate destination is the location of your main dashboard, which
is defined in the install and is labled as %Location-MainDashboard%. It will copy CONTENTS of the marked +folder, and the actual folder name.
Example: {$"Figure skating"}
Example of a project list is typically an INI file that has the same name as the project.
If the name of this project is Disperse Sticky Notes, then the project list will copy the contents of the Disperse Sticky Notes.ini into a new list.
The contents of the Disperse Sticky Notes.ini file, would look similar to this:
{~"Logos"}
{-"Inclusion Folder"}
{@"Disperse Sticky Notes.bat"}
{@"Disperse Sticky Notes.ini"}
{@"Install Disperse Sticky Notes.bat"}
{@"Readme.txt"}
Command characters:
Ampersand character is to notate the item next to it is a FILE; and to copy it to the TARGET.
- character is to notate the item next to it is a FOLDER and to IGNORE copying it.
~ character is to notate the item next to it is a FOLDER and copy it to the TARGET.
+ character is to notate the item next to it is a FOLDER and SPECIAL copy the folder name to the LAB or common folder, then copy contents INSIDE the folder name marked by + character.
$ character is to notate the item next to it is a FOLDER and SPECIAL copy the folder name to the main dashboard, then copy contents INSIDE the folder name marked by $ character.
] character is to notate the item next to it is a FOLDER and SPECIAL copy the folder contents to the LAB or common folder and not create the folder name in the LAB.
[ character is to notate the item next to it is a FOLDER and TREE copy it to the LAB or common folder.
Enjoy!
8 downloads
(0 reviews)0 comments
Updated
-

Disperse Elder Scrolls version
Menu system to allow a user to
Copy her ENTIRE dasbhoard to a backup location. Copy her project lab to a backup location (fast, since it only updates changed items and ONLY copies the lab). Copy her Phases of a project to a backup location. Create a time and date stamp of the current option, multiple times and as often as wanted. Copy a folder structure only, skipping files (data) in the folder structure (tree function). List the current source and target folders (open the folder locations for each), to allow the user to rename folders, delete folders, add content. Switch configurations to extend the life of the program. The menu allows 'flex' mode to load new swap configurations to manage more content that wasn't part of the original design. Search for creation kit, creation set, addon folder for Nexus mods. Create a marker and drop it into a directory if there are more than one instances of the creation kit, creation set, or dashboard. In general, the user uses this program to manage her projects.
User can create the folders that are already in the batch program or they can create their own and edit the program to reflect the changes.
Example: Search for TESV program. Example of Copy Choice Menu. User can active thumdrive detection or choose to have only mirror copies. Main menu and its detection/status. Task menu with many abilities. White lettering is for user to change to the directory in white and only work inside that folder. Choose Bstation, Alt, Flex mode. Flex option will appear in menu when it is necessary. Create a lab and in this example, create a phase.
9 downloads
(0 reviews)0 comments
Updated
-
BOX .bat and its support files.
*Part of the HCS-SDK and also an independent program
Required utilities to make this work
Free ANSICON utility from GITHUB, or any shell command that utilizes ansi.sys, ANSI emulation. Free COLORR.bat utility included with this download. Free PRIVILEGE.BAT utility included with this download. Free SPCCOUNT.BAT utility included with this download This is for programmers who want to make menus and results show up in a box display but don't want to make the box themselves.
The BOX command was meant to be 'called' from another program that would have a calculated result and wants to print it into a box display.
The box can be told what color the foreground and the background should be. Also the lightness or darkness can be specified along with width and height.
It is also the the main menu/GUI for Project Ashenfire's cosmetic functionality and MUST be copied to a folder that is in the PATH statement.
Example Box /w100 /h25 /pyellow /dark /bgreen
Inside the calling program:
call colorr def
call box /w100 /h25 /pyellow /dark /bgreen
2 downloads
(0 reviews)0 comments
Updated
-

WarehouseContainersAsh For Skyrim
This file is for a beginners mod with potion rack displays already created.
The modder just chooses where to drag and drop from the warehouse.
A "How To" document was created. Email showcasesupport@projectashenfire.org or join and chat with me.
This mod is for MODDERS who would like to add potion displays around their homes/dungeons.
You can not import this, you will have to:
Copy file to a back up place. Rename the original to the mod that you are creating. You can then freely drag and drop up to 27 displays of various counts of potions. Please credit this resource.
Ashenfire
20 downloads
(0 reviews)0 comments
Updated
-
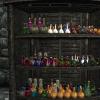
WarehouseContainersAsh-PotionRacks
Version 2. *All racks work independently now* Create them all at once.
Who should use it:
Modders
This is for modders that want to make potion racks available for their decorations. These racks are totally functional, drag & droppable, with NO SETUP!
Setup:
1. Extract the file to the skyrim DATA directory where all the .esp files are located.
2. Extract the file to a permanent backup location where you can copy from at any time. This backup location will NOT BE EDITED. This is the ORIGINAL.
3. Once the file is copied to your skyrim DATA directory, RENAME it to the name of the mod that you are creating.
4. You can now edit your mod in step 3 and drag and drop potions anywhere in Tamriel.
5. Thats it, you are done.
Example:
You want to create a mod called Avenging Angel House Mod
Rename WarehouseContainersAsh.esp to avengingangelshouse.esp then edit it in the creation kit.
EXTRA:
If you want to create potion racks for your mod that you already created, a tutorial was placed in the zip file.
NOTE:
COC warehousecontainersash
It is not ncecessary to coc to this location in the game, but it is there if you want. You can NOT import this file into a mod that you have already created. Forms, scripts &
other components are not importable, that I know of.
So the only way to make this work is to rename .esp file to whatever you want to, then start creating your house. The warehouse for potion racks can be dragged and dropped, with the
properties already chosen. NO SETUP!
124 downloads
- decoration
- drag&drop
- (and 3 more)
(0 reviews)0 comments
Updated